
We've been experimenting with a new thing at our home this summer - a dead lawn! Just look at the wonderful progress we've made on killing off the grass. But why... Is this the lazyman's approach to "lawn care"? The latest form of a "no-mow" lawn? No, we are in fact prepping the front yard for a sustainable revival of sorts.
While we are a bit lazy on yard maintenance, and I certainly do not like to mow (especially in August when hay fever allergies set in), the real reason for this unique approach is that we are killing the existing turfgrass lawn and rotting it out with compost on top of it, in preparation for a more natural (and drought tolerant) landscape.
We're going to replace this area with plants that have deep root systems that are native or adapted for the natural amount of rainfall Chicago receives. Once established, the landscape should require no extra water, and only occasional seasonal maintenance (as opposed to weekly mowing). Our biggest challenge will be finding plants that perform well given the abundance of shade.
Traditional lawn turfgrass has very shallow root systems (ever see sod?). When wet, the roots lock up preventing extra rainwater from infiltrating into the ground. This creates "ponding" or soggy lawns, and causes excessive stormwater runoff. On the other hand, native plants have deep roots that go down 6 feet or more to tap into the Earth's moisture. These plants grew all over the prairies of Illinois, and as the plants died or were burned off in natural fires, their root systems became deep-rooting fingers of compost. Over decades and eons, these composting roots evolved into some of the best soil and farmland in the United States.
In addition to returning some of this land to its natural sustainable use and using less water, our goal is to give a nice prairie-type of landscape setting for Humphrey House, which should fit well with the arts and crafts feel of the home. Now all we need is a good plan.
Thursday, June 24, 2010
Are Grass Lawns Overrated?
Wednesday, June 16, 2010
Managing our Rainwater
For those that recall, our home has a number of rain barrels around it. Well, the ones we installed last year were great - until we had a massive intense rain event on our small urban lot. There were a series of issues that combined to cause some water to enter our basement:
- Lots of rain - a few inches in a half hour
- Lots of water hitting two rain barrels
- Rain barrel overflow hose way too small to accommodate flow
- Barrels located near our exterior basement stairs
- Neighbor's downspouts also directed towards this area
- Concrete step that was disintegrated, allowing water to head downhill
- Floor drain full of leaves and debris, preventing drainage
= Water coming in the house under basement exterior door!
- Gutter diverter
- Rain barrel interconnection
- Underground discharge
- Wider overflow hose
2. Rain barrel interconnection. Every set of directions I've ever seen for connecting rain barrels seems to say they should be interconnected at the top overflow hose. After our basement flooded, I thought about this and it makes no sense. If you connect two or more barrels at the bottom, they will fill up at equal rates rather than having one fill up completely and hoping the overflow works faster than any new rainwater coming in. Here's a photo showing the diversion system, as well as the two barrels (on either side of our side gate) connected in tandem. The connection hose is hidden from view behind them.

 3. Underground discharge. I know I'm a nerd when I think this was a fun way to spend some time. When excavating for our bluestone pavers last year, I had the foresight to take advantage of the opportunity to dig a bit deeper, and create an overflow area for storm water that would carry it away from our our home's foundation wall. I purchased a 10' section of 4" PVC, added an elbow and a cleanout with a cap on one end (which can be capped in winter), and a Tee with access port on the other end.
After this, I connected 10 feet of drain tile (perforated tube) wrapped in landscape fabric to prevent silt infiltration, and ran it out where the old concrete sidewalk had been. All told, this runs about 25 feet away from the foundation wall.
Honestly I recognize this is excessive to accommodate overflow and way more than what most people need. Don't be scared into thinking you have to do this if you want rain barrels. We did this more because we had the opportunity. That said, you do need to have some kind of plan to take the overflow from the barrels. I highly recommend the following video showing more traditional rain barrel overflow.
 4. Wider overflow hose. This particular downspout handles exactly one-half of the roof area of our home, over 1,000 square feet of surface area. In a 1" rainfall, that means we're getting 620 gallons of water! Because of the large roof area, our (2) 65-gallon rain barrels fill up after roughly 1/4 of an inch of rainfall. In heavier rains, the small garden hose overflow can not handle the volume of water coming down the downspout.
The solution? Drill a new hole and install a 1.5-inch wide sump-pump hose. If its' good enough for leaky basements, its good enough for several gallons of rain per minute. Sump-pump hoses are sold in 20' lengths. I tried searching for something shorter but then I realized that I could snake the entire 20 feet all the way through the 4" drain tile system mentioned above. This puts the overflow way out in the yard in case there wasn't enough pitch to carry the water away. For you eagle-eyed home improvement experts, the hose is connected to an old stainless steel drain fitting from one of the sinks we took out of the home.
So, with these four measures, our stormwater management system is much better engineered. As I mentioned earlier, this type of system is overkill for most homeowner's needs. But we had a confluence of events that led to a leaking basement, and we don't want to have that ever again.
The weather the last few weeks in Chicago has put this to the test as it has been raining almost every day. Our barrels are full, and the manual downspout diverter is sending excess water to the storm sewer system. And I can sleep better knowing that any water that splashes past the diverter and makes its way to the rain barrels is overflowing into the backyard, away from the basement.
Monday, June 14, 2010
Building a Planter Box
The last few months have been too busy to blog, but we're going to try and carve out specific times to update the blog to let you know all that's been happening at (mostly outside of) Humphrey House.
We'll start with something actually made before winter: A raised bed planter box in the backyard. Since our porch is a half-story off the ground (about 5'feet) and we have a small yard, we felt like we needed something to help transition the yard to the porch.
I originally had brought home used railroad ties and had planned to use those to construct the raised bed. I figured they'd be nice thick materials and provide plenty of butt space. Plus, they were quite cheap and very thick. Perfect right?
Well, as I was unloading them, I realized a lot of "stuff" was coming off. This stuff is creosote, and is what railroad ties are treated with to resist decay. After reading up and learning creosote is probably carcinogenic to people and contaminates groundwater, I realized I probably don't want to bring that onto our property, much less have people sitting on it.  So, I took the railroad ties back to the store and got regular 6x6 treated lumber (ACQ, not CCA).
Anyway, because the timbers are 8 foot lengths, I planned to make a 6' x 2' raised bed, using four courses of timber to give the planter a comfortable sitting height. To start, I dug trenches a couple inches down into the soil for foundation drainage, and filled this pea gravel and sand. This made leveling the raised bed much easier as well, since there originally was a slight slope from the left to the right sides.
I laid the first course using full 8-foot lengths, and then cutting two 1'-6" pieces for the short ends. The next course would be 7' on the long sides, and a full 2 feet on the ends to stagger the joints. However, I soon realized that I was going to need something to keep these all together once they were stacked.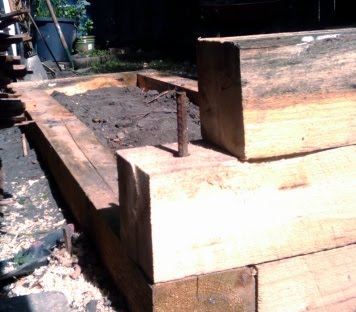 Fortunately I had a few 2'foot lengths of rebar lying around (doesn't everyone?), so I bored 3/4" holes through the corners and "persuaded" the rebar through with the help of my trusty mallet. I did the same for the second course. The third course I only bored halfway through so it was a sort of "cap" that would add support and then the rebar wouldn't be visible.
Because I imagined a 400-pound gorrila coming over and wanted to over-engineer the planter bed, I poured extra sand through a funnel down the boreholes around the rebar so it would extra be solid. I also had some galvanized steel (safe for contact with treated lumber) right-angle ties that I used on the top course to further anchor the front side of the planter to the two sides and the back side, so the entire top course is tied together. And just to be safe, I lined the sides of the bottom two courses with plastic so the AC2 chemicals stay away from the soil we put in there.
All said and done, it came together wonderfully. We now have a nice planter bed next to the porch that will be a perfect spot for herbs, veggies and flowers and an occasional butt when we're enjoying the outdoors. Here's how it looked at completion: And how it looks now with a garden of herbs and lettuce growing in it:


