Showing posts with label front yard. Show all posts

Wednesday, February 02, 2011

Photos of Chicago's Blizzard of '11

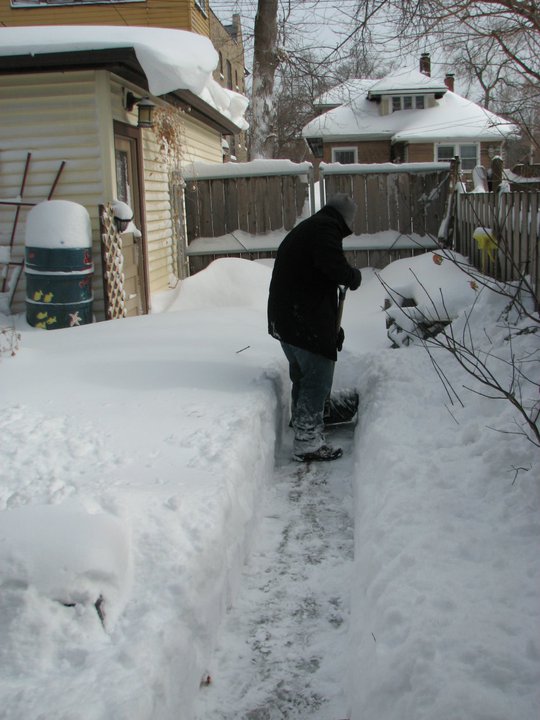
At Humphrey House, it's been a relatively uneventful winter - until today. At about 2:30 AM yesterday Feb 1, we started getting snow and howling winds (40-50 mph) and it didn't let up until 10:00AM today. When it was all over, it was the third-snowiest day on record with 20.2" totals. However, due to the high winds, there is hardly any snow on the roofs of any buildings - it all was blown onto the ground creating massive drifts.

In any case, here is our little snapshot into the world.

During the blizzard this morning the backyard was whited-out...
...and the winds had caked the front windows. Cosmo kitty says, "I wanna play out there!"


By noon, the snow had left and we ventured outside to find the backyard resembling a snowsea with frozen waves and currents.


Time to shovel a path. We went to the garage first so I could get a yardstick.


Overhanging the entrance door to the garage we discovered there was a new awning, perhaps put there to protect us from the elements?


The drywall T-square was the perfect device to plop in various places to judge the depth of the snow. No, your eyes aren't deceiving you - half of the four-foot tool is missing as the snow in the middle of the yard was 22" deep.


During the winds last night, we heard a clanging in the upper bedroom in back of the house. I had a sneaking suspicion some roofing material was loose. Turns out, it was the aluminum drip-edge that goes under the shingles to keep out wind-driven rain. methinks this may not be repaired for awhile.


Venturing out the front door we found a massive snow drift that had formed from the winds that were howling down the 10-foot canyon of space between our home and our neighbors home. A slight breeze made snow pick up and dance over the edge of this drift as if it were a desert sand dune.


Humphrey House from the street which had been plowed. Notice the massive drift on the roof of the front porch, nearly covering up the bedroom windows.

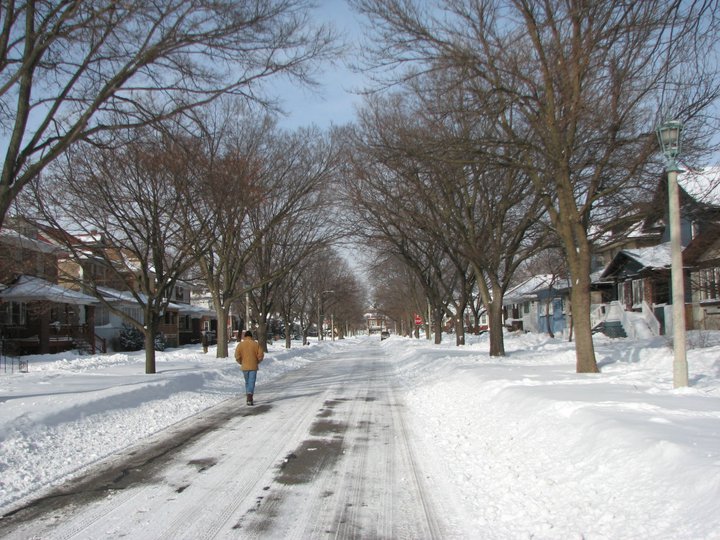
The view of our street. All pedestrians used the street for walking, and there were actually quite a few folks out today surveying the neighborhood.


Of course, what's the use in living in the snowbelt if you can't have a little fun every now and then. As Jen took this there was a distinct "Don't You Dare!!" that gave me pause from throwing the snowball.


Tuesday, October 26, 2010

Custom Graveyard Monuments

This year our annual haunting of Humphrey House are growing a bit out of control. I blame the book How To Haunt Your House, Jen thinks its because I don't like work as much play. Whatever the reason, the scary props are growing.

Besides the scarecrow and the graveyard fence, we also decided to take some 2" foam board and make custom grave markers for our front yard. The store bought tombstones are okay and we always steered clear of cheezy ones, but ultimately the just look so, well... fake. To liven things up, we were inspired to create some of our own tombstones.

Armed with a wire heat gun, I sculpted the remains of some 2" rigid foam insulation into various custom tombstones, which we then embellished by melting in designs with a soldering iron (note: use LOTS of ventilation!). Jen came up with all kinds of cool fonts and designs. Next up was coloring the foam board.

Mixing the same colors used on the scarecrow, we came up with a nice gray that I blended with some old drywall compound. This was used to cover the sides and back of the tombstones. I first tried this on the front of one tombstone (the "Crane" one below), but quickly remembered that this material is meant to fill in holes and cracks (duh!). It filled in the front details far too much. But on the sides and back, it gives the tombstones much more weight and appearance of somthing sculpted out of stone. A regular paint mix (no drywall compound) on the front faces made the tombstones complete.

After drying, we used black paint for any recessed details and used a nice iridescent paint we had left over (from our condo 6 years ago!) to highlight certain aspects. Here are the results:

Bill Compton's tombstone.. May he rest in peace for all eternity.

The Van Tassel grave marker (inspired by Tim Burton's Sleepy Hollow) is one of my favorites. Jen's skull-head design and side markers turned out great with the iridescent paint.


This last marker is a bit unique. I had to get Green into this display somehow, so I figured I'd make more of a monument as opposed to a tombstone, for the green homes rating system called LEED that I work with. There are five areas of the rating system that are represented by icons:

  • Sustainable Sites (SS) represented by the leaf
  • Water Efficiency (WE), shown by the drop
  • Energy and Atmosphere, indicated by the asterisk
  • Indoor Air Quality (IQ), shown by the waves
  • Materials and Resources (MR) shown by the reduce, reuse, recycle triangle.
It's a bit corny, and I know I'm taking my work home with me here, but I figured I was investing the time so might as well make it a bit personal.

Anyway, once we had the props complete, we staked them out in the yard with insulation hangers (more leftover building materials!) and a piece of lathe behind each one for support.


One of the nice things about all this work for Halloween is that its done using materials that we already had laying around from the various construction projects, giving the surplus material a new, and haunting, life. Just wait until we show you the hologram ghost we're making!

Monday, October 25, 2010

A Grave Yard Indeed

This year we learned that tearing out the grass in the front yard makes for a delightfully creepy graveyard in preparation for All Hallow's Eve. With leaves starting to fall and make their way around the landscaping, we simply needed to put up our tombstones to start out with a ghostly yard. Some flowers were still blooming, making an excellent offering for a tombstone or two.


But with concerns about the rampant number of children that visit our block on Halloween, we decided some protection might be in order. Maybe we could erect a fence around our tiny yard to give it a more formal feel. We thought of doing this with PVC pipe but decided for a more recycled look. I still had a pile of lathe from the plaster walls we took down when we redid the kitchen. It didn't take to long to find the longer pieces, strip the nails, and erect a graveyard fence. Jen's brilliant touch was wrapping the top in some imitation barbed wire we picked up on clearance last November.

There was a bit still lacking though, so we decided to make some of our own tombstones. More on that in a later post!

Friday, July 23, 2010

Some Finishing Touches in Front

I can tell you one thing. Putting together a garden during a hot, humid summer day is no fun. So after the initial landscape was in place in the front yard, I took it easy. Off tangent thought... if there no longer is any grass, can it still be called a front yard? Hmm.

Anyway, after the busy weekend planning and planting the front garden, I wasn't about to subject myself to further heat exhuastion. So I have been subsequently doing a little work after the sun goes down each day (but before nightfall).

I planted an evergreen groundcover, and then made a trip to the local mulch pile. A few weeks ago, Chicagoland had a massive round of windy thunderstorms that resulted in many trees and branches falling down. Our city picks these up and runs them through a grinder to make mulch. These are stashed in a few locations, and they let residents come by and help themselves to as much mulch as they'd like.

So I went to get some. I really missed my old pickup truck for this trip, and instead had to lay down a tarp in the trunk of our economy car, backed it up to the pile, and shoveled away.

Frequently, this free mulch can get quite rotten, but with the fresh thunderstorms that had passed through earlier in July, the available mulch was actually quite nice. I made several trips over the last two weeks, and it was interesting how the quality varied. Sometimes there was really rough course mulch (shown above), other times it was very fine wood chips. But beggars can't be choosers!

So far three trips have been made, and I plan to make at least one more to establish a nice mulch base. And, much as installing trim in a room helps bring everything together, mulch really does help give the front yard garden a finished look. And hopefully with a bit more rain (and rainbarrel water) the plants will all get properly established before winter.

Tuesday, July 13, 2010

Surprise! A green landscape plan

Sometimes the best things evolve and happen organically. Other times they don't.

Our front yard had evolved organically over the past 5 years that we've been in Humphrey House, almost like a nursery rhyme, "here a plant, there a plant, everywhere a plant plant." And you know what? It wasn't working. In fact, it failed miserably. Even though people tried valiantly to help us, we had no clue about various plant sizes - placing things in a tight bunch, too close to the foundation, putting tall plants in front of short plants, sun plants in shady areas - if there was a list of bad DIY landscape plans, I felt certain we were on that list. Well, all that changed over the weekend as I finally set things straight.

With Jen leaving town for the weekend, I promptly set off to surprise her upon her return, and ripped out the existing hardscape timbers and dug up almost every existing thing in our front yard and put the plants into spare containers. The only thing that survived were the coneflowers Chris from TinyBungalow gave us a few years ago and our weeping cherry tree. This gave me a blank slate, with lots of dead ground to play with.

The plan for our yard started with a goal: Create a sustainable landscape. Great, but what does that mean? Well, a landscape that is more native (adapted) to the local climate - able to withstand Chicago's winters and dry summers without extra care. A garden that doesn't need extra watering beyond the natural rainfall we receive. And a landscape that would be more pervious and help absorb stormwater on-site rather than directing it to the overburdened municipal storm sewers. Additionally, native plants also are more attractive to wildlife providing food and cover for birds, butterflies, etc.

But there were many challenges to meeting this goal:

  1. Aesthetics - we wanted something with year-round interest that didn't look like crap.
  2. Shade - our parkway has a Norway Maple that provides dense shade - and few hours of sunlight. Most aesthetically pleasing drought-tolerant plants and flowers thrive in full sun.
  3. Maintenance - I like the idea of quarterly yard maintenance rather than weekly mowing.
  4. Budget - always a factor, which meant trying to use many materials we had on-site
  5. Size - while not huge compared to many, we are dealing with 2/3 of our front yard, about 400 square feet, which could definitely stretch the budget. We also wanted some good vertical height to transition to the porch.
One of the nice things about delaying a landscape plan until July is that you can take advantage of season-end sales, which really helps with #4 above. I visited no less than 5 garden centers and deals ranged from buy 2 get one free to 50% off or more. I even got a 1/2 gallon healthy goldenrod plant for $1 at Lowe's just by asking how low they would go!

Well, it all came together so much better than expected. Once everything was cleared out and placed into extra planting containers, I laid down some flagstone pavers that had been left behind under the back porch by the previous homeowners. With a hardscaped footpath in place, I then played around with arrangements with the existing plants such as evergreen boxwoods, along with some new plants I had picked up. Fortunately some of the local garden centers have a nice distribution line with American Beauties. No, that's not a link to some X-rated site, it's a native plant landscape supplier. Combining this with the selection at the big box stores and our existing plants, I grouped the plants together in odd numbers and got successful results.


So what did we do? Well, using advice from friends as well as a native plant specialist, I selected:The hardest thing to find was an ornamental grass that can perform in a part shade environment, on about 4 hours of sun per day. I was careful not to choose Chinese Silver Grass, as that is classified as an invasive plant species in Illinois. But with a bit of help, I was able to locate an ornamental that was actually labeled "Full sun to Part shade", a Miscanthus feather read grass strain called "Karl Foerster". These will be great because the grass dies off and provides a clump of winter interest. And potentially neat colors in the spring and summer. Right now though, there's not much to look at.


While I was working, several neighbors came up and remarked on how improved things look. Of course, anything is better than the dead lawn that was there for for months. I'm not entirely convinced the spacing is "just right" for everything, but we'll keep an eye on the plants and adjust as the year goes by. In the meantime, it's had a truly transformative effect on our home giving it style and a natural prairie setting to our neighborhood.