Thursday, December 28, 2006

Second Anniversary at Home

The end of the year is a natural time to pause and take a moment to reflect on the past. For us, this also signifies the end of another year at Humphrey House. Yesterday, we passed the two year anniversary since we purchased our house in the last week of 2004. With this spirit in mind, I've put together a brief summary of things we've accomplished (or not):

Looking back through all that we've done is downright provoking. Perhaps it was the foolish naivety about what the Humphrey House project entailed, or just the sheer number of adventures we've encountered, but it certainly does not feel like only two years have passed us by. Thinking back to those early days, when we still lived in our condo, seems like a decade ago.

Anyone familiar with home improvement will tell you it could easily last indefinitely and never be "done", especially with some of the other things on our wish list (like our kitchen remodel, removing carpeting on the first floor and sanding the floors, etc). But with luck, the next year in Humphrey House will bring more fortune and a semblance of completion to our house, bringing it closer to returning to a home.

Tuesday, December 19, 2006

Wall covering has come

Drywall started magically appearing on the walls of our attic. At least, that how it seems when you leave for work and come home with new walls! What a difference hiring the pros makes - talk about the ultimate Easy Button!

Our garage was full of drywall - 70 sheets! - at the beginning of the week and we're down to about 10 now (sidenote: always buy extras for any project. Going back to return unused merchandise is so much more rewarding than running out to get more of something in order to finish the job!). We're installing several different types of drywall:


  • Standard 1/2" 4-foot by 8-foot sheets on the walls

  • Standard 5/8" 4-foot by 8-foot sheets on the ceilings

  • Standard 3/8" 4-foot by 8-foot sheets on top of older damaged 3/8" drywall in our stairwell

  • 1/2" 3-foot by 5-foot cementboard (Durock) in the shower and tile area surrounding the bathtub

  • Moisture-resistant "greenboard" 1/2" 4-foot by 8-foot sheets in the bathroom


The most interesting is the cement-board and greenboard in the bathroom. When Sara came by and saw the greenboard the other day she said "wow, you've already started painting in here!" Sorry Sara, but not quite. "Greenboard" contains an oil-based additive in the green colored paper covering that provides moisture resistance. Since we're adding a steam shower in our bathroom, we're making sure every surface has this installed.

The cement board, while difficult (and heavy!) to work with, is much better for wet water areas like our custom sized shower. Greenboard is not suitable for backerboard in this instance, and as of 01/2006 is no longer accepted in building code (International Residential Code R702.3.8). So grudgingly, I admit that building codes have their uses. I don't want to lean against the wall while taking a shower and have my hand fall through it like others have done.

So now that most of the wallboard is installed (only cementboard to go), our crew is working on the next step - plastering all the joints and screwholes. And then comes the messy part - sanding. I'm already trying to seal off the rest of the house so we have at least some kind of dust-free zone.

Thursday, December 14, 2006

Stud-ly help before the drywall comes

Monday morning, we had our drywalling contractors come to begin finishing our attic. The only problem was, we weren't ready for them yet. There was still the shower to frame, closets to build, and several other punchlist items to take care of. I knew it would be a long hard weekend.

Shower PanSaturday began early with John showing up at 8:30 to reroute the plumbing vent for the shower drain (which was finished before the wall was built, and was inside the shower area). He also brought some thick 40 mil liner that we lined the bottom of the shower with to create our custom shower pan. This liner will be the last line of defense for the ceiling below in case any water gets underneath the tile that will be the base of the shower. Due to the zoning setback requirements, our bathroom addition got squeezed a bit, and it will likely be most noticeable in the shower, which will be 30" wide. Hopefully making it 42" long will help compensate for the narrow width. It will be tight, but I think we can make it work. While John was here, we also ran a 1/2" copper line from the basement to the bottom of the shower area. This will be for the steam generator we purchased that will give us a much-needed retreat after a hard day's work! I can't wait for to try that out.

Saturday bonus: Our tub came in earlier than expected so we received it with the drywall delivery on Saturday, so while John was here we moved the tub up and mounted it (screwed) into place. We didn't have all the parts to hook up the drain yet, so there's still some work left, but at least we know what we have (and what we need) now!

Shower with plastic vapor barrier, from the outsideSunday was the big day that was our deadline. There was two day's worth of work to do in one day, so I did the only thing possible to help: I hit the Easy Button and Scott and Julie came over to help us wrap things up. They began by wrapping the interior shower ceiling and walls in plastic sheeting that will keep moisture from the steam getting to the wood underneath. We also carved out a niche for shampoo bottles, ran some speaker wire, put interior glass block windows to brighten the rooms, and Julie got to play stud-finder and marked stud locations on the floors for future reference. Of course, we had to clean everything up and move everything out so the drywallers had room to move.

But we did it. We wrapped everything up by 8:00 and we were ready for the drywallers to come on Monday.

And then at 10:30 sunday night, after looking over everything one last time, Jen asked, "So, how do we turn the steam shower on and off?"
"There's a separate control," I replied.
"Oh ok. Where is it?"
"It will be on this wall of the shower, and goes on after the tile is installed. Then you just connect it to the control cable right here... Oh wait a minute. The cable isn't there! Ahhh..." I screamed, realizing I had to run the cable really quickly.

So, we were finally ready just before midnight. But hey, we still met the Monday deadline!

Tuesday, December 05, 2006

Stop the press - before they catch on fire!

So we're passing a big hurdle in the way of renovating our bungalow attic. The last month or two have dragged on as we did a lot of the finish framing, and the insulation. My god, the insulation. No wonder contractors bidded it out so high. Dirty, time consuming work that never seemed to end. At least it was cooler as winter approached.

But significantly, we're about ready to have a drywall crew come in and cover up the walls at long last. We just needed to have the inspectors come by once more, for an insulation inspection. This is to verify that we actually did put the right levels in the building before closing up the walls. Initially, he liked what he saw - R19 in the kneewalls, and R38(!) in the ceilings. So we passed. Almost.

The insulation also includes a firestopping inspection, which requires a ASTM-rated caulkto be applied around openings between floors (conduit , plumbing, speaker wire, etc.) I know Mark's getting excited, but this is a special type of caulk that, when exposed to high
temperatures or direct fire, releases water vapor and forms a solid char and retards the spread
of fire. Otherwise, a fire on the floor below can get sucked up through the wall cavity like its a chimney. Plus, I got to caulk more over the weekend!

So anyway, today we got the official approval for the firestopping, and we're almost ready to move on. A few final pre-drywall punchlist items this weekend, and we'll be having 65 sheets of drywall dropped off before Monday.

Saturday, November 25, 2006

myspace rules the world.


i like me some myspace.

Wednesday, November 08, 2006

Bringing Back Brick Walls

I admit it. I'm a sucker for masonry and exposed brickwork of any kind. When we started demolishing the 1950's finishing of our attic and found the brick chimney to be in relatively decent shape (on one side anyway) we got excited about the possibility of including that in the final design space. Then we saw uncovered more and saw how bad it had become, especially when it started swaying during the dormer construction.

Since we needed to get the chimney extensively repaired anyway, we decided to replace the mortar all the way up and down instead of just in the damaged areas. It was about twice as much space so it wasn't too much of a problem. Instead of taking the DIY route on this one though, we decided to bring in the contractors that did the dormer expansion as they had some masonry expertise. They came over one Saturday afternoon and re-tuckpointed three sides of the chimney, and boy what a difference that made!

There was only one thing left to do. See if the old brickwork would clean up to an acceptable level of presentation after water had trickled years worth of filth down the sides for god only knows how long. I wanted to try some eco-friendly cleaner on the brick, but Menards didn't have any and really wanted to do it that day, so I went with the old standby: muriatic acid. Which, basically, is hydrochloric acid.

Taking great care to cover all skin (and wear goggles), I mixed 1 part acid to 4 parts water, grabbed a steel brush and a nylon brush and scraped and cleaned off one wall of the brick chimney. We wanted to at least have this one wall exposed as it will be the back wall of a niche right at the top of the stairs off the hallway. I planned to install a recessed light to highlight the brickwork and an eventual piece of artwork, so I was really hoping this would pull through.

It began questionably at first, but I soon discovered that a first pass with the steel brush/acid mixture removed a lot of the excess mortar and heavier deposits. A second pass with the nylon brush cleaned up any residue, and after a day of drying, I couldn't believe I was looking at the same wall. It looked amazing! I went about framing a soffit and installing a recessed can and when I flipped the switch, the results were impressive. And that's without drywall on the top and sides of the niche!

Now it's on to the other two sides of the brick chimney that will be exposed in the bathroom (the fourth side will be covered by a space reserved for ductwork). If only there was more brick to expose!

Thursday, November 02, 2006

Boo.

We like Halloween. Did you know that? We do. A LOT. When Jason went to the block coffee meetup this past summer, neighbors identified him to each other as the owner of the Halloween House (here's a scary postscript: most thought our house was vacant). But yes, it's becoming a tradition - deck out the house, get friends to come over, and spend the evening terrifying kids (AND their parents). In a good way.


This year, Mark and Amy, or rather, Malcolm the Zombie Boy and Countess Amelia Who Vants to Suck Your Blood, joined Jason's Grim Reaper and my own stupid (yet scary) invention, Evil Zombie Chef-Servant, in giving the kiddies nightmares. We made some children run so far from their parents that the foulest language was shouted in the street, and one kid even chucked his candy bag into our "cemetary" in his hurry to get away - and then wouldn't come back for it. The best, though, is a tie between the shattered flower pot and the litter of costume parts left on our lawn.

Ahhhh, Halloween.


TOP 10 THINGS HEARD AT HUMPHREY HOUSE THIS HALLOWEEN
1. "Now, Malcolm, don't get excited ... that's it, take him back to the cage!"
2. "Please don't scare my baby!"
3. "Oh HELL no!"
4. "That thing is your PET?"
5. "Oh SNAP!"
6. "AAAAAAAAAAAAAGH!"
7. "No, my god, you people ain't right."
8. "I ain't afraid of you. You don't scare me. You're not -AAAAAAAAAGH!"
9. "It's okay honey, really, see, you can take the candy, c'mon honey, it's okay ..."


AND THE SWEETEST COMMENT HEARD THIS YEAR ...
10. "I ain't never coming to you scary people's house ever again!"

Thanks guys, we really couldn't have done it without you.

Thursday, October 12, 2006

I See A

While I was up in the northern reaches of Wisconsin, Jen attended the The Historic Chicago Bungalow & Green Home Expo and picked up some really neat information from tons of vendors on bungalow restoration and renewable energy sources.

Well I was kinda bummed that I didn't get to make it to the expo. So when I heard that last Saturday was national solar day with local tours across the country, I quickly went to the ISEA website (pronounced I-See-A) to find out what the local group had planned. To my surprise, they were planning a viewing of 4 different buildings right in Oak Park! One of the homes even featured the tankless hot water heater that we bought (but have yet to install) for our house. The homes all featured solar thermal technology, which captures the sun's heat using water and transfers to your home hot water heater, essentially pre-heating it. A large system can also pre-heat the return air in an HVAC furnace by running the solar-heated water through a heating coil. Kind of like an automotive radiator that works in reverse. As a bonus, I got to see a converted electric only S-10 pickup and a diesel Jetta modified using a "Frybrid" system. The owner told me he drives for free using used cooking oil from local restaurants(biodiesel). All in all a pretty exciting afternoon!

Getting back to solar thermal systems though, the event put the attainability of a solar system within reach. A professionally installed system, after rebates from the state and a minimal federal tax credit come out to several thousand dollars. But the components themselves are relatively affordable except for the collector plates that mount on the roof. So I'm thinking that before we close up our walls upstairs (yes, we're still insulating), I might run some insulated 3/4" pipe up. Although with copper prices so expensive, maybe PEX is a better choice.

Thursday, October 05, 2006

Serenity now, dammit

As all our visitors of late have noticed, the sanctuary of the backyard is totally gone these days, having been stripped of all green by virute of serving as storeyard for the upstairs de/construction. Apparently all that grass dutifully tended by Sara and Jason for the past year only had one good party in it. So we're growing more. We're trying to anyway, if Sam the Bunny will give us a break.

But sweet serenity has returned to the Humphrey House. At least a little. After grustling about it for a year, I finally got a move on this past weekend and cleaned off the front porch. Lovely, isn't it?


Tuesday, September 19, 2006

Fun finds never end in our home

Just because we haven't posted in awhile doesn't mean progress has not been made. In addition to dealing with a computer hard drive failure, we've been tackling minor things that need to be finished up before we drywall the attic.. I've started to refer to it this work as "trim framing." Trim framing may consist of any of the following:

  • Scavenging the scrap pile to find the magical piece of lumber that is the proper thickness
  • Scavenging in the garage for the same
  • When that fails, ripping down 2x4's on the table saw to proper thickness
  • Using old (read: non-nominal) lumber, which is thicker than today's wood
  • Shimming behind 2x4's
The idea is to have straight surfaces so the wallboard attaches to a (mostly) flat surface. Tedious work, but as they say, the devil is in the details.

We thought there were few things left for us discover in the house. Little did we know! When doing some work to add an electrical outlet in the first floor bedroom, we found a "hidden" single outlet disguised in the baseboard.

Further investigation revealed that it was a lightbulb socket!?!

Apparently, instead of putting in a normal outlet, some previous owner thought this would be a better route. Fearing an electrical fire if this were actually used, I promptly removed the 'whip' that attached this to the power supply in the basement to disconnect it and began to remove the offending creature.

But now I wonder.. Since the baseboard is already cut up and destroyed, maybe we should just leave the light-socket-outlet-thingy in the wall (but disconnected) as a piece of personality for the house. It would also give some future owner a chance to puzzle over it as well.

Friday, September 01, 2006

Welcome To Humphrey House University ...

Looks like this weekend is gonna be a worker after all. Our previously scheduled plans to celebrate Jay's dad's b-day have been scrapped due to dog fungus - yes, you read that right - so we've got a three-day weekend to fill. Since I've been on house hiatus for a while now, I think this weekend will serve as a good educational tool for me. Classes planned include:

  • Experiments in Drywall 201 - I passed Drywall 101 during the basement phase, so I should be ready to learn a bend. Of course, I realize I passed only because I was the sole girl, and because at least I didn't do what Scott did on his first sheet and put the drywall on backwards. Regardless, we've created these little glass block niches (we just like our glass block, dammit) that we need to wall in. However, we don't have the lovely screwguns like before so it may not be as much fun ...
  • Studies in Shower Scenes & Toxic Fumes - For too long, we've lived with a bizarre situation: A wood-framed window painted shut in the shower. While I no longer feel (too) self-conscious showering in front of a five foot window that's five feet from my neighbor's living room windows, the lack of ventilation in this, our only bathroom, has been suffered through too long. Having to wait an extra ten minutes after waiting for the bathroom all morning just isn't working. The window must be replaced! We've got a glass block window, complete with vent, ready to go - just haven't had the time or focus or whatever. Bring on the tile destruction! Let's go!
  • Fun With Screening - I had to re-screen a window when I was in college and my sublettee's son played with razorblades and hacked out pieces of my screening to spell out his name (at least the first two letters before he got bored). So this is more of a refresher course. I want to rescreen the windows on the front porch so we can open them all, not just one. It'll be fall soon, and I'm so looking forward to that breeze blowing through the porch into the living room with yellow leaves falling outside. Which brings me to ...
  • Organizing Your Life For The Clutter-Prone - I've taken this class many many times, thank goodness repeats are allowed. The front porch needs some serious attention. After all, Halloween is coming, and how can I be expected to maintain our "Halloween House" status if the front porch is covered in boxes of Care Bears, weight benches, old purses and my art supplies?
Hope I graduate soon ...

Tuesday, August 22, 2006

Wiring Dilemma

Before the sublfooring in our attic conversion was installed, I used some of my newly acquired plumbing skills (and leftover pipe) to run a chase from what will be our "utility room" upstairs (one side of the low space behind the attic kneewall) all the way under our bedroom to the other side of the attic, behind the the other kneewall. The plan was to use this chase for wiring, such as cable TV, phone, etc.

Well this weekend during the Menards-17%-off-anything-in-a-bag-sale, I couldn't resist the temptation of topping off our bag with some Cat-5 (computer network) cable as well as cable TV (RG6 coax) cable. I already have tons of telephone cable (Cat-3) left behind at my employer's previous location, so I was all set to go.

I started running these three cable types in our attic last night - RG6 Coax, Cat-5, and Cat-3, but I paused halfway through the job with a question (plus it was 1:00 am); Will having these three different cables all bundled next to each other result in any signal bleeding or interference? What if I run audio speaker wires alongside too? Hmm.. time for some research.

Tuesday, August 01, 2006

A baffling roof ventilation problem

Warning: Technical and possibly boring post. But nonetheless I wanted to document this.

Remodeling HumphreyHouse has presented us with an opportunity to change the air movement in our attic. In order for a good roof to maximize its expected lifetime, and to increase a home's comfort level, it's important to have good ventilation in the attic.

In summer, the underside of a roof collects a ton of radiant heat, as Jay found out first hand this weekend when Chicago was gripped with a heat wave. Without ventilation coming in to move that air up from the underside of the roof to a vent near the peak, the heat has nowhere to go but through the insulation and into the house. Making an attic unbearably hot. During the winter, the heated air from inside the home carries water vapor from laundry, bathrooms, cooking etc. and when the warmer air hits the cold rafters and roof decking, it condenses and can create moisture problems.

Warm air can also cause the snow on top to melt and run down the roof. Now, you may not think this is a bad thing, except when that water runs over a soffit, which is not heated, it will form an ice damn near the end of the roof eave, causing water to refreeze on the shingles and work its way underneath to enter the house. We had some loooong icicles last winter, so hopefully we can avoid them turning into ice damns in the future by increasing ventilation.

However, the problem we're running into is one of headroom. Our rafters are only 2x4s, and we want to get as much insulation as possible without shrinking the room too much. We settled on R19 (2x6) insulation for the sloped part of the ceilings, which requires simply furring down the existing 2x4s. The flat part of the ceiling will have R38 (12 inch) insulation. But this doesn't leave much room for vent chambers - especially the typical foam baffles that you can purchase. These are 2 inches thick, and while we put them under the dormer roof, and will still have plenty of insulation, we won't have much room if we do that in the rest of the attic.

So with our HVAC installer's help, we devised an alternative solution that maximizes our insulation while still creating air chambers for ventilation. We installed a PVC pipe that connects the behind-the-kneewall part of the attic to the peak of the roof, and put a pipe into each rafter bay. In the laundry room, which will generate a lot of moisture, Jay drilled the PVC every few feet to ensure any moisture will get carried away in winter.

But how will the air travel up those pipes to begin with? We plan to install standard 2x4 insulation in the kneewall areas just in case we want warm/semi-heated storage, and to keep extreme weather from coming inside. So before stapling up that insulation, we furred down the 2x4 rafters behind the kneewall with 1x2's. That would leave a 1" gap for ventilation across the lower part of the roof once the insulation was installed (ice dams, bedamned!) These chambers terminate at a mini-peak at the top of the kneewall to take advantage of existing mushroom vents in the roof, and the PVC is right there to carry the air up to the attic peak where we have more mushroom vents.

So, to make a long story short, our plan is to have sufficient air movement under our roof and above our insulation, which will hopefully keep everything more comfortable and enjoyable.

Sunday, July 30, 2006

Piping for 13 hours

Saturday was quite possibly one of the longest days working on our house. Or maybe working in an attic during the 105 heat index made it feel even worse. The day started off well (and cool) enough, as our electrician Fred showed up as promised bright and early. After walking through the details with Jay, he put together a shopping list of a few extra items that Jay had not already picked up.

While Jay ran to Lowes, Fred started drilling through walls studs, sawing 1/2" metal conduit with a cool cordless bandsaw (which Jay promptly nicknamed "The Green Machine"), and contorting metal conduit into all kinds of funky shapes. Smartly, Fred started working on the non-A/C side of the attic first (the side that faces West and will be the master bedroom). He had most of the bedroom complete by the time Jay returned.

In the past year since Fred wired our basement, Jay had tried a few times (mostly unsuccessfully) to work with conduit and the pipe bender he has. Now, Jay was a willing apprentice as Fred tried to teach him some of the tricks of measuring and bending conduit. With a little help, it actually wasn't too bad. Jay ended up doing the stairs, half of the hallway lighting and smoke detectors, and half of the spare bedroom before the day was done.

Granted, that is only about 15% of the work and Fred needed help on some things a lot, but still, not too bad for an amateur.

By 5 o'clock we started moving slow as the heat sunk in and the A/C struggled to keep up. But Fred was determined at that point to get all the piping done before he left for the day. We pressed on, figured out a way to route the conduit down to the main circuit panel in what's termed the "homerun". I thought Fred kept referring to the Cubs spanking the Cards until I figured that out. Additionally, the centrally-wired smoke detectors will need to be wired into existing smoke detectors in the basement, so that required another pipe coming downstairs as well.

Then we determined that we were out of conduit. We'd already gone through about 450 feet of pipe(!) but needed another 40 more to finish the spare bedroom. Mostly this was because an earlier pipe Jay had run before the floor was completed turned out to be unusable.

After thinking this spelled the end of the day, Fred said no way. He was not leaving when we were so close to finishing. Maybe he's just a glutton for punishment. Or was trying to avoid his visiting in-laws. At any rate, when the work was finally done it was pretty much 8:30. Subtracting the half hour for lunch, that was 13 hours of work! Wow.

Fred says pulling the wires should only take 1/2 day though. Not quite clear if that means a normal 7.5 hour day or a true half day (4-5 hours) though. At any rate, he'll be coming out to finish the job and hook up some temporary outlets and lighting for us. Then we'll actually have power (or Lectre) and be able to call for the rough inspection. Woot!

Thursday, July 27, 2006

The 'Lectre is coming!

When my cousin Chase was around 5 years old, he had a tendancy to give special powers to his toys. The action figures invariably had the ability to "Lectre" any villians. I thought this was some wierd invention he came up with, or maybe something was lost in translation due to the foreign culture (he's from the South). After all, he later told me how he wanted to be a firetruck when he grew up. But after several weeks, it finally dawned on me that this was his shorthand for "Electricity."

We at HumphreyHouse are looking forward to this weekend, when our electrician Fred will be coming over to Lectre the upstairs. While it is doubtful he will complete everything, hopefully we will at least get some decent lights up there, and be able to walk up and down the stairs without tripping over extension cords anymore.

Maybe Fred can even teach Jay how to measure and bend conduit on his own for the future, too! We can only hope that our anticipated 99 degree highs (with 80% humidity) can be tempered with the extra window A/C unit and temporary HVAC we've routed from downstairs. Or hopefully at least enough to avoid dehydration.

Monday, July 24, 2006

How it feels to live in HumphreyHouse

Over the past weekend, we saw many friends and family members, who invariabily asked "How's the house coming?"

Well, sometimes it just gets overwhelming, so much so that it can almost be difficult to express in words. That is, until you find a cartoon that sums it up perfectly:


Also interesting was that the Chicago Tribune devoted an article to "houseblogging" on Friday - yes, there is a term for what we do here at HumphreyHouse. And others who do it too! In fact, for those inclined, you can read (or commisserate) with others over at houseblogs.net

Tuesday, July 18, 2006

A skeleton in the attic

Gramma's ghost has given way to a skeleton, as sidewalls, knee walls, and ceilings emerge upstairs.
I think this is one of my favorite parts of the whole construction process. For the first time, you start to see how the plans and designs you drew up (years ago) physically take shape. No more 1/4" = 1 foot scale; this is the real thing. Three dimensions, baby!

And it allows you to come up with other ideas. Such as pocket doors to allow more space (and light) into what will be a somewhat narrow laundry room. Or laying out and framing openings for future built-ins, such as two dresser drawers in what will be the master bedroom.

Many of the interior walls are being constructed by our contractor, but Kenny and Brian came up to lose weight during Chicago's massive heat wave last weekend by working in our attic with Jay. Actually, Brian raised the ceiling framing in the master bedroom, and Kenny helped construct the knee walls and insulate the under-eave areas.

Getting the materials upstairs proved to be fun as Mark briefly stopped by at the perfect time to help Ken and Brian toss boards up through the window. This assembly line was so much easier than carrying things through the kitchen and up the stairs. Wish Mark had thought of this sooner! ;-)

Anyway, thanks to Brian and Kenny's help, we got through the long weekend, and we are nearly complete with the framing for upstairs. We're planning on having the electrician come next weekend, and it all needs to be in place by then.

Wednesday, July 12, 2006

Living Room Renaissance

Last weekend, Jen's dad came up to lend a hand with a variety of tasks. While our contractors worked on completing the subflooring upstairs, Kenny and Jay worked on tracing the path of the living room light fixture.

Backstory: After moving in, we noticed an unused electrical box with a cover on it in the center of the ceiling. Not too surprising, right? Well, the surprise was that there was no switch to be found on any of the walls. Even shining a flashlight up along the wall to look for signs of obvious patching yielded no clues (although it did show us that the arches were added after the walls were built - probably in the 50's when that was a big remodeling movement).

While we had guessed where the switch might be, we never really knew until the floor upstairs was removed. Jay was then able to trace the conduit down to one joist bay, in the wall between the living room and the foyer. We also found that this light was one of the three gas-electric lights in the house, along with the Kit and DR. How cool! (The gas lines had been removed in the basement long ago). Now we knew where the cable led to, so we just needed to find the old switch box that some Previous Owner (PO) decided to cover up.

However, it turned out that our detective work was not quite finished. To locate the box, we drilled test holes at the right height for a switch box. Didn't find anything. One of us went upstairs, shook the electrical conduit like mad while the other tried to "hear" if the box had just been pushed into the wall and was floating around in there. Nothing.

We began to question ourselves. If some PO had removed the light, there must have been a good reason, right? I mean, you don't just go about removing lights from your house, do you? Was the light leaking gas (when it was gas-powered light) or something? Was the electric line broken somewhere? Were the wires even properly taped or capped off?

Finally, we decided to start cutting a hole about 4 feet off the ground in the wall. But from the backside (our entry closet) - so at least the living room side would appear okay. Still nothing. Where could it be? We peeked upwards from the hole and were shocked to see the electrical box - about a foot up! This means that the original switch was nearly 5 feet off the ground! No wonder we found no trace of it. We can only assume the Original Owner must have wanted this for some reason. Maybe so kids wouldn't play with the gas-lights or something. Or maybe they just ran out of conduit.
Anyway, we eventually got a new box installed at a normal height, tested the circuitry (it was all in good shape), patched our holes, and attached a vintage-looking light fixture that Jen and I had found at a demolotion sale last year. And guess what? It fits the style of the room perfectly! Which leads me to wonder, why did some PO remove the wall switch?


(Click for larger image)

Thursday, July 06, 2006

Plumbing, Take 2

Well, I now feel like I could act as a plumbing consultant (at least for OP village code) to ensure that everything comes into compliance. Educational experts always say that the best way to learn is through failure. Well, that's what happened to us, along with a whole lot of extra work. Good thing we had the extra time from a holiday weekend.

We started off by demolishing (yet another) wall in our kitchen to expose the cast iron pipe. The old vertical stack needed to be replaced since we were cutting out a section of it below. That was a bear of a job, but a special chain pipe cutter that John brought made the job easier. Unfortunately, in order to remove the old stack, we also had to replace the 1st floor bath toilet drain which was molded into the old cast iron pipe. Of course, in order to fully reach that, we had to drop one of our HVAC supply ducts in the basement. Then we were finally able to start chiseling out the old drain, which was embedded in the 3-4 inches of concrete "subflooring" under our first floor bathroom. It's hard to convey just how hard this whole process was in words, and, sadly I did not take any photos before the cast iron was removed. But the whole process took the better part of Saturday, if that gives you any idea. By the time the pipe was out, we had just enough time to run the new PVC pipe from the basement upstairs, and reconnect our toilet.

As you can see, things started to get messy and complicated in the basement utility room with all the PVC pipes from upstairs connecting in to the stack.

After failing our inspection last week, we learned we could purchase a copy of local building code amendments for "a nominal fee". Turns out that it is only $5.00! Well worth the investment, and something I wish we'd known of earlier. It will definitely come in handy as it contains the amendments for ALL building codes, not just plumbing.

So on Monday, we moved on upstairs and rerouted all of our "improper" venting in the attic. We did this early in the morning (8am!), which fortunately turned out to be relatively cool up in the attic while it was raining. By the time the showers passes, it was noon, and we had completed everything except pushing the pipe through the roof (finished later that afternoon).

Then it was down to the basement, where we were able to devise a monstrous maze of piping. (photo coming soon) Why so complicated? In order to make sure every little nit-picky thing that we could be failed for was taken care of so there was no chance of failing the inspection again.

And guess what, when the inspector came at 10:30 this morning, he was very pleased to see everything was so well done and completed correctly. So, now we can continue with flooring and framing!

Wednesday, June 28, 2006

Feeling like failure

Sadly, we failed our plumbing inspection yesterday. Apparently the term "partial" inspection we used when setting the appointment wasn't good enough, and so he was expecting a full-on system ready to go.

I've tossed it over and over in my mind. Maybe its because the inspector was new on the job and out to prove himself. Maybe when he learned this was done by the owner, that he was out to teach a lesson. Maybe the six problems were all minor and innocent enough by themselves, but when combined, simply amounted to too much error.

Whatever the reason, we're now looking at a not-so-independant weekend to fix the problems. We can't get the flooring people to continue until the following are fixed:

- Apparently the condensate water that comes from a furnace (you know, drip. drip. drip), is far to excessive (sarcasm) to put down a 4-inch vent pipe from the toilet below. This is known as "wet venting" and is prohibited. What if that drain blocked the sewer gases from escaping below? Arg.

- Unfortunately, this means running a new drainline, roughly where the wall between the first floor bath and kitchen is. Since there's a lot of cast iron there, we have to remove the entire existing plumbing stack. Which we have to do anyway because the inspector said if we change to PVC anywhere on the stack, everything else must be PVC.

- On a different note, the point where the vent exits the roof is too close to the skylight. We had it 7 feet away (which is fine with illinois plumbing code), but OP needs it 12. So we have an unusable hole in our roof, and must re-route the vent.

These are the biggest issues. The others are smaller and aren't worth mentioning. Or maybe I'm too frustrated to do so. At any rate, Jen has gone to the evil village, and purchased a copy of the code amendments (a very new service they offer), so we can study up and be prepared for the re-inspection next week. We only get one of these, and then we have to start paying extra fees, so hopefully we can slip it by.

Oh, of course, the framing inspection went fine. There is only one minor correction needed.

Here Kitty Kitty

Tuesday, June 27, 2006

A complete shell


Our dormer is now completely framed - roof and all! We have a torched-down asphalt roof (because the slope is so low), and the sides are, well, sided. We were fortunate with the weather as we only had one slight rainfall. It was actually the morning the roofers were here, but it only interrupted them for an hour.


Over the weekend, Jay's stepdad came over to help install plumbing. Several hours (and plenty of glue sniffing) later, we had about 80% of the plumbing lines that we will need for our new bathroom upstairs.

Some of our initial dormer bathroom layout revolved around where we could run plumbing up and down to the second floor. This week, after a bit of analysis, we realized that there was a large unusable area we could use that was already in place... the back of the narrow closet in the first floor bath! It's 30" deep, but only 18" wide, which means most of the back is too dark and hard to get to anyway.

In addition to housing the drain pipes from above, this will likely be where we run up natural gas and AC lines for the upstairs furnace too. Fitting the pipe into the back turned out to be relatively simple, once we busted through 4" of concrete in the bathroom floors. Talk about a solid foundation for tile!! As John is fond of saying, they just don't build em like they used to!

Friday, June 16, 2006

Another Eventful Day.

Today was an.. Interesting day. Sometimes, it truly seems that the sagas never end when renovation is going on. Today, in fact, could quite possibly be described as a series of unfortunate events:

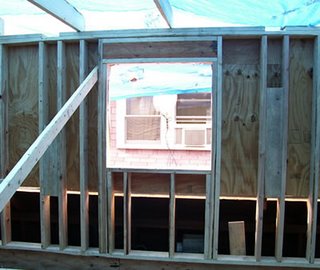
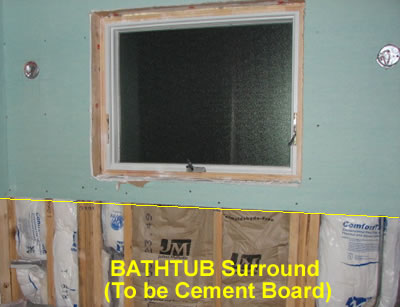
a) We found out the window we picked out earlier this week won't work. A window above a bathtub (less than 5' off the ground) must be made of tempered glass (like an auto windshield), so that if you slip and fall when stepping out of the tub, you don't shatter the glass and slice your legs off. Yes, it's part of the building code. Fortunately, our alley-neighbor Mike (who is graciously letting Jay park his truck in one of his spaces) sells Andersen windows. So we put in an order for tempered, obscured glass with a nice Prairie-style grill. Should be here in 3 weeks.

b) After ordering a 4'-wide window, we discovered the contractors had already framed the opening. At 3'-wide. Fortunately, we were able to change our window order.


c) Around 11am, Mike called Jay to tell him the dumpster truck was here to pick up the full dumpster. But Jay's truck (parked in Mike's lot as previously mentioned) was in the way. Jen had to leave work to go move it.

d) Shortly before noon, the contractor's office called Jay to inform him the dumpster had been successfully loaded on the truck. The problem was that now the truck could not leave due to a different car that was in the way. Jay asked which car, but they didn't know, so they gave him the phone number for JL Rolloff.

e) After a few unsuccessful attempts, Jay got a hold of JL Rolloff moments after noon. The dispatcher said, "oh yeah, our driver just left there. It took him awhile but finally he was able to get three other guys (Mike the neighbor + 2 of the carpenters), and they lifted(!) the car in question and pushed it out of the way.

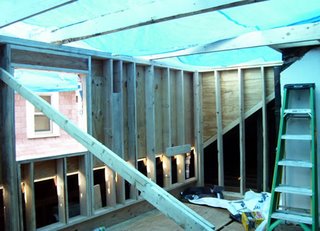
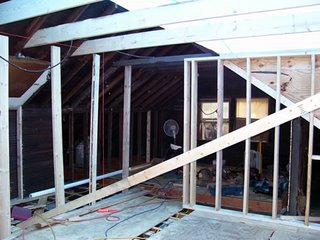
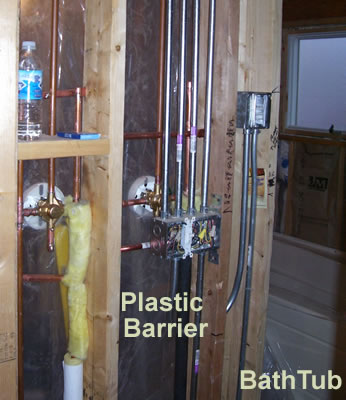
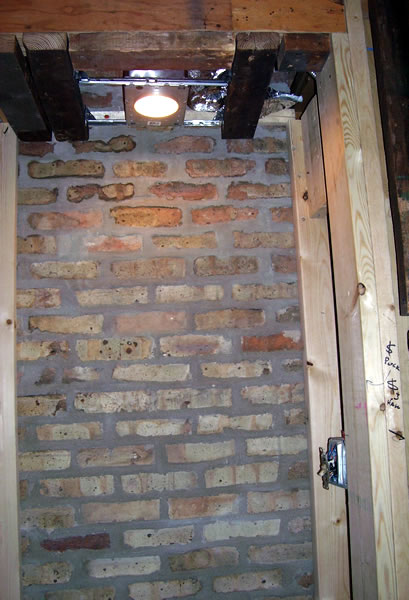
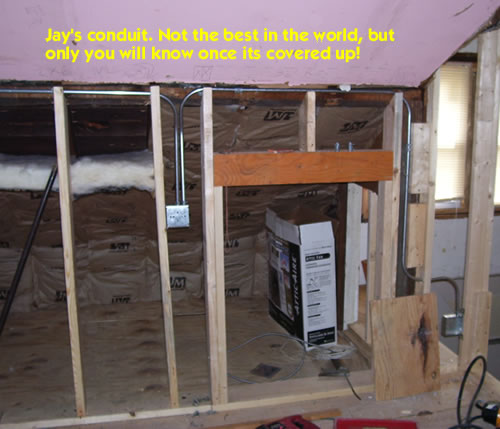
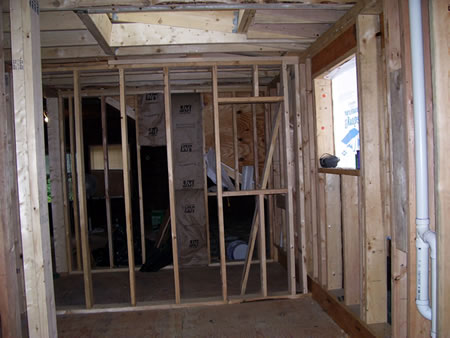
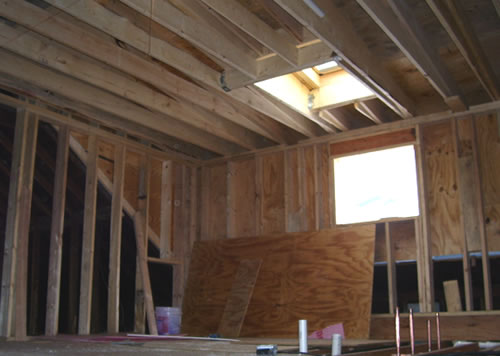
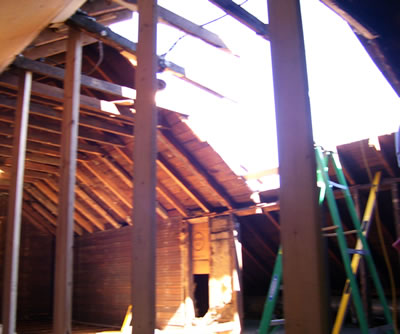
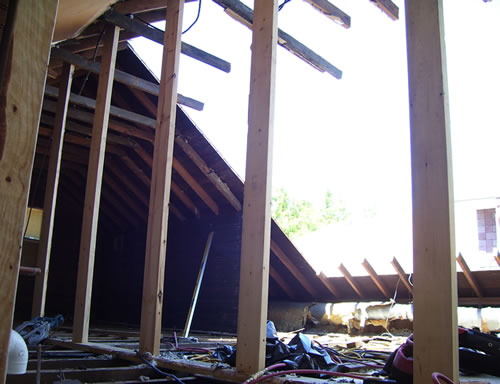
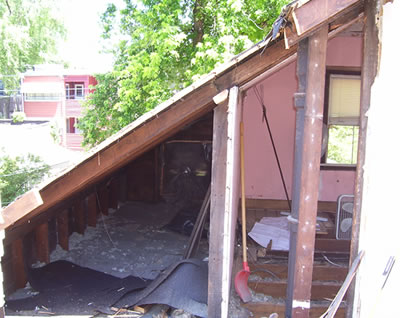
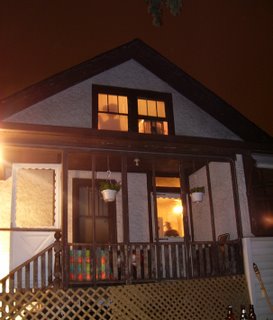
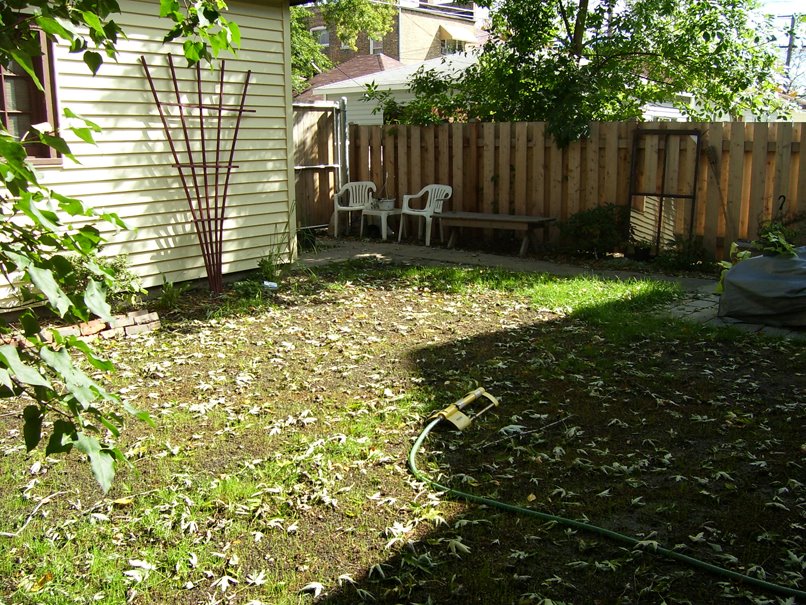
f) Meanwhile, back INSIDE the house, actual work was being accomplished. Specifically, framing the three exterior walls of the dormer. Here's the eye-candy:


g) Apparently, while working on cutting some of the lumber in the backyard, the foreman Arthur, was injured by one of the other workers throwing out pieces of our roof. Jen tried to offer him ibuprofen or something for his apparently broken ankle, but he refused.

h) Arthur did tell Jay as he was leaving that he would return tomorrow morning to frame the roof of the dormer. "On a Saturday?!?" Jay asked. "Why not?" he replied, "But maybe we be a little later, maybe 8 instead of 7 turdy." "Yeah," Jay said. "Sleep in a little - it IS Saturday after all."

Wow. Lately, there has been a lot of discussion about how immigrants "ruin" the availability for jobs for American citizens. From what I've seen this week, legal status isn't what people competing for these jobs should be concerned about. The work ethic of these guys has been amazing. They work from 7:30am to 5:30pm or so every day and only take a 30-minute lunch (sometimes shorter). Hard work and dedication, to me, are the spirit that the American dream was built on. Inpsiring.

So maybe not everything that happened to day was unfortunate. But it certainly was eventful.

The price for level floors

Well, our crew is halfway done with our floors upstairs. Some of the problem areas (such as above the living room) are already framed with the new LVL joists, and there is some temporary plywood sitting on top of them. Without the floor even being finished, there is already a noticeable difference in our floors. You can actually walk across the "room" without feeling like you're walking in a bowl like it used to feel!

Quite refreshing, to be honest. Especially since this is where our bedroom will be. The key to this whole system was lifting the existing floor from below into a quasi-level state with some house jacks.


The old floor was so far out of whack that we lifted approximately 2 inches at the center of the celing beneath! The new joists are sistered to these old joists, and span the whole length of the room, so they will effectively be holding up the original joists when we release the jacks.

All this, and only 2 small crack in the ceiling's plaster. Other rooms in the house, however, were not as fortunate. A small hole has developed in our first floor bedroom from a dropped (tool? foot? lumber?). Other cracks or smaller holes are evident throughout the other rooms on our first floor. The biggest thing may be the lighting fixtures in our DR and Kit, which dropped down while Jen was making lunch the other day! Thankfully the ceiling fan was OFF, otherwise she may have been beheaded!

Our home is sadly an official hard-hat area now. :(

Thursday, June 15, 2006

How cool is that?

As if we didn't have enough going on this week, just to make things interesting, Chris from powerzoning came by on Tuesday to swap out our existing furnace and broken A/C condenser with a brand-new high efficiency model. To our dismay, on Memorial Day weekend when Chicago got into the 90's and humid (in May! The global warming debate rages on), we discovered that our old A/C system was no longer working.

Since the furnace itself was older and kind of inefficient, we figured now was the time to upgrade to a new HVAC system. We scheduled it this week because it is now much cooler in Chicagoland, meaning it was easier for them to fit us into their busy schedule of service calls and installations. Also, how fun is it to have six (6!) contractors working on your house in one day?

After a few hours of work, we had a super cooling cure for this summer's heat, and he reinstalled the Powerzoning system too! Our new furnace is made by Armstrong Air, is slightly smaller, but is nice and shiny and much quiter. Say Hi, Chris! :)

Chris will be coming back soon to install a secondary system for the upstairs attic. It's hard to think that far ahead at this point when things are so crazy, but we told him to keep his calendar open.

Who says you need a roof?

Well, they've done it. They cut open our attic roof to make way for the dormer, and it was truly a marvel to see how much a 20-foot skylight changes things. I don't know if I can fully describe in words, so I'll just post some pix (click images for larger view):

It started innocently enough by cutting the angled part of the attic roof.


Then it proceeded to a 20-foot long hole! They had to erect a temporary wall to hold up the opposite side of the roof.


Cross section of the area behind the chimney (looking East):


... And the other side of the chimney, which we discovered is in desperate need of repair. Jen is a fan of all the light upstairs, as long as it doesn't rain.


When the workers left for the day, our attic became a tinted shade of blue as they tarped off the hole. Looking up at the soothing blues almost make us forget we live amidst chaos. Almost.

Tuesday, June 13, 2006

Attic Exposure

We've moved completely downstairs now. Last weekend Mark, Sara, et al helped us prepare for Monday's start date with our contractors.

After a brief mishap to start the day when their dumpster people said "No way this will fit in your backyard," things got moving once they contacted our previous dumpster service, JL Rolloff (how can we not go with a company that has our initials?) Then our backyard filled up with building materials. And then debris.


After several hours of sawing, ripping, and prying our entire second floor was, in fact, floorless. All the old subflooring was stripped out exposing the ceilings (and electrical runs) from the first floor.

Also, the contractors recommended we install a window (since we ended up moving back the dormer to comply with zoning), so last night we went Window Shopping. After an eventful evening criss-crossing Chicago and Western Suburbs (Lowes, Home Depot, HOBO, and Menards) we finally found one we liked.

And to cap off the day, Jay figured how to get the old mortise lock working so we can lock the basement when we leave for work. Phew!

Monday, June 12, 2006

Gramma's Arrival on a Firy, Smoky Night


Once upon a weekend bleary, after working to exhaustion (nearly)
on the humphrey house and yard till our muscles were all sore
while we kicked back, just talking, laughing, suddenly there came a tapping
as of someone's cane just rapping, tapping on the fence-gate door.
"It's just some kids," Jason said," tapping on the fence-gate door
Only this, and nothing more."
.....
But now GRAMMA, never moving, still is sitting, still is sitting
In the window facing eastward, silent on the second floor
Sitting in her rocking chair as days go by she's always there
and the light behind her streaming throws her shadow on the fence-gate door.
And as we wonder, will we ever, complete this house, our big endeavor?
We hear the whispered, "never, never!"
Quoth GRAMMA, "Nevermore."

Thursday, June 08, 2006

Sanctuary


Ah ......

Who knew I was a fan of the serene outdoors? With all the chaos inside the house, I've been turning towards the natural side to feel a sense of accomplishment lately. It's feeling lovely. More pictures are posted below.
SERENITY NOW!

Tuesday, June 06, 2006

Tuesday, May 30, 2006

Garage Facelift

Well, the construction season has arrived at HumphreyHouse, that's for sure!

Last weekend, following the plan, we dove into a facelift for the garage to give it more of a "prairie wheat" hue rather than the "rusty brick-shit" color we've been staring at for the past year. Saturday started off bright and early with a paint job for the trim, and preparatory work like removing the spotlight over the door.

Around 10, Mark showed up and he and Jay started off installing siding. Mark had never done it, but is always eager to learn a new skill and thoughtfully point out flaws in Jay's thinking. That's not an insult, but a compliment; he keeps the big picture in mind. Anyway, Jay had once helped Frankie and Jen side part of their house, and figured, "eh, how bad can it be?".

Well, I'm pleased to say he was right. It was a little slow at first, but we quickly learned that installing vinyl siding, even over an existing wood siding, is a relatively easy task. They started on the side of the garage that is close to our neighbors house - the side we never see, and worked things out like getting the overlapping seams facing the same direction and more. They got started a bit late due to a delay from a bench-clearing brawl during the Cubs-Sox game and interruptions when Jay sliced his thumb and Mark sliced our tree, but by the end of the day, the North wall of the garage was done.

Sunday was the most impressive day though, as they moved to the side of the garage that faces the house. The slideshow below is captures the transformation in progress...