Monday morning, we had our drywalling contractors come to begin finishing our attic. The only problem was, we weren't ready for them yet. There was still the shower to frame, closets to build, and several other punchlist items to take care of. I knew it would be a long hard weekend.
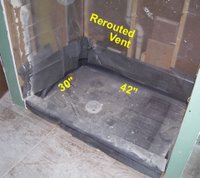 Saturday began early with John showing up at 8:30 to reroute the plumbing vent for the shower drain (which was finished before the wall was built, and was inside the shower area). He also brought some thick 40 mil liner that we lined the bottom of the shower with to create our custom shower pan. This liner will be the last line of defense for the ceiling below in case any water gets underneath the tile that will be the base of the shower. Due to the zoning setback requirements, our bathroom addition got squeezed a bit, and it will likely be most noticeable in the shower, which will be 30" wide. Hopefully making it 42" long will help compensate for the narrow width. It will be tight, but I think we can make it work. While John was here, we also ran a 1/2" copper line from the basement to the bottom of the shower area. This will be for the steam generator we purchased that will give us a much-needed retreat after a hard day's work! I can't wait for to try that out.
Saturday bonus: Our tub came in earlier than expected so we received it with the drywall delivery on Saturday, so while John was here we moved the tub up and mounted it (screwed) into place. We didn't have all the parts to hook up the drain yet, so there's still some work left, but at least we know what we have (and what we need) now!
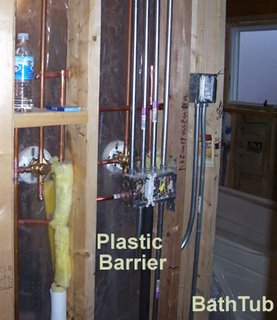 Sunday was the big day that was our deadline. There was two day's worth of work to do in one day, so I did the only thing possible to help: I hit the Easy Button and Scott and Julie came over to help us wrap things up. They began by wrapping the interior shower ceiling and walls in plastic sheeting that will keep moisture from the steam getting to the wood underneath. We also carved out a niche for shampoo bottles, ran some speaker wire, put interior glass block windows to brighten the rooms, and Julie got to play stud-finder and marked stud locations on the floors for future reference. Of course, we had to clean everything up and move everything out so the drywallers had room to move.
But we did it. We wrapped everything up by 8:00 and we were ready for the drywallers to come on Monday.
And then at 10:30 sunday night, after looking over everything one last time, Jen asked, "So, how do we turn the steam shower on and off?"
"There's a separate control," I replied.
"Oh ok. Where is it?"
"It will be on this wall of the shower, and goes on after the tile is installed. Then you just connect it to the control cable right here... Oh wait a minute. The cable isn't there! Ahhh..." I screamed, realizing I had to run the cable really quickly.
So, we were finally ready just before midnight. But hey, we still met the Monday deadline!