
I admit it. I'm a sucker for masonry and exposed brickwork of any kind. When we started demolishing the 1950's finishing of our attic and found the brick chimney to be in relatively decent shape (on one side anyway) we got excited about the possibility of including that in the final design space. Then we saw uncovered more and saw how bad it had become, especially when it started swaying during the dormer construction.
Since we needed to get the chimney extensively repaired anyway, we decided to replace the mortar all the way up and down instead of just in the damaged areas. It was about twice as much space so it wasn't too much of a problem. Instead of taking the DIY route on this one though, we decided to bring in the contractors that did the dormer expansion as they had some masonry expertise. They came over one Saturday afternoon and re-tuckpointed three sides of the chimney, and boy what a difference that made!
There was only one thing left to do. See if the old brickwork would clean up to an acceptable level of presentation after water had trickled years worth of filth down the sides for god only knows how long. I wanted to try some eco-friendly cleaner on the brick, but Menards didn't have any and really wanted to do it that day, so I went with the old standby: muriatic acid. Which, basically, is hydrochloric acid.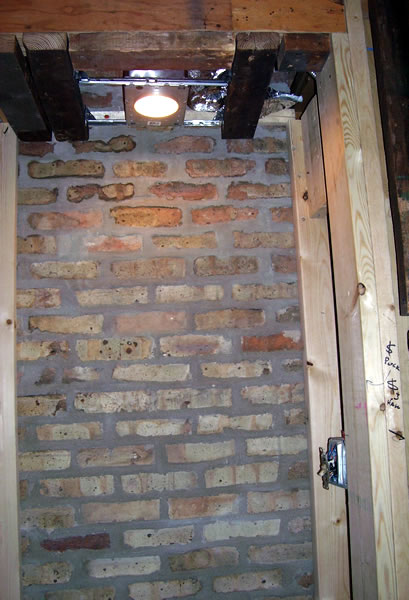 Taking great care to cover all skin (and wear goggles), I mixed 1 part acid to 4 parts water, grabbed a steel brush and a nylon brush and scraped and cleaned off one wall of the brick chimney. We wanted to at least have this one wall exposed as it will be the back wall of a niche right at the top of the stairs off the hallway. I planned to install a recessed light to highlight the brickwork and an eventual piece of artwork, so I was really hoping this would pull through.
 It began questionably at first, but I soon discovered that a first pass with the steel brush/acid mixture removed a lot of the excess mortar and heavier deposits. A second pass with the nylon brush cleaned up any residue, and after a day of drying, I couldn't believe I was looking at the same wall. It looked amazing! I went about framing a soffit and installing a recessed can and when I flipped the switch, the results were impressive. And that's without drywall on the top and sides of the niche!
Now it's on to the other two sides of the brick chimney that will be exposed in the bathroom (the fourth side will be covered by a space reserved for ductwork). If only there was more brick to expose!
Wednesday, November 08, 2006
Bringing Back Brick Walls
Subscribe to:
Post Comments (Atom)


5 comments:
Hey, I love the exposed brick!
Did your contractor use lime mortar on those joints? If your house was built before 1930 there's a good chance the original mortar used had little or no portland cement content.
The house was built in 1918 I believe, and I'm pretty sure the mortar was a lime mortar. Definitely whiter. The new mortar is darker and definitely not matched the old mortar on the one side not done. I didn't even think of that that earlier! At least its uniform everywhere though. Thanks for the comment!
i have a question about the reverse situation. i'm moving into a new place where the exposed brick is too clean and perfectly tuckpointed. it looks like a garage. i'd like to age it a little. any ideas about how to go about that?
thanks.
dan@dankaufman.net
Dan, I've heard there are masonry tint companies that can stain brick to make it look more aged, and in a bit of searching, I did find one DIY brick tinting kit from www.bricktinter.com. Maybe they can help! PS. Did you used to be in TMLMTBGB years ago? I may have seen you a few times.
Hey thanks Jay! I'll check that out. I'm actually more concerned with aging the mortar than the brick. It's just too pristine and uniform right now.
Small world! I'm a big TML fan and post on their newsgroup, but I've never performed with them. I am a stand-up comic though, so maybe you saw me somewhere else.
Post a Comment