Showing posts with label backyard. Show all posts

Wednesday, February 02, 2011

Photos of Chicago's Blizzard of '11

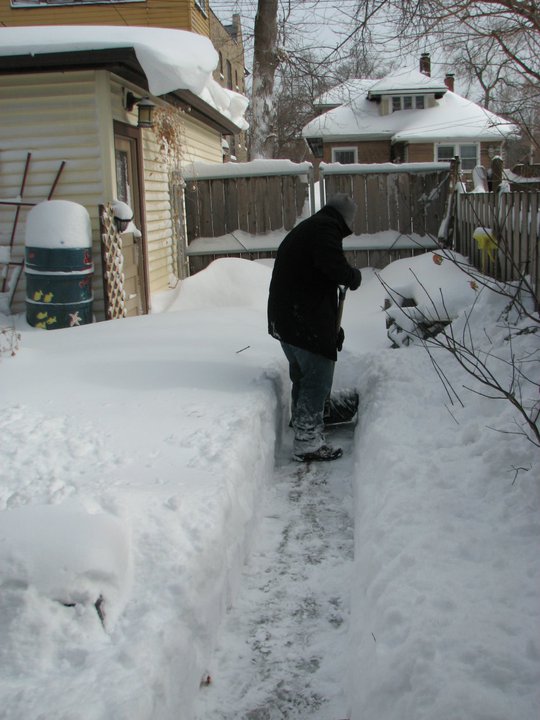
At Humphrey House, it's been a relatively uneventful winter - until today. At about 2:30 AM yesterday Feb 1, we started getting snow and howling winds (40-50 mph) and it didn't let up until 10:00AM today. When it was all over, it was the third-snowiest day on record with 20.2" totals. However, due to the high winds, there is hardly any snow on the roofs of any buildings - it all was blown onto the ground creating massive drifts.

In any case, here is our little snapshot into the world.

During the blizzard this morning the backyard was whited-out...
...and the winds had caked the front windows. Cosmo kitty says, "I wanna play out there!"


By noon, the snow had left and we ventured outside to find the backyard resembling a snowsea with frozen waves and currents.


Time to shovel a path. We went to the garage first so I could get a yardstick.


Overhanging the entrance door to the garage we discovered there was a new awning, perhaps put there to protect us from the elements?


The drywall T-square was the perfect device to plop in various places to judge the depth of the snow. No, your eyes aren't deceiving you - half of the four-foot tool is missing as the snow in the middle of the yard was 22" deep.


During the winds last night, we heard a clanging in the upper bedroom in back of the house. I had a sneaking suspicion some roofing material was loose. Turns out, it was the aluminum drip-edge that goes under the shingles to keep out wind-driven rain. methinks this may not be repaired for awhile.


Venturing out the front door we found a massive snow drift that had formed from the winds that were howling down the 10-foot canyon of space between our home and our neighbors home. A slight breeze made snow pick up and dance over the edge of this drift as if it were a desert sand dune.


Humphrey House from the street which had been plowed. Notice the massive drift on the roof of the front porch, nearly covering up the bedroom windows.

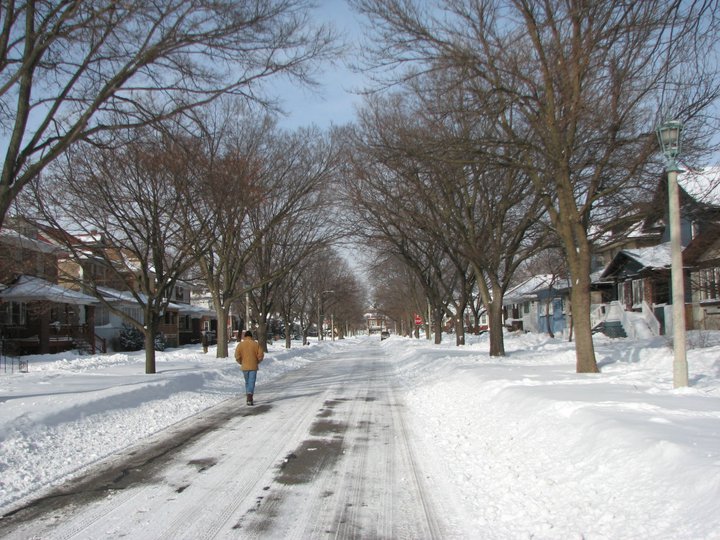
The view of our street. All pedestrians used the street for walking, and there were actually quite a few folks out today surveying the neighborhood.


Of course, what's the use in living in the snowbelt if you can't have a little fun every now and then. As Jen took this there was a distinct "Don't You Dare!!" that gave me pause from throwing the snowball.


Saturday, July 31, 2010

Happy Hops Plants

Earlier this spring I was working with a Habitat for Humanity green building project, and one of the project members and I had a discussion about growing Hops. I mentioned I'd like to do that for a type of greenscreen if nothing else, and perhaps one day get into homebrewing.

Well, later that day, the energy rater colleague happened to stop by his father's house, who had extra hops plants growing. So he dug some up. And then just happened to be near our home and dropped them off for us. What a pleasant surprise!

I managed to separate the root rhizomes into several groups, and planted them into seven containers. Some of these looked pretty sorry, but to my surprise, eventually every single one formed into a plant!

And it turns out hops plants are very excellent vertical growers. The vines are almost sticky, and want to grab ahold of anything they can - including me when I was tried to train them.

I put a few of these into a raised bed near the garage, and strung some landscape string from hooks in the garage eave to the wood frame in the bed. The hops quickly found their way up the garage as shown at right. Within a few weeks, the vines then had nowhere else to go vertically, so they started spilling over and climbing up themselves. We now have a large bunching mass of hops. And since this wall receives the most sun in our tiny back yard, the plants started forming little flowers already.Elsewhere in the yeard between us and our neighbors, I took an extra 10' section of 1/2" gas pipe and pounded it in the ground almost 2 feet, threw a Tee on it and a few short segments to create a pole stand for two other hops vines. These hops vines have also worked out quite well - these were two of the plants I was less certain would make it.

These plants are not quite flowering, but they certainly are reaching for the sky. It may not be until next year that actual hops buds are produced. But that's okay, the main idea for these is to add some color against the drab color of the neighbor's home, as this is what you see when you walk off our back porch.

I subsequently learned all these hops plants are from the Siebel Institute, a well-respected brewing academy, so I think some homebrewing will be in my future. I even had extra plants that I donated for a friend's pergola. And Chris actually has brewed beer before, so they may get put to use sooner than mine. In the meantime, we're enjoying the extra vertical greenery in our small urban yard.

Wednesday, June 16, 2010

Managing our Rainwater

For those that recall, our home has a number of rain barrels around it. Well, the ones we installed last year were great - until we had a massive intense rain event on our small urban lot. There were a series of issues that combined to cause some water to enter our basement:

  • Lots of rain - a few inches in a half hour
  • Lots of water hitting two rain barrels
  • Rain barrel overflow hose way too small to accommodate flow
  • Barrels located near our exterior basement stairs
  • Neighbor's downspouts also directed towards this area
  • Concrete step that was disintegrated, allowing water to head downhill
  • Floor drain full of leaves and debris, preventing drainage
    = Water coming in the house under basement exterior door!
Tearing apart the concrete last year helped address a number of issues such as grading and building a new concrete step. I also took advantage of this opportunity to reconfigure how our rain barrels worked. The neighbor has since directed her downspouts to keep water on her lawn, but in the meantime I came up with four solutions specifically to handle downpours:
  1. Gutter diverter
  2. Rain barrel interconnection
  3. Underground discharge
  4. Wider overflow hose
1. Gutter Diverter. I ended up purchasing one of the diverters shown at right. The great feature here is a manual lever that can send water either to the rain barrels, or to the downspout. This will allow us to divert water from entering the rain barrels when they're already full. It also is an easy way to winterize the rain barrels. My only change is instead of the final "turn-out" shown in the photo, I used a fold-up ramp that takes water to the rain barrels.

2. Rain barrel interconnection. Every set of directions I've ever seen for connecting rain barrels seems to say they should be interconnected at the top overflow hose. After our basement flooded, I thought about this and it makes no sense. If you connect two or more barrels at the bottom, they will fill up at equal rates rather than having one fill up completely and hoping the overflow works faster than any new rainwater coming in. Here's a photo showing the diversion system, as well as the two barrels (on either side of our side gate) connected in tandem. The connection hose is hidden from view behind them.


3. Underground discharge. I know I'm a nerd when I think this was a fun way to spend some time. When excavating for our bluestone pavers last year, I had the foresight to take advantage of the opportunity to dig a bit deeper, and create an overflow area for storm water that would carry it away from our our home's foundation wall. I purchased a 10' section of 4" PVC, added an elbow and a cleanout with a cap on one end (which can be capped in winter), and a Tee with access port on the other end.

After this, I connected 10 feet of drain tile (perforated tube) wrapped in landscape fabric to prevent silt infiltration, and ran it out where the old concrete sidewalk had been. All told, this runs about 25 feet away from the foundation wall.

Honestly I recognize this is excessive to accommodate overflow and way more than what most people need. Don't be scared into thinking you have to do this if you want rain barrels. We did this more because we had the opportunity. That said, you do need to have some kind of plan to take the overflow from the barrels. I highly recommend the following video showing more traditional rain barrel overflow.

4. Wider overflow hose. This particular downspout handles exactly one-half of the roof area of our home, over 1,000 square feet of surface area. In a 1" rainfall, that means we're getting 620 gallons of water! Because of the large roof area, our (2) 65-gallon rain barrels fill up after roughly 1/4 of an inch of rainfall. In heavier rains, the small garden hose overflow can not handle the volume of water coming down the downspout.

The solution? Drill a new hole and install a 1.5-inch wide sump-pump hose. If its' good enough for leaky basements, its good enough for several gallons of rain per minute. Sump-pump hoses are sold in 20' lengths. I tried searching for something shorter but then I realized that I could snake the entire 20 feet all the way through the 4" drain tile system mentioned above. This puts the overflow way out in the yard in case there wasn't enough pitch to carry the water away. For you eagle-eyed home improvement experts, the hose is connected to an old stainless steel drain fitting from one of the sinks we took out of the home.

So, with these four measures, our stormwater management system is much better engineered. As I mentioned earlier, this type of system is overkill for most homeowner's needs. But we had a confluence of events that led to a leaking basement, and we don't want to have that ever again.

The weather the last few weeks in Chicago has put this to the test as it has been raining almost every day. Our barrels are full, and the manual downspout diverter is sending excess water to the storm sewer system. And I can sleep better knowing that any water that splashes past the diverter and makes its way to the rain barrels is overflowing into the backyard, away from the basement.

Monday, June 14, 2010

Building a Planter Box

The last few months have been too busy to blog, but we're going to try and carve out specific times to update the blog to let you know all that's been happening at (mostly outside of) Humphrey House.

We'll start with something actually made before winter: A raised bed planter box in the backyard. Since our porch is a half-story off the ground (about 5'feet) and we have a small yard, we felt like we needed something to help transition the yard to the porch.

I originally had brought home used railroad ties and had planned to use those to construct the raised bed. I figured they'd be nice thick materials and provide plenty of butt space. Plus, they were quite cheap and very thick. Perfect right?

Well, as I was unloading them, I realized a lot of "stuff" was coming off. This stuff is creosote, and is what railroad ties are treated with to resist decay. After reading up and learning creosote is probably carcinogenic to people and contaminates groundwater, I realized I probably don't want to bring that onto our property, much less have people sitting on it. So, I took the railroad ties back to the store and got regular 6x6 treated lumber (ACQ, not CCA).

Anyway, because the timbers are 8 foot lengths, I planned to make a 6' x 2' raised bed, using four courses of timber to give the planter a comfortable sitting height. To start, I dug trenches a couple inches down into the soil for foundation drainage, and filled this pea gravel and sand. This made leveling the raised bed much easier as well, since there originally was a slight slope from the left to the right sides.

I laid the first course using full 8-foot lengths, and then cutting two 1'-6" pieces for the short ends. The next course would be 7' on the long sides, and a full 2 feet on the ends to stagger the joints. However, I soon realized that I was going to need something to keep these all together once they were stacked.

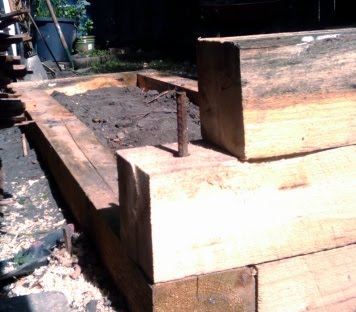
Fortunately I had a few 2'foot lengths of rebar lying around (doesn't everyone?), so I bored 3/4" holes through the corners and "persuaded" the rebar through with the help of my trusty mallet. I did the same for the second course. The third course I only bored halfway through so it was a sort of "cap" that would add support and then the rebar wouldn't be visible.

Because I imagined a 400-pound gorrila coming over and wanted to over-engineer the planter bed, I poured extra sand through a funnel down the boreholes around the rebar so it would extra be solid. I also had some galvanized steel (safe for contact with treated lumber) right-angle ties that I used on the top course to further anchor the front side of the planter to the two sides and the back side, so the entire top course is tied together. And just to be safe, I lined the sides of the bottom two courses with plastic so the AC2 chemicals stay away from the soil we put in there.

All said and done, it came together wonderfully. We now have a nice planter bed next to the porch that will be a perfect spot for herbs, veggies and flowers and an occasional butt when we're enjoying the outdoors. Here's how it looked at completion:

And how it looks now with a garden of herbs and lettuce growing in it:

Thursday, December 10, 2009

Placing Pavers

Well it took a bit of time to install (and even more time to post), but we got our bluestone pavers all in place. It wasn't easy as the shapes were mostly rectilinear, so we had to conjure up some old Tetris skills (see Dad, I told you Nintendo was good for us!). We were able to lay out a design that would blend the large stones with the small, yet have the durability to last.


We started by "cascading" the largest pavers in the high-traffic area of the back yard, near the rear stairs. These large stones are roughly 3 x 4, and quite hefty! But by offsetting each by about 6" or so, the pattern creates an optical curve from the gate towards the back yard.

We then had to reserve some large 2' x 4' stones for the walkway that connects our garage to the patio.

The pavers are not grouted or set in concrete, but instead the joints are filled with sand and stone dust. This permeable paving allows for stormwater to drain through the paved area more naturally, instead of diverting all the water to the edges of the patio. It also will be more tolerant of any movement due to freeze/thaw cycles during winter.

The colors of the bluestone pavers are a muted in these photographs of the completed job area due to the final layer of stone dust. After winter, we'll likely do a light powerwash to remain any residual surface grime. In any case, here is the completed work:


Everything wrapped up pretty nicely, and we even have a pile of remnants we may do something artistic with next year. For the time being though, we had about one nice day that we got to enjoy our patio before the weather started to really cool down. After the winter snows freeze and thaw, hopefully there will be little movement between the pavers.

Tuesday, October 20, 2009

Finding Place for Extra Dirt

Humphrey-house has been a bit of a mud pit for the last... oh five weeks or so, as we tore out the old concrete in the backyard and are putting in reclaimed bluestone pavers. It seems like years already. There has been a lot of digging, excavating, pain killers - and then - more digging. It's all a necessary evil as we prepare for a 4-inch base of gravel and 1-2 inch of sand under the pavers.

Given the small urban lot, we quickly ran into a problem though. What do we we do with all of that dirt? We had to creative. Fortunately, some landscape design wishes and our favorite holiday came in to save the day.

Ideas for Extra Dirt:

1) Create a landscape planter!
We always thought a nice raised planter bed with wide rails in front of our rear porch would be a great landscape feature. It would make gardening a bit easier, and also provide extra sitting room outside. If only we had enough dirt to fill it though... a-ha! Problem solved! Sadly, while this turned out great (and I will post about the construction later), this ended up taking only a few loads of dirt in the wheelbarrow, so other dirt solutions were needed.


2) Raise those flower beds!
We have a "peripheral" planting area that surrounds the yard. In the past, it's been unofficially defined as the line where we can't get the few blades of grass in the yard to grow further. Now, with several wheelbarrows (20+) of roto-tilled soil, we have sleek looking berms surronding the yard. The berms give a lot of depth and texture to the small space! Bonus: concrete chunks can be reused as a nice little "rock garden".


3) Make graves!
This was honestly the most fun way to place the extra dirt. We normally have a cemetery in the front yard at Halloween. but this year it got more interesting and authentic as we created fresh graves for the tombstones. Mwah -ha -ha!


Even after these efforts, we still have a fairly hefty mound we will need to deal with. Some will be used to back-fill in dirt around the edges of the patio, but we may have to craigslist it, or build a semi-raised planter for next year's veggie garden. In the meantime, we're ready to climb out of the mud and onto a patio!

Wednesday, October 14, 2009

Digging Trenches

This summer we had some drainage problems with the old concrete slab we had that was pitched towards the house. Large rainfall = water cascading down the basement walk-out stairs and seeping into the house.

We knew it had to be fixed, and preferably before winter. So after a bit of scouring, I came across a Craigslist posting for some large bluestone pavers. A great look at reasonable cost. Plus, we could finally put our patio furniture on an actual patio! A week later, I heard jackhammers across the alley and found a crew tearing up a concrete sidewalk. After short conversation and some cash, they came and removed our old sidewalk.

Now we had a nice big trench going through the yard. Could be a fun slip-n-slide if only we lived on a hill. And if it was summer. But instead, i will slowly continue to dig this out for the patio.

I'm finding its quite hard to do a siginficant landscape job like this on a small urban lot. There are piles of bluestone all over the rear, and patio furniture, grill, firepit, landscaping stuff, piles of dirt, rain barrels, potting materials and other errata that all needs to be shuffled from one area to another as work progresses. It's also really hard to dig out compacted dirt! My back is getting a good workout from this, and I can only take a little at a time.

But things will need to pick up. Chicago just got our first below freezing temps (although one year ago we set records in the 80's), so there is little time left before winter to wrap this project up. Otherwise we'll be stuck shoveling snow off the "temporary" stepping stones all winter long!

Thursday, May 14, 2009

Finally Fixing the Back Porch

Last weekend we started doing some outdoor upkeep around the yard, including the first mow of the season. Each year, I think we get more and more determined to have less and less grass. This year, we're starting a vegetable garden in the already-small backyard. And I love the idea of a "no-mow" lawn mix of groundcover wildflowers and clover for the front yard. Maybe next year?

In any case, this weekend we picked up a new "Earth Machine" composter and yet another rain barrel. Jen wonders if we have enough rain barrels, and I say, No way, there's always room for more! More on the rain barrels in another post.

It was such a nice day that our friends from Tiny Oak Park Bungalow even dropped by while I was working the yard and delivered a much welcome gift of native plants - some purple coneflowers for our front yard! We were pleasantly surprised and very grateful. They'll make a nice replacement for the dead mums that have lived in front of our house for the last six months.

Also, we've been struggling with a way to have a functional and aesthetically pleasing screen visual for the window off our back porch that overlooks the alley (a lovely view in winter). I had some lattice work temporarily attached for about a month, which worked great as screening, but seemed a little too "off" in terms of the design. I just couldn't figure out how to transition that lattice with the stairs leading up the back porch of our arts and crafts home. Here is the power of a fresh set of eyes. A friend commented that a design with more horizontal and vertical lines would complement the home a lot better and look less tacky. Duh! I felt like a ton of craftsman bricks hit me in the forehead.

So with that in mind I sketched an idea for the nearly 4-foot by 4-foot area we would like to screen. In an homage to the old kitchen wall we dismantled, we may even be able to construct this with some of the wood (yes I still have it). The design consists of adding two 2x4 vertical studs (guess what... on 16-inch centers). Then, approximately every foot, have a group of three narrow pieces of wood running horizontally. Throw in a few short vertical pieces to "tie" the groups of three together, and voila! A craftsman-zen type of porch screening that will also allow us to (hopefully) grow a climber like clematis up during the summer months. Here is a pretty lame, but effective mockup I did in Photoshop of how this might look.


Next step: doing the work, as well as finishing the painting job that got cut short last fall. And yes, we'll be fixing the lattice inconsistency under the porch as well, so things aren't quite as ghetto here at Humphrey House.

Tuesday, April 28, 2009

Reusing an Old Concrete Sidewalk

I recently re-acquainted myself with a local architect who happened to come through our home during the green home tour last fall. He's doing a renovation of a green detached garage, and told me about a neat idea he's doing that could have a place in our backyard plans.

Instead of completely demolishing an existing sidewalk to better fit our backyard design plan, we could take a saw and cut up the existing 24" wide sidewalk at intervals around every 18" or so. We could then reuse these "blocks" as really big concrete pavers set in a gravel base, as shown below (thanks to Tom for the photos).


We were warned that 18" x 24" sections 4 inches deep turned out to be really heavy, so we'd probably do a thinner section, maybe 10 or 12 high. For our yard, I think it would be neat to kind of stagger sections of concrete, similar to the recycled concrete paver design shown here.

Pros:
Reuse the existing materials on-site
Little to no need for new concrete
Better drainage for stormwater

Cons:
Labor intensive - cutting and making heavy
Winter questions - how will it hold up during snow shoveling?

As other ideas may be less feasible given our modest budget, reusing our old concrete may be a better alternative than leaving things for "next year" as we've been punting on solving the backyard dilemma for four years now. Some of the concrete we have is in really poor shape, especially the stairs leading down to the basement, and need to be fixed this summer. We'll have to seriously consider how well reused pavers would work.

Friday, April 24, 2009

Firmer, but not final, Backyard Plan

I've been meaning to post this for awhile, but here is a more refined version of our backyard plan that we're going with. Now we're starting to get a feel for the costs for redoing portions of the concrete (which need redone badly, especially near house / rear stairs).


The "Dharma patio" may or may not be feasible this year... we'll have to see. Click the image above to view a larger version of this - and kudos to Jen for the excellent digital mock-up using our original plat of survey!

Friday, March 20, 2009

Developing a Garden Plan: part 1

After the hit-and-miss plantings of the last few years, Jen and I decided that this was the year to actually develop a plan for our backyard that would incorporate many of the the things both of us desire.

  • space for a table / chairs
  • vegetable garden
  • herb garden
  • raised planters
  • gravel / porous paving areas
  • solid paving from house to garage
  • shade-friendly plants
  • perennial plants
  • firepit area
  • compost area
  • water efficiency (more rain barrels)
  • And perhaps a bit of an oxymoron - low maintenance
Of course, there needs to be a lot of compromising because we're working with an area that is effectively 22 x 30, surrounded by a fence, and most of which is shaded by a large maple tree on the north east corner of the area, as well as some very mature lilac bushes. Here is a preliminary drawing we came up with that incorporates the existing site elements with much of our "wish list" items.


After this initial step, we are now working through designing the hardscaping that needs to be done to accommodate all of these features. In addition to the soft lines of the gravel-based plan above, we came up with many other ideas for the space - rectangles, a diagonal patio, a circular theme. With the goal of trying to find a plan that best fit the small space, we have pretty much settled on the octagonal patio idea shown below.


This would ideally be pavers, but may be stamped / stained concrete too. We already need to have some concrete re-done in the left-side area of these plans. The steps leading down to the basement are crumbling, and the slab there is pitched towards the house. When coupled with a large downspout that sometimes overflows, that is a bad combination.

Also, Jennifer is a little concerned about the patio area being limiting - we like to have gatherings with friends when weather allows, and the backyard fills up fast - she's worried it will fill up even faster with a small defined patio space! So this may evolve ... we shall see.

But with a firm(ish) plan in place, we can start to look at how to go about implementing it - and what will fit within our budget.

Tuesday, March 10, 2009

Our Garden's Solar Window

One of the neat things about instructing for the Illinois Solar Energy Association is that I have access to some pretty neat tools. My friend Jim loaned me a site assessment tool that has turned out to be a pretty neat device for determining the best location for our garden.

The Acme Solar Site Assessment Tool (manufactured appropriately enough by Wiley Electronics), is a tool that basically is a camera mount that is aligned with true South, and then takes seven photos from different positions from east to west. The neat part is the software, that then brings in all of these images and plots the path of the sun across them at different times of the year. It also determines the shading, and calculates the hours of sunlight available throughout the year.

While our backyard is clearly not a useful site for solar panels, I was more concerned with ensuring that we can get at least 5 - 6 hours of sun for our vegetable garden. So I took photos from two locations in our yard - one near the garage (shown above), and one spot near the back porch of our house (shown below).


Based on these sun paths, it looks like the first location, close to our garage, will be the best location for our vegetable garden. That will receive a bit of morning light, and a healthy amount of afternoon sun. Although, in this location, we may still have to sneak a bit of tree trimming on our neighbor's tree. We may also try to put some container-based plants near the porch and see how they do. That way, we can always move them if needed.

In any case, this was a fun way to see how the sun hits our home all year round, and we also now know where the best location for solar panels would be (our roof), should we ever decide to.

Wednesday, March 04, 2009

Growing a Garden

With 20-degree weather in northern Illinois, it's difficult to think about the growing season and summer coming. But, before we know it, warmer weather will be upon us. Especially now that our USDA growing zone has been bumped up to a warmer level (Zone 6), in what I love to hear described as not global warming, but global wierding.

Since most of the major renovation projects are out of the way at Humphrey House, and we don't have much money to spend right now anyway, I'm trying something new this summer: planting a vegetable garden. Jen has grown several herbs and peppers each year in our backyard. And we're slowly getting pretty decent at this. Last year our plants were quite successful.

So for 2009, I figured it was time to leap into a full-fledged grow-your-own-food garden this year. Sort of a victory garden for self-sufficiency. After all, you can't get more local then your backyard! We're beginning by starting to grow plants from seeds ourselves. To make things easy, I picked up a seed starting kit made by a company with the deceptive and tempting name, "Jiffy". I'm hopeful that it really is *that* easy to start seeds, and the hardest part is thinking far enough in advance. We will see.

So with the help of a Mother Earth guide to growing your own food, I've started some seeds for a garden that hopefully isn't too ambitious for us:

Current seeds:
Broccoli
Onions
Eggplant
Thyme

To be joined later by:
Carrots
Tomatoes
Basil
Peppers
And maybe even some sweetcorn growing along the garage!

Coming next: Time to find and start planning space in the backyard to grow this garden!

Friday, May 30, 2008

Green Goodness


We have a lawn in back again. YAY!

Thursday, May 15, 2008

Patching in a lawn with drought tolerant grass


My feeble attempts at getting some kind of lawn in our backyard seem to be continually thwarted each year. Upon moving in, our original backyard had a massive pit full of sand in it from the Previous Owner's sandbox. Since we started working on the house, the backyard has been a massive traffic area and a natural construction staging area full of all kinds of debris and materials for our second floor remodel and kitchen renovation, ruining any attempts we make at reviving it.

Add in the fact that our backyard is small to begin with, has several tall trees and buildings surrounding it, and receives probably only 5 hours of sunlight, it seems like a continually futile battle. So futile in fact, that Jen has repeatedly said she is ready to throw in the towel and just make our backyard grass-free and turn it into a big landscaped area with pea gravel or pavers etc.

Since we still haven't decided what we're going to do with this space (we need a plan!), I am making a last ditch effort this year to once again plant grass seed. Since I want to avoid watering the lawn, I found a hardy variety of grass called tall fescue that is promised to be drought tolerant once it's established and good for cool areas and even shady spaces. After some research, this showed up as one of the "greener" species of lawn grass that would be appropriate. I especially liked this description of tall fescue:

Low maintenance. Tall fescue has excellent tolerance for heat stress and drought. It will tolerate moderate traffic and infrequent mowing. This species is not well adapted to high altitudes.

So I've sowed some seed in one last desperate attempt to salvage a grassy spot in our yard. I figure we'll eventually carve out some kind of plan out of the grass anyway, but it would be nice to have a "green" canvas to begin with. It will be interesting to see how this blends in with the existing (spotty) lawn grass, which I believe is typical Kentucky bluegrass. I'll have to get some photos up of our yard soon to show its progress.

Thursday, October 05, 2006

Serenity now, dammit

As all our visitors of late have noticed, the sanctuary of the backyard is totally gone these days, having been stripped of all green by virute of serving as storeyard for the upstairs de/construction. Apparently all that grass dutifully tended by Sara and Jason for the past year only had one good party in it. So we're growing more. We're trying to anyway, if Sam the Bunny will give us a break.

But sweet serenity has returned to the Humphrey House. At least a little. After grustling about it for a year, I finally got a move on this past weekend and cleaned off the front porch. Lovely, isn't it?


Thursday, June 08, 2006

Sanctuary


Ah ......

Who knew I was a fan of the serene outdoors? With all the chaos inside the house, I've been turning towards the natural side to feel a sense of accomplishment lately. It's feeling lovely. More pictures are posted below.
SERENITY NOW!

Tuesday, June 06, 2006