Showing posts with label framing. Show all posts

Tuesday, September 19, 2006

Fun finds never end in our home

Just because we haven't posted in awhile doesn't mean progress has not been made. In addition to dealing with a computer hard drive failure, we've been tackling minor things that need to be finished up before we drywall the attic.. I've started to refer to it this work as "trim framing." Trim framing may consist of any of the following:

  • Scavenging the scrap pile to find the magical piece of lumber that is the proper thickness
  • Scavenging in the garage for the same
  • When that fails, ripping down 2x4's on the table saw to proper thickness
  • Using old (read: non-nominal) lumber, which is thicker than today's wood
  • Shimming behind 2x4's
The idea is to have straight surfaces so the wallboard attaches to a (mostly) flat surface. Tedious work, but as they say, the devil is in the details.

We thought there were few things left for us discover in the house. Little did we know! When doing some work to add an electrical outlet in the first floor bedroom, we found a "hidden" single outlet disguised in the baseboard.
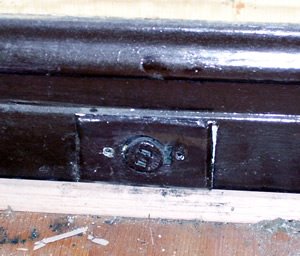
Further investigation revealed that it was a lightbulb socket!?!
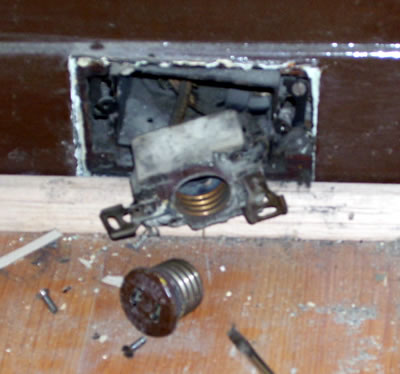
Apparently, instead of putting in a normal outlet, some previous owner thought this would be a better route. Fearing an electrical fire if this were actually used, I promptly removed the 'whip' that attached this to the power supply in the basement to disconnect it and began to remove the offending creature.

But now I wonder.. Since the baseboard is already cut up and destroyed, maybe we should just leave the light-socket-outlet-thingy in the wall (but disconnected) as a piece of personality for the house. It would also give some future owner a chance to puzzle over it as well.

Tuesday, July 18, 2006

A skeleton in the attic

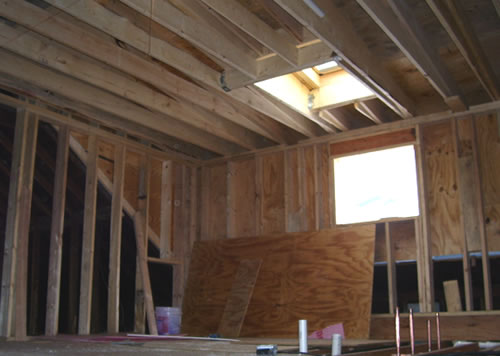
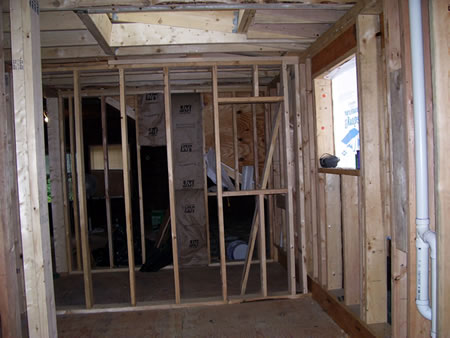
Gramma's ghost has given way to a skeleton, as sidewalls, knee walls, and ceilings emerge upstairs.
I think this is one of my favorite parts of the whole construction process. For the first time, you start to see how the plans and designs you drew up (years ago) physically take shape. No more 1/4" = 1 foot scale; this is the real thing. Three dimensions, baby!

And it allows you to come up with other ideas. Such as pocket doors to allow more space (and light) into what will be a somewhat narrow laundry room. Or laying out and framing openings for future built-ins, such as two dresser drawers in what will be the master bedroom.

Many of the interior walls are being constructed by our contractor, but Kenny and Brian came up to lose weight during Chicago's massive heat wave last weekend by working in our attic with Jay. Actually, Brian raised the ceiling framing in the master bedroom, and Kenny helped construct the knee walls and insulate the under-eave areas.

Getting the materials upstairs proved to be fun as Mark briefly stopped by at the perfect time to help Ken and Brian toss boards up through the window. This assembly line was so much easier than carrying things through the kitchen and up the stairs. Wish Mark had thought of this sooner! ;-)

Anyway, thanks to Brian and Kenny's help, we got through the long weekend, and we are nearly complete with the framing for upstairs. We're planning on having the electrician come next weekend, and it all needs to be in place by then.

Wednesday, June 28, 2006

Tuesday, June 27, 2006

A complete shell


Our dormer is now completely framed - roof and all! We have a torched-down asphalt roof (because the slope is so low), and the sides are, well, sided. We were fortunate with the weather as we only had one slight rainfall. It was actually the morning the roofers were here, but it only interrupted them for an hour.


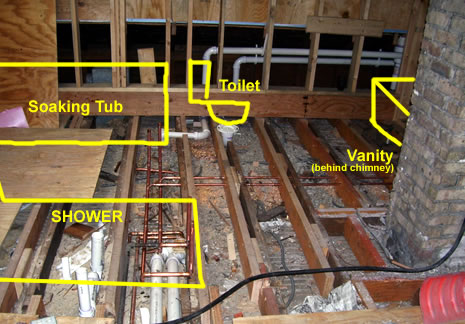
Over the weekend, Jay's stepdad came over to help install plumbing. Several hours (and plenty of glue sniffing) later, we had about 80% of the plumbing lines that we will need for our new bathroom upstairs.

Some of our initial dormer bathroom layout revolved around where we could run plumbing up and down to the second floor. This week, after a bit of analysis, we realized that there was a large unusable area we could use that was already in place... the back of the narrow closet in the first floor bath! It's 30" deep, but only 18" wide, which means most of the back is too dark and hard to get to anyway.

In addition to housing the drain pipes from above, this will likely be where we run up natural gas and AC lines for the upstairs furnace too. Fitting the pipe into the back turned out to be relatively simple, once we busted through 4" of concrete in the bathroom floors. Talk about a solid foundation for tile!! As John is fond of saying, they just don't build em like they used to!

Thursday, June 15, 2006

Who says you need a roof?

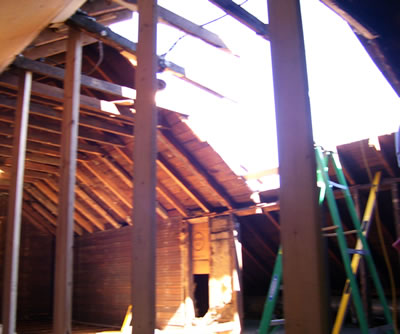
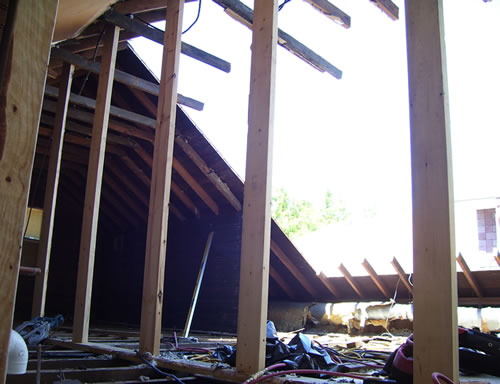
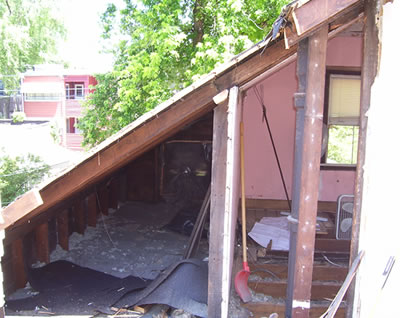
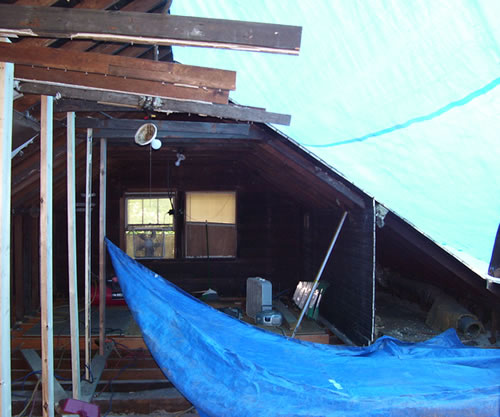
Well, they've done it. They cut open our attic roof to make way for the dormer, and it was truly a marvel to see how much a 20-foot skylight changes things. I don't know if I can fully describe in words, so I'll just post some pix (click images for larger view):

It started innocently enough by cutting the angled part of the attic roof.


Then it proceeded to a 20-foot long hole! They had to erect a temporary wall to hold up the opposite side of the roof.


Cross section of the area behind the chimney (looking East):


... And the other side of the chimney, which we discovered is in desperate need of repair. Jen is a fan of all the light upstairs, as long as it doesn't rain.


When the workers left for the day, our attic became a tinted shade of blue as they tarped off the hole. Looking up at the soothing blues almost make us forget we live amidst chaos. Almost.

Friday, June 03, 2005

Beam It Up, Scotty ...


Our man Scotty was here this week to assist in the re-construction of the basement. Back when we thought we had a pretty severe deadline (see previous posts) we had invited Scotty, an old pal of Jason's brother-in-law with a thorough knowledge of all things constructional, to come down from Wisconsin for a paid gig doing drywall and more.

As usual, we got a little ahead of ourselves.

However, Scotty did prove to be useful as hell. He and Jason did a lot of framing in the basement with Jay's newest toy, a concrete nailgun that uses actual Remington .22 caliber blanks to fire the nails into the concrete flooring of the basement. They also worked on reorganizing the garage after a shitty incident earlier in the week gave us cause to do so. More on that later.


We'll be asking Scotty to come back once we've gotten our electrical and framing inspections completed. Then he can come kick some evil bootay on the drywall. YEAH!

Thursday, January 27, 2005

Ballooning the House

After ripping down the ceiling in the basement, our suspicions were confirmed. Our house, built in 1916, was constructed using Balloon framing - not the platform framing style used today.

What does this mean? (This may sound too technical) The wall studs run all the way from the sill to the top plate in the attic. The second floor joists (our weak 2x6s) are nailed to the sides of the studs, rather than having the studs stop in a top plate and the joists sitting on those as is done today. Balloon framing was used very little after 1930 because of the difficulty of finding good, long old-growth wood pieces and the fact that balloon framing was a fire hazard.

Scott and I tested this open framing style last weekend by going up into the attic and pulling out about 4 inches of insulation on one of the exterior walls. Then, with Scott watching in the basement below, I dropped some plaster pieces down the chasm. "Ouch! Quit throwing things at me!" came floating up to me from below. Sorry Scott :)

Not only did we verify the balloon framing, this test also told us that there is absolutely no insulation between the studs of the exterior walls!! Its amazing our house stays as warm as it does on the first floor. That plaster/lath must be a good insulator (then again, we haven't received our first gas bill yet).
So I did some research on adding insulation and we are thinking about using blown-in cellulose insulation (click for details) which turns out to be:

  1. great for retro-fitting
  2. environmentally friendly (made from treated recycled newspaper)
  3. more effective than traditional insulation
  4. Most importantly, cheaper! :-)

We'll wait to do this until we start ripping out upstairs though.