
The front of our house looked so good after removing the crappy white vinyl siding last September, that Jen and I have been talking ever since about restoring the original siding back a little bit further. We considered going "all the way" down the sides, but that idea was quickly eliminated, as it would require (a) lots of work to repair the original wood siding, and (b) lots of paint (and $).
So, a happy compromise was to take the siding off just along the front porch part of the home and restoring that original wood siding. This allows us to stay within a reasonable budget (1 gal of paint) and we also don't lose the (marginal) value of the foam board insulation under the vinyl that covers the heated living area. Best of all, the house looks good from the street instead of having the wood siding in front oddly transition to white vinyl at the corner, as shown below.
 The timing to do this project is now, after the blower door test revealed that our access door connecting the basement to the front porch crawlspace was a major source of air leakage. Really not too surprising, considering how cold that part of the basement can get in winter. We decided to seal off this door permanently, and realized we could still access this storage space from the outside if we built a new door into the siding. This would actually make the front porch crawl space more usable and be a great space to store gardening pots, landscape supplies, etc.
As with many of the finer carpentry projects at Humphrey House, Kenny came up for a weekend to help with this project. Removing the siding went quite quickly, and we even found someone on Craigslist to take it away for free. During siding removal, we found the wood underneath was in really good shape,especially on the North wall. The south wall was a bit worse, but was still quite salvageable.
 We then cut an access hole for a new door to the crawl space on the south wall. The bottom piece of lumber (touching the ground) was quite dry rotted, which is really no suprise given that it was original pine, untreated and left in contact with the soil. We had to replace this board, and also "sister" brace the studs as some of them had rotted at the bottom few inches. To avoid future damage, I also dug out a trench and filled it with two layers of old 16 x 8 concrete pavers and sand before we replaced the bottom board with a pressure-treated 2x8.
It was interesting to see the porch framing was really a "skirt" in which the studs came down from above,  but were tied with a cross-beam to the main part of the house, and a support column at the corner. Of course, we had to reinforce this when we cut out the crossbeam for an access door. We put in a LVL header (leftover from the LVLs we sistered to the second floor floor joists), and beefed up the framing with supporting studs underneath this header.
Anyway, we debated how this new door should open, to the left or the right? To avoid future landscaping damage and any threshold issues, we decided that it would be best to try and get this new access door to swing UP, and we could attach it with a chain / hook to an eyelet in the wall. We also wanted to make this look unobtrusive, so we used low profile 1x4's as the trim edges, and reused the siding cut out as the finish of the door, working to line up the lines so they would match the existing siding. This was more difficult than it sounds because there were some really bad pieces of wood in this particular part of the wall. With a few pieces of old kitchen wall lathe (we don't toss anything!) as a bit of a standoff, we ended up mounting the siding on a piece of plywood and the lines matched up pretty well. A few hinges completed the job, and we now have a nice little trap door to the front porch!
Once the wood siding is repaired with some wood filler and then primed, we will paint the door the same Roycraft Bronze Green as the surrounding wall so it all blends together. Then it will be a like a secret trap door to a hidden passageway! Where one can behold bags of potting soil! Exciting, right? Well, we'll see once it's all painted.
Monday, September 28, 2009
Restoring Siding and Building a Trap Door

Wednesday, September 26, 2007


Tuesday, June 05, 2007
Nothing says Summer like Rest(oration)
Things have been quiet lately as we settle into our completed renovations upstairs. It's so nice to rediscover little things. For example, our queen-sized bed seems infinitely more spacious in our new master bedroom than it did when we had it in a tiny room in the basement (with ductwork over our heads).
And it's nice to feel some of the design decisions we made pay off so well. With summer in Chicago, we've mostly just been using our second HVAC system to keep the second floor from becoming too hot, and just Powerzoning our basement's cold air to cool the main floor. This has held up pretty well so far, unless it gets really humid out, which saves us from using both AC systems.
Also our decision to incorporate Velux daylighting suntunnels
Jen and I have discussed delving into the next major project (kitchen remodel!), and decided to postpone this until fall. We'd like to spend 1 summer NOT in the middle of a major project, and actually get to enjoy it some.
But remembering that there is no "rest" in "restoration", we will still tackle some loose ends here and there. For example, the front porch is no longer a storage area, and I was finally able to hang the 2-seater swing we purchased 2 years ago.
Other projects on the horizon include wrapping up some loose ends upstairs (trim) and installing a floor for the tiny laundry room so we can move our washer and dryer up. And I'm also planning to disconnect some downspouts and install a rain barrel to conserve water, and slow-water our garden.
Wednesday, November 08, 2006
Bringing Back Brick Walls
I admit it. I'm a sucker for masonry and exposed brickwork of any kind. When we started demolishing the 1950's finishing of our attic and found the brick chimney to be in relatively decent shape (on one side anyway) we got excited about the possibility of including that in the final design space. Then we saw uncovered more and saw how bad it had become, especially when it started swaying during the dormer construction.
Since we needed to get the chimney extensively repaired anyway, we decided to replace the mortar all the way up and down instead of just in the damaged areas. It was about twice as much space so it wasn't too much of a problem. Instead of taking the DIY route on this one though, we decided to bring in the contractors that did the dormer expansion as they had some masonry expertise. They came over one Saturday afternoon and re-tuckpointed three sides of the chimney, and boy what a difference that made!
There was only one thing left to do. See if the old brickwork would clean up to an acceptable level of presentation after water had trickled years worth of filth down the sides for god only knows how long. I wanted to try some eco-friendly cleaner on the brick, but Menards didn't have any and really wanted to do it that day, so I went with the old standby: muriatic acid. Which, basically, is hydrochloric acid.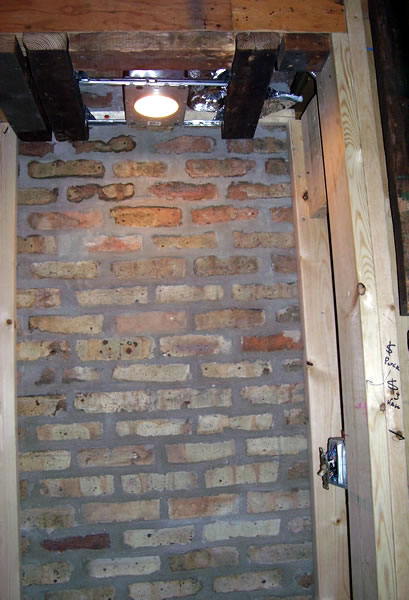 Taking great care to cover all skin (and wear goggles), I mixed 1 part acid to 4 parts water, grabbed a steel brush and a nylon brush and scraped and cleaned off one wall of the brick chimney. We wanted to at least have this one wall exposed as it will be the back wall of a niche right at the top of the stairs off the hallway. I planned to install a recessed light to highlight the brickwork and an eventual piece of artwork, so I was really hoping this would pull through.
 It began questionably at first, but I soon discovered that a first pass with the steel brush/acid mixture removed a lot of the excess mortar and heavier deposits. A second pass with the nylon brush cleaned up any residue, and after a day of drying, I couldn't believe I was looking at the same wall. It looked amazing! I went about framing a soffit and installing a recessed can and when I flipped the switch, the results were impressive. And that's without drywall on the top and sides of the niche!
Now it's on to the other two sides of the brick chimney that will be exposed in the bathroom (the fourth side will be covered by a space reserved for ductwork). If only there was more brick to expose!
Wednesday, July 12, 2006
Living Room Renaissance
Last weekend, Jen's dad came up to lend a hand with a variety of tasks. While our contractors worked on completing the subflooring upstairs, Kenny and Jay worked on tracing the path of the living room light fixture.
Backstory: After moving in, we noticed an unused electrical box with a cover on it in the center of the ceiling. Not too surprising, right? Well, the surprise was that there was no switch to be found on any of the walls. Even shining a flashlight up along the wall to look for signs of obvious patching yielded no clues (although it did show us that the arches were added after the walls were built - probably in the 50's when that was a big remodeling movement).
While we had guessed where the switch might be, we never really knew until the floor upstairs was removed. Jay was then able to trace the conduit down to one joist bay, in the wall between the living room and the foyer. We also found that this light was one of the three gas-electric lights in the house, along with the Kit and DR. How cool! (The gas lines had been removed in the basement long ago). Now we knew where the cable led to, so we just needed to find the old switch box that some Previous Owner (PO) decided to cover up.
However, it turned out that our detective work was not quite finished. To locate the box, we drilled test holes at the right height for a switch box. Didn't find anything. One of us went upstairs, shook the electrical conduit like mad while the other tried to "hear" if the box had just been pushed into the wall and was floating around in there. Nothing.
We began to question ourselves. If some PO had removed the light, there must have been a good reason, right? I mean, you don't just go about removing lights from your house, do you? Was the light leaking gas (when it was gas-powered light) or something? Was the electric line broken somewhere? Were the wires even properly taped or capped off?
Finally, we decided to start cutting a hole about 4 feet off the ground in the wall. But from the backside (our entry closet) - so at least the living room side would appear okay. Still nothing. Where could it be? We peeked upwards from the hole and were shocked to see the electrical box - about a foot up! This means that the original switch was nearly 5 feet off the ground! No wonder we found no trace of it. We can only assume the Original Owner must have wanted this for some reason. Maybe so kids wouldn't play with the gas-lights or something. Or maybe they just ran out of conduit.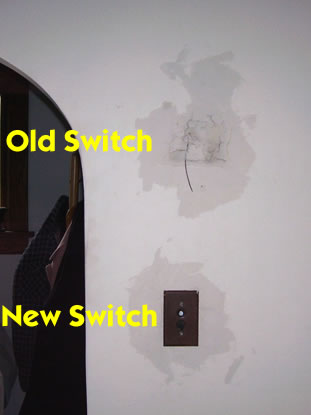 Anyway, we eventually got a new box installed at a normal height, tested the circuitry (it was all in good shape), patched our holes, and attached a vintage-looking light fixture that Jen and I had found at a demolotion sale last year. And guess what? It fits the style of the room perfectly! Which leads me to wonder, why did some PO remove the wall switch?


 Posts


