
This blog post is a bit delayed, but we finally have some new floors to rave about! Years after moving - far more than expected - we finally ditched the old teal green carpeting and now have some wonderful stained floors in the home.
With the help of our friends at Green Home Experts, we tried several different color samples of a product called Rubio Monocoat. This is a single-application floor stain and finish that does a fantastic job of making the floors in our house pop like never before. Best of all, the product doesn't have any noxious off-gassing like traditional polyurethane, and it has no harmful chemicals.
We went with Rubio's color "Black." I know what you're thinking, "Who wants black floors?!?" but the reality is this doesn't paint the entire floor black, it ends up staining the wood grain black and the surface of the wood a rich dark color. Just see the closeup on Rubio's web site to see what I'm talking about. The oil was applied by hand along the room edge and then with a floor buffer throughout the rest of the floor to give a nice finish. Working with the product is a little different as you need to work in an area within 15 minutes so the oil doesn't dry too much. But there is just one application of the oil that is needed.
 Usually there are no repeat visits, but we learned a lesson on this. You see, the paint turned out so nice in the Living Room that we decided to the Dining room too after the floors were done. Learn your lesson here from our mistake: No matter what you do and how tempted you are, wait until EVERYTHING else is done before finishing floors.
Because Rubio Monocoat is a natural oil it takes a while to dry. It needs 36 hours of drytime to be walkable, and three weeks to fully cure and dry out. The painting and sanding required in the dining room ended up getting dust into the crevices of the not-quite-dried floors, resulting in a hazy finish. But a few drops of oil on a floor buffer corrected the issue. The bad part is it required another 36 dry time and cure time.
Overall though we are quite happy with the way things turned out. In fact the color matched the floor trim very well, and made the built-in trim and mantel appear a bit too muted, so I grabbed an old cloth and some linseed oil and cleaned up the existing wood too so everything now has a nice rich luster. I also debated stripping the old paint off the fireplace, but time is a luxury right now, so we put a coat of a nice rich gray over the painfully boring white, which blends in nicely with the new green-blue walls and dark floors. And, until some other thing strikes our fancy, I think we can call this room "done!" For the time being.
Tuesday, June 14, 2011
Finished Floors!

Thursday, May 19, 2011
Finally Redecorating the Living Room
In our remodeling journey, the overall motivation here is to refinish the floors before baby comes and soon begins crawling on them, but first, we have to fix the walls and ceiling and paint them. You see, the living room has been left mostly how we found it upon taking ownership of Humphrey House. There have been a few small changes, but nothing major. There were however several things needed:
- We had long ago removed an air duct due to structural concerns, but never patched the hole.
- The thermostat needed moved out of our dining room into the living room
- The ceiling needed some serious patch attention after a work above
- We never were able to insulate above/below the bay windows (finished a day ago).

Deciding on paint was an interesting experiment that involved many trips to our local Benjamin Moore store for samples. It was interesting to learn that they are slowly phasing out all high-VOC paints, so all of their paints for indoor use will soon be low or zero-VOC. We will be using the Benjamin Moore Natura line which is zero-VOC paint to keep our indoor air healthy, especially with a pregnant woman in the house. But we eventually settled on a color called Silver Minx for the walls in the Living Room.
Brandon's crew came and did some great work, and painted the ceiling a flat white, the ceiling trim (already painted) a semi-gloss white, and the walls the green/blue. Someday it would be nice to strip the crown molding in this room down to the original wood and refinish it, but now is not the time so we reluctantly added another layer of paint to it.
The wall paint color is interesting - it appears light blue in daylight, but changes to light green at night. Pretty neat.


In this last photo, you can compare the wall on the left with the first photo in this post above and see that the gaping hole where an air duct used to be is now patched in. I actually spent an evening using SOY-Gel stripper
 , a nice product that performed well. I had some pieces of matching trim from the old kitchen in the garage (thank god I saved them). One coat of the stripper and a few hours later, the layers of paint easily came off. It still took a fair amount of time to scrape the boards in detail and clean them to be stained, but this made patching the wood where the air duct used to be pretty easy for the Sustain-a-building crew.
At long last, the Living Room is ready for the finish flooring.
Wednesday, May 18, 2011
The Whirlwind Continues with Flooring
Yes, getting ready for baby is in full swing here at Humphrey House, which means any activity that may cause or contribute to creating dust needs to be done NOW before baby comes and is soon crawling around licking the floors.
So the next rooms on our whirlwind finishing of Humphrey House is to tackle the Living Room and Dining Room. Sustain-a-building came out and helped us once again by insulating the walls with blown-in cellulose above and below the massive 10-foot wide bay window in the living room. This area always gets so cold in winter time and having something in the walls other than the dead air space that has been there for the last 100 years will certainly help.
In the photo below, you can see the holes cored to blow in the cellulose insulation above and below the bay windows, and also Cosmo kitty saying goodbye to carpet.
 The carpet that the home's PO had installed before we moved in finally had to go. We have effectively treated this carpet like a dropcloth for years, knowing that someday we would be taking it up and refinishing the beautiful hardwood floors beneath. Well, no time like the present!
Pulling up a seam in a high traffic area near the hallway, we found that the floors underneath look to be in remarkably good condition. I expected to find a clawed, scratched floor similar to the maple that was in the kitchen, but no, these were in great shape.
Oh well, we had already decided to sand them down anyway, so out with the old!


Once the old surface was sanded, we got to see some gorgeous graining in the floors. These are super nice and we are very fortunate to have them in such good condition after a century. It looked like this was just the first time they had been sanded too! Hopefully you get an idea of the grain from the closeup below (Bonus points for anyone who IDs the book Jen chose to block off the heat duct).

The grain will show up nicely as we're planning on a dark finish of Rubio Monocoat, a product which actually penetrates and bonds with the wood to create a durable surface. From the manufacturer, "Monocoat all-natural oil wood floor finishes are plant-based, VOC-free and completely non-toxic oil finishes of extraordinary durability."
But first, we need to have Sustain-a-building come and paint!
Tuesday, December 23, 2008
Happy Holidays at Humphrey House
Having passed significant remodeling milestones this year (i.e. having a working kitchen), we've found Humphrey House has become a wonderful home to host our families over the holidays. It started on Thanksgiving with Jen's parents and Jay's mom's family all coming over for dinner. The event went so well (and comfortably fit twelve adults and five children) that we invited everyone back for an early Christmas last weekend (actually, on the solstice last Sunday). It's funny how well some of the decorations we purchased several years (and apartments) ago work so well in our home, especially around the fireplace in the living room and bay window in our dining room. They look like they were meant to be, resulting in displays that Martha Stewart would even be proud of!
The best part of the photo above is our fireplace. Shortly after purchasing the house, we learned that the chimney lining was missing several flue tiles. Unless we wanted creosote build-up to catch fire and burn down the house (which was tempting at various times in the past four years), using the fireplace is just too dangerous until the chimney is either relined or upgraded with a pellet fireplace insert.
Anyway, as we took our Christmas decorations out of storage and tested light strands, we found one balled up strand that was flickering white lights. Sudden inspiration struck Jen, and she put the ball of lights behind the fireplace screen, which instantly transformed the hearth from a black hole into a darn-near-perfect representation of fire. I still occasionally find myself caught off-guard the flickering out of the corner of my eye and wondering why the room isn't warmer!
After a few years putting decorating on hold, Humphrey House is very thankful for finally being done up for Christmas. It's been so good in fact, that Santa came by a bit early to wish us and our blog readers a Merry Christmas!
Wednesday, July 12, 2006
Living Room Renaissance
Last weekend, Jen's dad came up to lend a hand with a variety of tasks. While our contractors worked on completing the subflooring upstairs, Kenny and Jay worked on tracing the path of the living room light fixture.
Backstory: After moving in, we noticed an unused electrical box with a cover on it in the center of the ceiling. Not too surprising, right? Well, the surprise was that there was no switch to be found on any of the walls. Even shining a flashlight up along the wall to look for signs of obvious patching yielded no clues (although it did show us that the arches were added after the walls were built - probably in the 50's when that was a big remodeling movement).
While we had guessed where the switch might be, we never really knew until the floor upstairs was removed. Jay was then able to trace the conduit down to one joist bay, in the wall between the living room and the foyer. We also found that this light was one of the three gas-electric lights in the house, along with the Kit and DR. How cool! (The gas lines had been removed in the basement long ago). Now we knew where the cable led to, so we just needed to find the old switch box that some Previous Owner (PO) decided to cover up.
However, it turned out that our detective work was not quite finished. To locate the box, we drilled test holes at the right height for a switch box. Didn't find anything. One of us went upstairs, shook the electrical conduit like mad while the other tried to "hear" if the box had just been pushed into the wall and was floating around in there. Nothing.
We began to question ourselves. If some PO had removed the light, there must have been a good reason, right? I mean, you don't just go about removing lights from your house, do you? Was the light leaking gas (when it was gas-powered light) or something? Was the electric line broken somewhere? Were the wires even properly taped or capped off?
Finally, we decided to start cutting a hole about 4 feet off the ground in the wall. But from the backside (our entry closet) - so at least the living room side would appear okay. Still nothing. Where could it be? We peeked upwards from the hole and were shocked to see the electrical box - about a foot up! This means that the original switch was nearly 5 feet off the ground! No wonder we found no trace of it. We can only assume the Original Owner must have wanted this for some reason. Maybe so kids wouldn't play with the gas-lights or something. Or maybe they just ran out of conduit.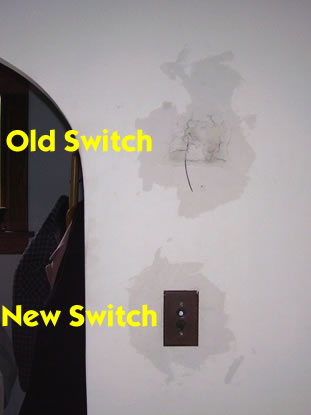 Anyway, we eventually got a new box installed at a normal height, tested the circuitry (it was all in good shape), patched our holes, and attached a vintage-looking light fixture that Jen and I had found at a demolotion sale last year. And guess what? It fits the style of the room perfectly! Which leads me to wonder, why did some PO remove the wall switch?
Friday, June 16, 2006
The price for level floors
Well, our crew is halfway done with our floors upstairs. Some of the problem areas (such as above the living room) are already framed with the new LVL joists, and there is some temporary plywood sitting on top of them. Without the floor even being finished, there is already a noticeable difference in our floors. You can actually walk across the "room" without feeling like you're walking in a bowl like it used to feel!
Quite refreshing, to be honest. Especially since this is where our bedroom will be. The key to this whole system was lifting the existing floor from below into a quasi-level state with some house jacks.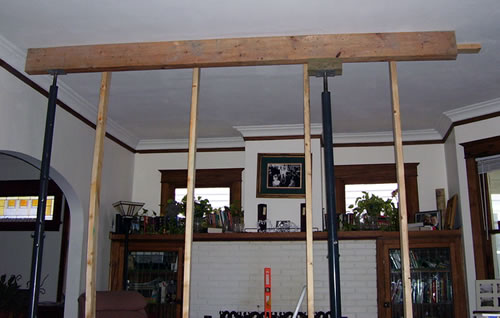
The old floor was so far out of whack that we lifted approximately 2 inches at the center of the celing beneath! The new joists are sistered to these old joists, and span the whole length of the room, so they will effectively be holding up the original joists when we release the jacks.
All this, and only 2 small crack in the ceiling's plaster. Other rooms in the house, however, were not as fortunate. A small hole has developed in our first floor bedroom from a dropped (tool? foot? lumber?). Other cracks or smaller holes are evident throughout the other rooms on our first floor. The biggest thing may be the lighting fixtures in our DR and Kit, which dropped down while Jen was making lunch the other day! Thankfully the ceiling fan was OFF, otherwise she may have been beheaded!
Our home is sadly an official hard-hat area now. :(

 Posts
Posts


