Showing posts with label porch. Show all posts

Wednesday, February 02, 2011

Photos of Chicago's Blizzard of '11

At Humphrey House, it's been a relatively uneventful winter - until today. At about 2:30 AM yesterday Feb 1, we started getting snow and howling winds (40-50 mph) and it didn't let up until 10:00AM today. When it was all over, it was the third-snowiest day on record with 20.2" totals. However, due to the high winds, there is hardly any snow on the roofs of any buildings - it all was blown onto the ground creating massive drifts.

In any case, here is our little snapshot into the world.

During the blizzard this morning the backyard was whited-out...
...and the winds had caked the front windows. Cosmo kitty says, "I wanna play out there!"


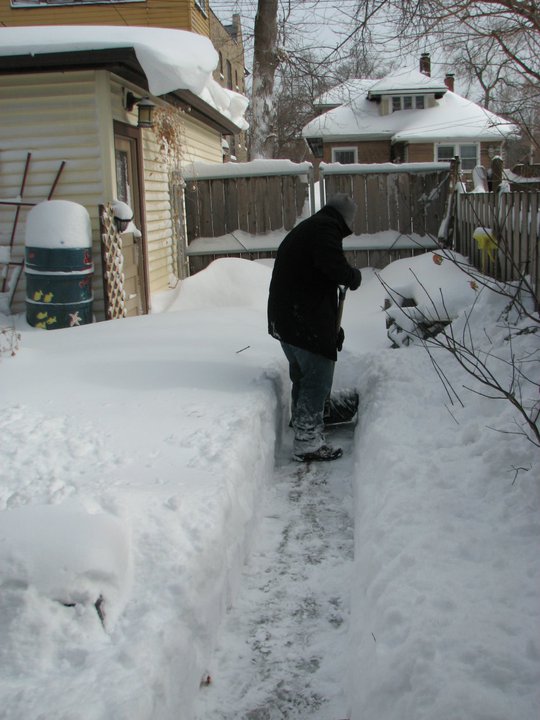
By noon, the snow had left and we ventured outside to find the backyard resembling a snowsea with frozen waves and currents.


Time to shovel a path. We went to the garage first so I could get a yardstick.

Overhanging the entrance door to the garage we discovered there was a new awning, perhaps put there to protect us from the elements?


The drywall T-square was the perfect device to plop in various places to judge the depth of the snow. No, your eyes aren't deceiving you - half of the four-foot tool is missing as the snow in the middle of the yard was 22" deep.


During the winds last night, we heard a clanging in the upper bedroom in back of the house. I had a sneaking suspicion some roofing material was loose. Turns out, it was the aluminum drip-edge that goes under the shingles to keep out wind-driven rain. methinks this may not be repaired for awhile.


Venturing out the front door we found a massive snow drift that had formed from the winds that were howling down the 10-foot canyon of space between our home and our neighbors home. A slight breeze made snow pick up and dance over the edge of this drift as if it were a desert sand dune.


Humphrey House from the street which had been plowed. Notice the massive drift on the roof of the front porch, nearly covering up the bedroom windows.

The view of our street. All pedestrians used the street for walking, and there were actually quite a few folks out today surveying the neighborhood.


Of course, what's the use in living in the snowbelt if you can't have a little fun every now and then. As Jen took this there was a distinct "Don't You Dare!!" that gave me pause from throwing the snowball.


Monday, June 14, 2010

Building a Planter Box

The last few months have been too busy to blog, but we're going to try and carve out specific times to update the blog to let you know all that's been happening at (mostly outside of) Humphrey House.

We'll start with something actually made before winter: A raised bed planter box in the backyard. Since our porch is a half-story off the ground (about 5'feet) and we have a small yard, we felt like we needed something to help transition the yard to the porch.

I originally had brought home used railroad ties and had planned to use those to construct the raised bed. I figured they'd be nice thick materials and provide plenty of butt space. Plus, they were quite cheap and very thick. Perfect right?

Well, as I was unloading them, I realized a lot of "stuff" was coming off. This stuff is creosote, and is what railroad ties are treated with to resist decay. After reading up and learning creosote is probably carcinogenic to people and contaminates groundwater, I realized I probably don't want to bring that onto our property, much less have people sitting on it. So, I took the railroad ties back to the store and got regular 6x6 treated lumber (ACQ, not CCA).

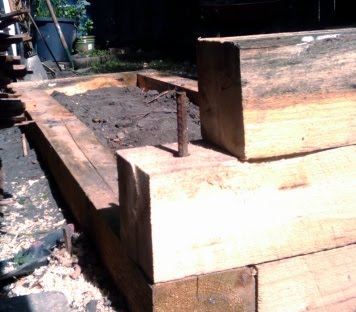
Anyway, because the timbers are 8 foot lengths, I planned to make a 6' x 2' raised bed, using four courses of timber to give the planter a comfortable sitting height. To start, I dug trenches a couple inches down into the soil for foundation drainage, and filled this pea gravel and sand. This made leveling the raised bed much easier as well, since there originally was a slight slope from the left to the right sides.

I laid the first course using full 8-foot lengths, and then cutting two 1'-6" pieces for the short ends. The next course would be 7' on the long sides, and a full 2 feet on the ends to stagger the joints. However, I soon realized that I was going to need something to keep these all together once they were stacked.

Fortunately I had a few 2'foot lengths of rebar lying around (doesn't everyone?), so I bored 3/4" holes through the corners and "persuaded" the rebar through with the help of my trusty mallet. I did the same for the second course. The third course I only bored halfway through so it was a sort of "cap" that would add support and then the rebar wouldn't be visible.

Because I imagined a 400-pound gorrila coming over and wanted to over-engineer the planter bed, I poured extra sand through a funnel down the boreholes around the rebar so it would extra be solid. I also had some galvanized steel (safe for contact with treated lumber) right-angle ties that I used on the top course to further anchor the front side of the planter to the two sides and the back side, so the entire top course is tied together. And just to be safe, I lined the sides of the bottom two courses with plastic so the AC2 chemicals stay away from the soil we put in there.

All said and done, it came together wonderfully. We now have a nice planter bed next to the porch that will be a perfect spot for herbs, veggies and flowers and an occasional butt when we're enjoying the outdoors. Here's how it looked at completion:

And how it looks now with a garden of herbs and lettuce growing in it:

Tuesday, October 20, 2009

Finding Place for Extra Dirt

Humphrey-house has been a bit of a mud pit for the last... oh five weeks or so, as we tore out the old concrete in the backyard and are putting in reclaimed bluestone pavers. It seems like years already. There has been a lot of digging, excavating, pain killers - and then - more digging. It's all a necessary evil as we prepare for a 4-inch base of gravel and 1-2 inch of sand under the pavers.

Given the small urban lot, we quickly ran into a problem though. What do we we do with all of that dirt? We had to creative. Fortunately, some landscape design wishes and our favorite holiday came in to save the day.

Ideas for Extra Dirt:

1) Create a landscape planter!
We always thought a nice raised planter bed with wide rails in front of our rear porch would be a great landscape feature. It would make gardening a bit easier, and also provide extra sitting room outside. If only we had enough dirt to fill it though... a-ha! Problem solved! Sadly, while this turned out great (and I will post about the construction later), this ended up taking only a few loads of dirt in the wheelbarrow, so other dirt solutions were needed.


2) Raise those flower beds!
We have a "peripheral" planting area that surrounds the yard. In the past, it's been unofficially defined as the line where we can't get the few blades of grass in the yard to grow further. Now, with several wheelbarrows (20+) of roto-tilled soil, we have sleek looking berms surronding the yard. The berms give a lot of depth and texture to the small space! Bonus: concrete chunks can be reused as a nice little "rock garden".


3) Make graves!
This was honestly the most fun way to place the extra dirt. We normally have a cemetery in the front yard at Halloween. but this year it got more interesting and authentic as we created fresh graves for the tombstones. Mwah -ha -ha!


Even after these efforts, we still have a fairly hefty mound we will need to deal with. Some will be used to back-fill in dirt around the edges of the patio, but we may have to craigslist it, or build a semi-raised planter for next year's veggie garden. In the meantime, we're ready to climb out of the mud and onto a patio!

Tuesday, June 02, 2009

Building a Prairie-styled porch screen / trellis

Mention you have a home in Oak Park, and inevitably you are asked if it is near or similar to the many Frank Lloyd Wright homes in the area. The fact is, he had nothing to do with our home, or most of those in our neighborhood. Nevertheless, Humphrey House took one step closer to emulating the famous prairie-style architect this weekend.

Ever since our kitchen remodel, we noticed that one of our windows that brings in tons of daylight also allows unwanted views from our alley. While we do have blinds, I wanted to create a visual screen using one of the existing support posts on our rear porch, and thought a trellis to grow vines up during summer would be a fantastic solution. A homegrown green screen, of sorts.

After purchasing and temporarily hanging some typical diagonal criss-cross lattice, Jen and I both were underwhelmed. It seemed to clash too much with the rest of the porch and there was no clear place to transition it. Enter our friends from Tiny Bungalow, who stopped by to visit one Saturday, and mentioned that a screen could be made out out of spare wood, emphasizing horizontal and vertical lines, which would better compliment the home. Duh! This should have been plainly obvious, but just one of those mental block things we had.

Fortunately, under the porch, I still had a stash of old wood lathe and even some old growth pine 2x4s from the kitchen wall we wrecked on the Today Show, and I realized that creating a screen trellis would be the perfect homage! The space was 4' x 4', and could even be framed with studs 16-inches on center, just like the wall we had torn down.

Onto the design. I knew horizontal lines would be important, and Jen (a designer) always emphasizes the "rule of three". So I figured 3 groups of 3 pieces of lathe would be the foundation of the design. Once this was in place, the top and bottom were too open, so I played with a few layouts and settled on a 1-2-1 piecing. After painting and hanging all the wood, it looked great, but still a bit too sparse.

It was time to figure out some vertical arrangements. I originally planned to bisect the groups of three with short vertical pieces. But this ended up looking too.. eh, formulaic? I played with other designs, doing them in X shape, a diamond shape, but it just didn't look right. I went inside to see the view from the kitchen area, and examined how the rear door's stained glass was done. Then I realized that by partially spanning the groups of three on the trellis to connect one group with the other, I could create a much more organic-looking design. I also remembered that Frank Lloyd Wright's stained glass work often mirrored the prairie grasses and plants, so I tried to figure out how to achieve that. After all, we planned to grow plants up it half the year anyway. I started with a tight group of vertical pieces, representing "leaves" of a plant, which then open to the wider "flowers" of a plant, shown in the image below.

Ultimately, things came together quite stunningly. This is now a very striking addition to our backyard, and I daresay even a focal point of the home when viewed from the rear. Complimented by some nifty little lanterns and soft colorful lighting put up by Jen, our rear porch finally has a welcoming feel to it that draws the eye and body outside. A truly remarkable transformation. Thanks for the inspiration, TinyBungalow! And to Jen, Scott, and Julie, who all were on hand to help me shape and give feedback during the process! And thanks Mr. Wright for your timeless influence!


I added one final artisanal touch that may be hard to notice from the photos here. The very top piece in the middle section has a complete circle from a knot in the wood, perfectly centered in the lathe, and the very bottom piece of lathe has a half-circle in it. From sun to moon, we now have a beautiful arts and crafts influenced screen trellis built into our porch.

Now, I just need to resist the temptation to create other designs with all the other pieces of lathe we have stored under the porch...

Thursday, May 14, 2009

Finally Fixing the Back Porch

Last weekend we started doing some outdoor upkeep around the yard, including the first mow of the season. Each year, I think we get more and more determined to have less and less grass. This year, we're starting a vegetable garden in the already-small backyard. And I love the idea of a "no-mow" lawn mix of groundcover wildflowers and clover for the front yard. Maybe next year?

In any case, this weekend we picked up a new "Earth Machine" composter and yet another rain barrel. Jen wonders if we have enough rain barrels, and I say, No way, there's always room for more! More on the rain barrels in another post.

It was such a nice day that our friends from Tiny Oak Park Bungalow even dropped by while I was working the yard and delivered a much welcome gift of native plants - some purple coneflowers for our front yard! We were pleasantly surprised and very grateful. They'll make a nice replacement for the dead mums that have lived in front of our house for the last six months.

Also, we've been struggling with a way to have a functional and aesthetically pleasing screen visual for the window off our back porch that overlooks the alley (a lovely view in winter). I had some lattice work temporarily attached for about a month, which worked great as screening, but seemed a little too "off" in terms of the design. I just couldn't figure out how to transition that lattice with the stairs leading up the back porch of our arts and crafts home. Here is the power of a fresh set of eyes. A friend commented that a design with more horizontal and vertical lines would complement the home a lot better and look less tacky. Duh! I felt like a ton of craftsman bricks hit me in the forehead.

So with that in mind I sketched an idea for the nearly 4-foot by 4-foot area we would like to screen. In an homage to the old kitchen wall we dismantled, we may even be able to construct this with some of the wood (yes I still have it). The design consists of adding two 2x4 vertical studs (guess what... on 16-inch centers). Then, approximately every foot, have a group of three narrow pieces of wood running horizontally. Throw in a few short vertical pieces to "tie" the groups of three together, and voila! A craftsman-zen type of porch screening that will also allow us to (hopefully) grow a climber like clematis up during the summer months. Here is a pretty lame, but effective mockup I did in Photoshop of how this might look.


Next step: doing the work, as well as finishing the painting job that got cut short last fall. And yes, we'll be fixing the lattice inconsistency under the porch as well, so things aren't quite as ghetto here at Humphrey House.

Thursday, October 05, 2006

Serenity now, dammit

As all our visitors of late have noticed, the sanctuary of the backyard is totally gone these days, having been stripped of all green by virute of serving as storeyard for the upstairs de/construction. Apparently all that grass dutifully tended by Sara and Jason for the past year only had one good party in it. So we're growing more. We're trying to anyway, if Sam the Bunny will give us a break.

But sweet serenity has returned to the Humphrey House. At least a little. After grustling about it for a year, I finally got a move on this past weekend and cleaned off the front porch. Lovely, isn't it?


Friday, September 01, 2006

Welcome To Humphrey House University ...

Looks like this weekend is gonna be a worker after all. Our previously scheduled plans to celebrate Jay's dad's b-day have been scrapped due to dog fungus - yes, you read that right - so we've got a three-day weekend to fill. Since I've been on house hiatus for a while now, I think this weekend will serve as a good educational tool for me. Classes planned include:

  • Experiments in Drywall 201 - I passed Drywall 101 during the basement phase, so I should be ready to learn a bend. Of course, I realize I passed only because I was the sole girl, and because at least I didn't do what Scott did on his first sheet and put the drywall on backwards. Regardless, we've created these little glass block niches (we just like our glass block, dammit) that we need to wall in. However, we don't have the lovely screwguns like before so it may not be as much fun ...
  • Studies in Shower Scenes & Toxic Fumes - For too long, we've lived with a bizarre situation: A wood-framed window painted shut in the shower. While I no longer feel (too) self-conscious showering in front of a five foot window that's five feet from my neighbor's living room windows, the lack of ventilation in this, our only bathroom, has been suffered through too long. Having to wait an extra ten minutes after waiting for the bathroom all morning just isn't working. The window must be replaced! We've got a glass block window, complete with vent, ready to go - just haven't had the time or focus or whatever. Bring on the tile destruction! Let's go!
  • Fun With Screening - I had to re-screen a window when I was in college and my sublettee's son played with razorblades and hacked out pieces of my screening to spell out his name (at least the first two letters before he got bored). So this is more of a refresher course. I want to rescreen the windows on the front porch so we can open them all, not just one. It'll be fall soon, and I'm so looking forward to that breeze blowing through the porch into the living room with yellow leaves falling outside. Which brings me to ...
  • Organizing Your Life For The Clutter-Prone - I've taken this class many many times, thank goodness repeats are allowed. The front porch needs some serious attention. After all, Halloween is coming, and how can I be expected to maintain our "Halloween House" status if the front porch is covered in boxes of Care Bears, weight benches, old purses and my art supplies?
Hope I graduate soon ...

Thursday, April 20, 2006

Now that's a right proper back porch ....


Happy with no teeth
Happy here in hibernation
Slurpin' on a peach
Starin' at the situation
Kitty at my foot
Meowin out a conversation
Rocking back and forth
That's my only destination
- from "Back Porch" by Presidents of the United States of America

That's right, folks. Since as far as the top floor goes we're kinda stalled out like the old zeldamobile at a four way stop until we get some contractor quotes, we decided to look for other ways to occupy our time.

RING RING RING. 9am Saturday morning. "Hey guys, it's Julie. You got anything I can smash? I'm in a smashy mood."

I eye the back porch through the grogginess of half-awaketown, and say "Sure. Bring a hammer."

Viola .... DESTRUCTION, properly sanctified by the fact that it's a 100+ year old porch in need of some serious attention. Like, now. So thanks, Julie, for kicking the porch screen's ass into oblivion. That, and for the Brokeback Mountain. :)

While it's still a far cry from finished, at least we got it started!!!