
It's FINALLY really coming together. The cabinets were hung with care on Saturday by Jason, Kenny (aka Dadoo), Jen's brother Matthew and our dear friend Mark. They look incredible. Jennifer & Amy assisted by being bossy and rather uncharacteristically laid back (truth be told they worked on wedding plans most of the day for the upcoming Jackson-Zientarski nuptials). But who, you ask, is the adorable (albeit short) red-headed fellow peeking out from the sink cabinet depths? It's Daniel, our nephew (Matt's 18 month old son), who made sure to test the durability of our cabinets (and his own as well - we need kid-sized hard hats in this house). Check our photos from the weekend below! They look amazing, I can't believe how happy I am!
Showing posts with label cabinetry. Show all posts
Showing posts with label cabinetry. Show all posts
Tuesday, January 15, 2008
Cinnamon Spice Makes EVERYTHING Nice

Thursday, January 10, 2008
Color Me Svelte ...
Well, our kitchen, anyway. We finally settled on paint colors AND countertop choice - YAY! David Gulyas (see post below) brought over the complete Sherwin Williams collection for us to go through with large swatches for each, which was overwhelming but ultimately fun. David coached us through some good color selections. We went back and forth quite a bit, whittling it down to our final choices, but finally have a full palette for the kitchen. Check it out!
We ended up getting the paint matched elsewhere - SW is a little pricey for our dear little pocketbook. (Jay, wanna post about the horrors and the goods?) We're finishing priming this evening, and then Jason's sister graciously offered up her mad skills (and that of her beau) to paint on Friday, which means we'll be ready for hanging the cabinets this weekend! Things are finally coming together, and I just can't tell you how excited I am!!!!
Tuesday, January 08, 2008
Using a Water Level to Overcome Uneven Floors
One of the challenges fun things about living in a 100-year old home is trying to make something level on the original floors. This is no easy task when you sometimes feel as though, while standing in place, one foot is cooler than the other due to its higher altitude. If this sounds scary, just imagine trying to install a 10-foot run of cabinets across these peaks and valleys so that the faces of the cabinets all line up cleanly, and don't resemble something that belongs on the Earthquake ride at Universal Studios.
I have honestly been struggling with approaching this for awhile, but now that we've removed the old vinyl flooring (and its excessively fastened underlayment), we have to confront the issue. To my initial shock, our kitchen designer, David, had a simple solution: water. Even more elegantly, water: in a long tube. The concept is similar to the familiar bubble seen on most carpenter's levels, but works even better for multiple data points. There are ways to do this by yourself that involve a bucket, but it's even quicker (and simpler) with two people. In between playing gigs at CBGB years ago, David spent his days as a carpenter remodeling apartments in New York, and had worked on many floors in much worse shape than ours. David offered to help us create a benchmark using a water level last weekend, and we started by taking about 20 feet of clear tubing and filled it most of the way with water. David went downstairs and capped the end of the tube with his thumb while I filled the tube most of the way with water (we left about 5 feet of air). Then we grabbed both ends and draped the middle off our balcony (so the tube was in a long U shape), to get rid of any air bubbles. As tiny air bubbles slowly rised (with help from us tapping the tube), the two water levels became closer together until they were finally level. Then we went back inside to our kitchen.
On the wall with the cabinets, we decided to arbitrarily make a benchmark measurement at a 40" height at what seemed like the highest point in the room. At this height, once we snap a chalkline for our benchmark all around the room, we can see where the peaks and valleys are on the floor. Additionally, we will be able to simply measure down from the benchmark line to mark the top of the base cabinets, and measure up to mark the bottom of our upper cabinets. We marked that first location's position at 40"with a pencil and I stayed at that initial point as David moved along the walls. At each corner, David would hold up his end of the tube and move it up or down as I kept my end of the tube stationary. The water line would move up and down at first, but once it stopped moving, David marked the water's level on the wall.
 After the first line had two points, we both simply capped our ends of the tube to avoid spilling any water, and David moved along to another point along the wall. We did this along each wall with at least two points (sometimes more if an obstruction might get in the way of a straight line). Once we were done, we snapped a chalk line, and voila! Truly level benchmark!
 Only one mishap occurred. As I was explaining this process to Jen, I realized that for a few of our marks, I had not taken my thumb off the tube to let the air escape and the water equalize! So we had to back and redo a few marks that were too high. Listen up kiddies and don't do what I'm doing in the photo here - air and water must mix for a level! It's a good thing we discovered that now instead of after lifting and mounting the cabinets.
Anyway, thanks to David, we now have a point of liftoff for the cabinets to be installed. And just in case we need it again in the near future, I capped both ends of the tube and hung it in the basement (perhaps a picture rail?). Hopefully we'll be trying for the cabinet install next weekend.
Thursday, January 03, 2008
Countertops and Color Schemes
Let the kitchen decorating begin! Over the holidays we managed to get the walls up and prime them to be ready for decoration. We're currently having the original maple floors patched where the rooms were combined and refinished by the fine gents at Elm Floor from Elmwood Park who came highly recommended to us. That leaves us time to decide things that, in all honesty, should have probably been done a long time ago. Well, it was hard to visualize how the space and colors will be working together until we had a blank canvas. While browsing many kitchen design photos, we noticed that light cabinetry generally is paired with dark countertops, and dark cabinetry generally has lighter countertops. Since we already have elected to go with dark cherry cabinets (currently taking up residence in our living room), we thought we were pretty well pigeoned into a light coutnertop. Besides, its a small space, and we didn't want too many dark colors to become overwhelming and claustrophobic. Another plus is that a lighter surface doesn't reveal how dirty they are as easily as dark surfaces (as we learned from having black appliances in our condo!), so we can wait longer before cleaning it!
 We went to our local KDA and looked at some Zodiaq samples, and found a style called "Cappucino" that really was great against Cherry cabinets. I've succumbed to the fact that we simply don't have the budget to purchase IceStone counters, as much as I love the idea of having beer-bottle-based countertops. But Zodiaq is a great alternative that is still green, harder than granite, and requires almost no maintenance.
However, some darker (midtone?) counters, such as a rich green, end up looking really sharp with cherry cabinets. I mean REALLY sharp, as we found out by looking at the "Magellen Green" Zodiaq sample in the store. We didn't think much of this color by looking at the brochure (or web site for that matter), but this just proves that it is hard for the web or print to capture the look of these stone-ish counters, especially the abstract "sparkle factor" that Jen loves so much.
I think we've pretty much decided that it is down to these two counter colors. Kudos to Jen for the awesome mockups of our kitchen space with cabinet layouts with both counters done by hand in Adobe Illustrator. It's good to have a graphic designer in the family! Once we decide on the counters, we can figure out colors on the walls that will encapsulate them.
Wednesday, December 05, 2007
KItchen Cabinets pt 2

Jason never remembers to post a picture along with his essays, er, blog posts. This is from the American Woodmark website, and shows the cabinets we chose ... Townsend style, cherry wood, spice finish.
Monday, December 03, 2007
Our Cabinet Decision
Trying to be green isn't always as easy as it sounds, especially for remodeling homes. Although there is research that shows that green building adds only a marginal cost to a new building (commercial construction), it's not necessarily the case for home remodelers. We've discovered this the hard way, especially when selecting cabinets for our kitchen.
See, for our cabinets we did the traditional 3-estimates approach, but one of the estimates we did was from a local Chicago manufacturer, Urban Prairie, getting their feet off the ground at GreenMaker, Chicagoland's green building supplier. They offer cabinets made from sustainably harvested wood (not a clear-cut forest), minimizing wood waste, assembled with formaldehyde-free glue and non-toxic finishing, resulting in low-VOCs. The owner was really hip to our green remodeling efforts and tried to work with us as much as possible, but ultimately, the expense was still almost one and half times the cost of other estimates we received.
The second estimate was close to the "green" cabinets, but still a bit much for our budget. But before we went with the third estimate, cabinets from a big-box home store, I did want to know the manufacturer's sustainability practices. Specifically, where they get their wood from and how is it harvested, and whether their adhesives used formaldehyde. When I called American Woodmark, I got a first flustered rep who clearly had never been asked about this before. She took my information down, and I was called back a few days later by Bryan Earl, the vice president of marketing and communications.
Although American Woodmark doesn't score very high on the eco-friendly scale, Mr. Earl was fairly forthright and not ignorant on the topics. He explained that while the wood was not FSC-certified, trees were not illegally logged in some foreign country, but came from Appalachian mountains. One negative was the statement that they don't really replant, they just "let the trees take care of themselves" in terms of repopulating.
As for the adhesives used in the particle board, American Woodmark uses glue that does contain formaldahyde, but their products exceed HUD's air quality standards of .4 parts per million (ppm). Mr. Earl then proceeded to tell me that wood gives off formaldehyde naturally. While I don't doubt the veracity of the statement, I do think it might not be at as high a rate as formaldehyde-based glue.
Anyway, despite these issues, we are limited to a shoestring budget and unfortunately were not able to go with green cabinets, electing for other green features in our kitchen remodel. So a few weeks ago we placed an order for mission-style cherry cabinets from American Woodmark. The cherry is at least a quick growing tree, and more importantly, we have the satisfaction of letting manufacturers know that consumers are starting to pay attention to these issues.
Much to our surprise, our new cabinets arrived earlier than advertised last week. Ah! They're piled up in our living room now, and it have lit a fire under us to get the kitchen ready for them. It's amazing how room utility comes and goes as building supplies find a space in unexpected areas of the home!
Sunday, September 30, 2007
Cabinetry Decisions
We're beginning to seriously (re)plan a complete remodel of our kitchen, after tossing out many ideas over the past three years. While we have a designer helping us with the layout and specifications, there are some considerations we'd like to make that are more consistent with green building standards:
- Patching and refinishing the existing hardwood floors under nasty old vinyl.
- Instead of the standard granite countertops, using a polished concrete and recycled glass product called Ice Stone. That way when I break a beer bottle on it, it will blend right in.
- More daylighting! We liked our suntunnels so much, we'll add one to our kitchen nook. More sunlight = less need for electricity. And a more pleasing open spaciousness.
- On that note, upgrading the windows to highly energy-efficient ones.
- Cabinets. This is where it gets more difficult.
 On a routine trip to Menards shortly after moving into our house, Jen saw some cabinets that would match the arts and craft style of our home. The manufacturer, Medallion Cabinetry, got the product name right by naming this style of cabinets, the "Oak Park." They even have window panes mirroring the windows in the front of our house. Great!
Except now, in our quest for green building, we reach a dilemma. These cabinets are made of quarter-sawn oak, which, while beautiful, is extremely wasteful and not sustainable since oak is a very slow growing tree. So it takes longer to replenish this material than other woods such as Maple, Alder or Lyptus.
There are other options that would match the style of our home, such as Mission-style maple cabinets that would work - but not as well as the "Oak Park" line. The higher cost of these oak cabinets may ultimately prevent us from purchasing them anyway, but its very difficult to balance being environmentally-conscious renovators while matching the character of the home.
Tuesday, March 20, 2007
Reclaimed Vanity

As our new dormer bathroom as nearing completion, we started looking for cabinetry. Although our width was a standard 6 feet wide, we only planned for one sink and it would need to be not centered but right-justified. We quickly found prices for just cabinetry escalating to the $500-800 stratosphere, and that was without a countertop or sink! So we started scouring demolition sales, ebay, and Craigslist, and lo and behold, a nice marble-topped maple cabinet came up that was 54", but had the sink in place right where we needed it. It had been ripped out of somebody's Lincoln Park townhouse and needed some repair in teh back, but Jen fell in love with the fossilized trilobites and the price couldn't be beat: $200.
Jen's dad came up and worked some cabinet wizardry to get it into shape again, and helped prepare it for our unusual plumbing configurations upstairs. A little bit of glue, extra reinforcement, and a few saw cuts later, we had it in place. It definitely gives an upscale feel to our new bath.
All we need now is a faucet and it will be complete!
Tuesday, September 13, 2005
New Cabinets Already?
We haven't even begun on the kitchen, but we now have some new cabinets!
I know, you're asking if we're crazy. Well, they're not exactly new, but they are new to us. We've infected our good friend Mark with some remodeling bug, and he is revamping his condo's kitchen. Rather than see his old cabinets in a landfill, we gladly accepted his offer. Plus, we know we are desperately in need of help organizing things, as anyone who has seen our 2.5 car garage wonders how we manage to fit one small car in it.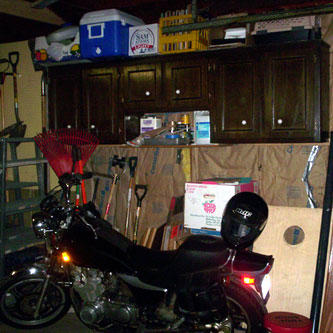 Scott and Mark brought them over and helped move things around so we could install them strategically throughout the garage. After Jay helped Mark install the new cabinets, Mark also gave us two base units as well! One is now in the laundry room and the other in the garage. With all this new space, we might even be able to pull in Jay's new truck if needed!
Subscribe to:
Posts (Atom)

 Posts
Posts


