
Working in the field of green homes is both a blessing and a bit of a curse. It's great to establish contacts with people that understand healthy indoor air and energy efficiency, but when you live in a 1920's house you realize there are a lot of improvements that can be made.
One thing we had done a few years ago when we finished our second floor was install some storm windows on the original windows in the master bedroom as I really liked the vintage glass and look. The storm windows helped a bit, but after several winters sleeping next to this cold surface, it quickly became apparent that we had to look for something that would perform better and be more comfortable for us. Especially since the windows take up the majority of the wall. So not only did we want comfort, but if I was going to buy windows, I want the best performing windows I can get while still keeping the historic look of the front facade of our home.
I spoke with Andy Scott from Energistics, who is both an energy rater (building science specialist) as well as a distributor for Serious Windows,. Who better to advise than someone who has the tools and training to make informed decisions about building performance? Andy helped me get the remodel-friendly and affordable vinyl option (Series 501) with mullions that divide the top sash into three panes of glass to help keep the historic look.
What makes these windows particularly good is a suspended film in the glass that helps reflect back unwanted heat from the sun - an important issue that is usually difficult to control for West-facing windows receiving afternoon heat. The windows have a U-value of 0.21, which means there R-value is 4.75 (1 divided by U-value = R-value). Even though they are vinyl, the frames are very well insulated (rare for vinyl windows). This is very good for a window. Since we were adding windows, I also had Sustain-a-building install these windows. When removing the old windows, they took advantage of the work to dense-pack cellulose above and below the windows to help keep the room even more comfortable. It still amazes me that most homes built in the 1920's do not have insulation - energy must have been very cheap back then! Before installing trim, the guys used Great Stuff Window And Door Foam
We also recreated the craftsman-style built-up trim / crown molding used on our kitchen remodel and the nursery trim so the house has some good continuity now. Here's a nice detail shot for you trim aficionados: The trim pretty much consists of 1 x 4's. The top casing piece has a small bullnose addition that wraps the 1x4, and then the addition of a crown molding piece above. A flat 1x3 caps off the crown for the finished look.
And the result if we take a step back in the room and admire the work? Absolutely stunning. We may not even get curtains (just shades) since this looks so good!
From outside, the windows are bit brighter than the "Craftsman tan" paint we used on the windows on the front porch so they do jump out a bit. I haven't yet decided if its worth painting the new vinyl to match or not, but for now its much better than the older brown that just looked like the windows faded into a black hole. The view from the street certainly looks much better, and I know we're going to be very comfortable next winter thanks to our Serious Windows!
Tuesday, May 17, 2011
These are Some Serious Windows

Monday, May 16, 2011
'Bout Time you Finished Those Windows!
Windows (and more specifically, window trim) has been one of the luxuries we were willing to live without when we finished our second floor a few years ago. We always intended to do it, but we just needed to move upstairs first. Then, a few years passed.
There's nothing like a deadline to get things done though, is there? Beginning with the nursery, we finally got some trim going. The first step was staining the windows themselves. This was much more difficult than I had expected, and took nearly an entire day to stain and then use 2 coats of sealer. So many small parts and angles! Of course, we used Water-based stain and sealer
For the window trim, I wanted to recreate the arts and crafts look that is present throughout the rest of the house, so we used a similar craftsman-style built-up trim / crown molding for the nursery trim. Jen quickly began nesting, but you can see a nice detail of the finish result in the photo below:
We definitely needed help with this and other projects we'll be posting about soon, so I called on my good friend and one of Chicagoland's leading Green builders, Brandon Weiss of Sustain-a-building to help us get things done in a quality, sustainable manner. His expert carpenter made quick work of the window trim, which needed a bit extra detail in the form of a 3/8" jamb extension.
Finishing the trim wrapped up the construction work needed for the nursery, and Jen quickly descended into nesting mode. For those wondering about the nursery decor, we sort of have a playful take on Alice in Wonderland going on. I'm sure we (ahem, Jen) will be able to post more about that later. But one thing that is gleaming in the corner there is a wonderful bunny light gifted to us by the good folks at Square 1 Precision Lighting, makers of some of the best energy-efficient lighting out there (yes, better than LEDs). Here is the bunny in all his glory, chasing his stopwatch in the shadows:
Wednesday, September 02, 2009
Discovering Where our Energy Dollars Go
We've taken the summer off of blogging, but things are starting to pick up again here at Humphrey House. Sorry for the delay, but life happens sometimes. Anyway, I recently borrowed my friend Jim's blower door as a sort of DIY energy audit, looking at the overall "tightness" of our home. For those unfamiliar, a blower door is basically a high-powered fan that sits in a tarped-ff doorway. You close all the windows in the building and turn this sucker on High. This will suck the air out of the house, and then start pulling air in from outside the home through any cracks and crevices. The fan is attached to an air pressure gauge monitoring both indoor and outdoor pressure, to ensure the home is depressurized to around 50 Pascals (Pa). At this level, noticeable drafts occur. [More info]
Once I had this setup and running in our kitchen doorway, I went around the home looking for obvious air drafts. Our house is now littered with pieces of blue masking tap indicating all the leaks and drafty spots in the house that should be sealed up before winter comes along. Most interesting finding: the older windows did not leak around the window sashes so much as they leaked around the frame. For example, more air moved from a gap underneath the window stool (interior window sill) between that and the piece of trim below the window (the window apron).
The really cool techie thing about the blower door test is the fact that with the gauge, you can tell just how leaky a building is. Despite consciously remodeling with energy efficiency in mind, I knew that I'd be in for some surprises. After all, we're living in a home built 100-years ago, when there was likely no insulation, and air barriers were really more like "hair barriers". So, the air pressure gauge measures the volume of air moved out of the home. As you may recall from high school, volume is usually measured in cubic terms. In this case, we're looking at cubic feet of air, but we want to know that over time. So the gauge tells at a certain air pressure (50 pascals) how much air is moved in a minute (CFM)? Well, in our 1.5-story home, it's around 4400 CFM.
What does this number mean in real terms of how leaky the house is? Well there's a rough back-of-the-envelope calculation that can make this more meaningful. (Math Warning!)
We need the volume of air in the house. Given the average 8-foot ceiling height and 3500 sq ft of living area (2135 above ground + 1365 finished basement), we have about 28,000 cubic feet of air in the home. (Humphrey House air volume = 3500sf x 8ft = 28,000 cubic feet).
We can find out how many times the air in the house turns over per hour by taking the air pressure gauge measurement, 4400 CFM, multiply by 60 minutes to convert to hours, and then divide by the air volume in the home: (4400 CFM x 60 M) / 28,000 cubic feet = 9.4 air changes each hour (ACH).
You might be tempted to say, "That's one leaky house!" but remember, this is at a high pressure of 50 pascals. We can "normalize" that number by using a factor for a well-shielded home in an urban area to find the natural air changes (ACHn). For simplification purposes, we'll use a factor of 16.7 (this is derived from LBL empirical data). So we divide our 9.4 ACH by 16.7 to arrive at a normalized air exchange of 0.56 ACHn.
This means roughly 1/2 of the air in the house is changed over every hour. For comparison, the 1989 standard for air exchanges recommends 0.35 ACHn. So, in other words, despite soy foam in part of the house and other energy efficiency efforts, we're still pretty leaky.
We have a lot to do to air seal the home, but thankfully the blower door helped us find all the little holes where our energy dollars were flying out the house. Next step is to work on fixing them. If you're interested in getting a detailed analysis like this of your home, follow the directions on EnergySavers.gov, or find a professional energy auditor at natresnet.org or www.bpi.org. If you're in Chicago, look at any of these.
Monday, December 15, 2008
Solving the Stairway Dilemma
One of the problems with living in a home during substantial remodeling is the sometimes piecemeal approach you must take to projects out of shear necessity and sanity. Case in point: our stairs from the second floor into the family room / kitchen.
This space was unfinished and open for a long time and was often a ground zero dividing line between living areas and work areas for different phases of our remodeling. And not being very experienced in trim carpentry, we never were quite sure exactly how to complete the transition. But after finally consulting with several people (who insisted it was much easier than we were making it out to be), we developed a sort of hybrid solution of various ideas. First of all, instead of having the handrail terminate directly into the wood jamb and center column, Jay decided to use some extra plinth blocks he had to make a decorative terminal for the handrail, shown in the image here.
We still have plans to do a craftsman-ish trim design on the center column, which will focus on three raised pieces of oak trim, and to echo that triple motif, we decided to arrange the stair banisters in groups of three. Instead of the typical turned oak spindles, we wanted to keep the straight lines of the era and went with 1" rectangular spindles, shown here as we waited for the two coats of "Rosewood" stain to dry. Speaking of this stain color, it took a lot of experimenting to find a stain that best matched the vintage 1912 trim in the house, and we even mixed different stains together. But ultimately, the rosewood came to be the closest match and after a couple of coats, gave the depth and color that we wanted. Best of all, this is a water-based stain (not oil-based) so cleanup and any mistakes were a breeze to handle, and there weren't any noxious fumes.
Anyway, back to our stairs dilemma. While it was obvious that the stairway spindles would attach to the bottom of the handrail, we struggled with how to finish the bottoms. Should we create a bottom rail parallel to the top handrail that would be slightly above the stairs themselves, or should we carry the spindles all the way to the treads of the stairs? We decided to go with the latter.
Wednesday, December 10, 2008
Stairway Plant Shelves with an Arts-and-Crafts Touch
Ever since we "finished" our second floor in 2007, there have been a few punchlist items we've been meaning to take care of. One of these was to trim off the sides of our U-shaped stairwell with some finished shelving.
When we expanded the stairs from the original bungalow winder stairs into a standard-width staircase and landing, we had to demolish the old "cat walk" balcony that wrapped around the stairs. However, this left some large, 18" deep shelves flanking both sides of the landing in the middle of the stairwell. These would make great plant shelves as the windows in the stairwell are the only ones that truly face south and receive sun all year round.
While wandering through the trim aisle on a recent trip to the hardware store, we stumbled across this nice 2" oak trim with a very arts-and-crafts floral design cut into the oak. It seemed like the perfect trim piece for our plant shelves! It may be hard to tell from the photo above, but the trim piece has a nice floral vine pattern that weaves along the whole length of the long shelf. Of course, we stained these shelves to match the rest of the new trimwork in our stairs and kitchen area, using a couple coats of a nice low-VOC water-based stain "Rosewood Red", which matches the original trim in Humprey House quite well.
Here's the finsihed plant shelf, already home to our collection of plants and Jen's herbs just in time for winter!
Tuesday, March 11, 2008
Time for Trim, Craftsman Style
We're down to the final stretch in our kitchen remodel. Those finishing touches that add that extra sparkle to a finished space. Yes, the trim.
I'm glad we remodeled elsewhere in the house first as it's given us perspective and time to figure out how to approach this. And also a chance to research different options. When finishing the basement (our first big project), we went with cheap modern trim options. Not quite as basic as plain ranch casing, but not very consistent with a 95-year-old house either.
However, we wanted our kitchen to flow with the rest of the house, and making the trim similar is an important part of accomplishing this. While we saved all trim that was removed before our remodeling, we quickly realized there would not be enough and without thing feeling too disjointed, we would have to get new trim for most of the kitchen / family room area. Our bungalow has trim pretty consistent with traditional Oak Park area arts and crafts homes, in that the casing for doors and windows is plain and squarish with no mitered corners.


The doorways all have a 9" plinth block at the base to transition from the baseboard trim, which is a 3-piece system of a tall baseboard with a separate curved cap, and then shoe molding along the base (similar to quarter-round) to finish it off. At the tops of the doorways and windows, there are no mitered corners. Instead, the 4" vertical casing ends against a small bullnose piece of trim about 3/8" tall. Above this is a square 1x6 board, with crown molding attached to the top. The trim throughout most of our workingman's home was done in pine or fir instead of the more expensive oak. However, the pine of 95 years ago was old-growth pine, much harder and more durable than today's pine.
During this process, the book The New Decorating with Architectural Trimwork
A quick trip to the local bigbox hardware stores revealed that it would be tricky if not impossible ot try and replicate this with today's trim options. So it was time to investigate some specialty suppliers. David suggested we check out OWL Hardwood or Hines lumber. Armed with the renovation experience of having to make multiple trips for any given project, I naturally chose the closer of the two. And learning that Hines Lumber also has a commitment to sustainability was a big plus as well. In fact, they even carry Forest Stewardship Council (FSC) rated lumber. While this certified sustainable lumber is intended for framing and not trim work like we needed, it was good to learn they backed up their word and weren't just trying to "greenwash" their business.
One of the other decisions we had to make was to decide whether to go with pine (cheaper) or red oak (more expensive) for the trim options. David mentioned that since both are harvested locally (within 200 miles), the sustainability factor was sort of a toss-up. It really came down to what we could afford and prefer.
After a thorough analysis, we decided to do a mix of woods. All the baseboard trim would be in pine, and all door and window trim would be in oak. That way we could add a greater sense of character to our newly renovated kitchen / family room area and still blend it with the rest of the house. And once the trim is stained, there shouldn't be too much of a difference. From working with the helpful reps at Hines, we were able to find trim profiles that were actually really close to the trim elsewhere in the home. The only thing that is really different is the crown molding profile, but it isn't too noticeable unless you really study the two side by side in the hallway.
Realizing we may have to repaint, we've taken an unconventional approach of installing all the trim before staining and finishing it due to some time constraints we're working with.
There are few more elaborate craftsman-style trim details we plan on stairwell shelves and the column dividing the hall and stairs from the family room, but we'll post more on that another time.
But so far the transformational results have been amazing, and the house really flows well now, with a nice blend between the "old" and the "new."
December 2008 Update: We finally did stain the trim and finish the stairwell.
Thursday, February 07, 2008
KITCHENY GOODNESS
We're so close now we can taste it. And by it I am of course referring to the three cakes, 64 cupcakes and two batches of muffins I have successfully produced in the kitchen.
Sadly, I seem to have lost my ability to cook, however. My attempt at Tuscan Chicken with a mushroom wine reduction went horribly wrong (hey, guess what, the smoke alarm works!) and I even managed to burn eggs the other morning. Who knew four months out of commission would kill my cooking memory? Well, maybe once I get used to the BEAUTY of this new space my skills will come running back.
In the meantime, we've got several punch list items left, including finishing the electrical, adding trim to the cabinets, windows, doors and floor, hanging shelves in the nook, getting the couch, stools and tv for the sitting area, and more, but we're this close. Below are some photos to whet your appetite for more - BON APPETIT!
Thursday, November 10, 2005
The whirlwind continues
The last month or two has been relatively slow in our progress. Of course, we had other distractions in Chicago, such as 70 degree whether in November, and a White Sox world series sweep, which was truly an amazing experience. Especially in this city! But now the pace has quickened, as we are trying to wrap up our work in the basement and shift our focus to the main floor of the house.
There have been a number of "housekeeping" things to do in the basement. Finish trim, clean out basement, finish installing electrical outlets, installing rough electric for stairwell light, move a crawlspace access door. Now that that is all wrapping up, we are having a final electrical inspection Friday.
And besides raking all those leaves (see post below), there is more exterior stuff we are working on before it gets too cold, such as finishing off the window framing outside, capping the exterior trim with aluminum flashing, cleaning gutters, installing HVAC duct for kitchen nook (this 1/3 of our house is currently not heated!), cleaning out and reorganizing the garage (those construction supplies in the basement got to go somewhere!) and more.
We're managing well, but we're motivated because we want to get our stuff moved out of storage by Nov. 18. Next week! Ahh! The power of a deadline should never be underestimated.
Thursday, October 13, 2005
Trimming Out

Turns out the pipe from the water shut off in our yard to the water main was made of lead (gotta love 100 year old construction!) so the village came out and replaced that for us while we still had a gaping hole in our front yard. They're still repaving the street, but at least our water will be safer now.
On the inside, we've been busy working to clean up after we had mass graves dug inside a room we thought was done. Now, we're really almost done with it. Jen's studio may have a 1 inch water pipe running through it, but we've tried to mask it by painting it the same color as the walls. Last weekend was full of finish / trim work. For both this room and the music studio we:
1. Got foam-backed berber carpet and cut to fit in each room, and then secured it to the concrete with some super-sticky adhesive. We were able to do this without any seams since both rooms were relatively small. The floors feel so much better already! 2. Installed 90% of the trim needed for both rooms. Jen's studio still needs a bit around the interior glass block window, and the music studio needs some capping pieces at the top of the wainscotting. This made the room look so much brighter, and a healthy contrast to the deep purple walls.
3. Earlier in the week, Sara came by on her day off and painted the big family room, and Jen finished off the fireplace on Saturday. This room is incredibly bright and spacious and is really impressive to walk into now. A little trim and carpet in here, and we can cross another room off the list. All the hard work and planning is finally paying off!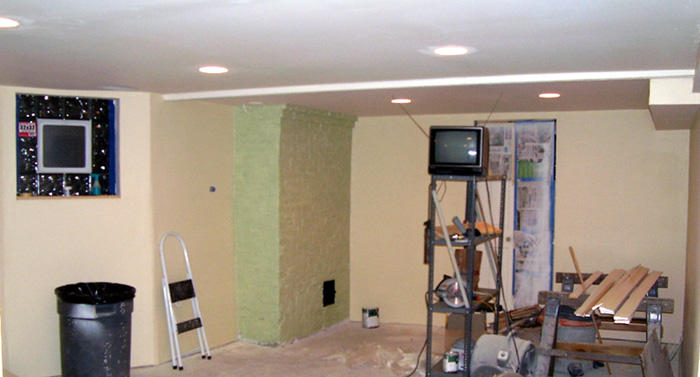

 Posts
Posts


Anyway, although it was incredibly labor and time intensive for just a few square feet, we're very pleased with how the stairwell turned out. When its warm again, we plan to create some detail work on the center column that will echo the triple-pattern of the stair banisters. The plan is to have three 1-inch vertical oak trim pieces hanging from a horizontal band that wraps around the column, to lend the room more of a craftsman feel.