
 Earlier this spring I was working with a Habitat for Humanity green building project, and one of the project members and I had a discussion about growing Hops. I mentioned I'd like to do that for a type of greenscreen if nothing else, and perhaps one day get into homebrewing.
Well, later that day, the energy rater colleague happened to stop by his father's house, who had extra hops plants growing. So he dug some up. And then just happened to be near our home and dropped them off for us. What a pleasant surprise!
I managed to separate the root rhizomes into several groups, and planted them into seven containers. Some of these looked pretty sorry, but to my surprise, eventually every single one formed into a plant!
And it turns out hops plants are very excellent vertical growers. The vines are almost sticky, and want to grab ahold of anything they can - including me when I was tried to train them.
I put a few of these into a raised bed near the garage, and strung some landscape string from hooks in the garage eave to the wood frame in the bed. The hops quickly found their way up the garage as shown at right. Within a few weeks, the vines then had nowhere else to go vertically, so they started spilling over and climbing up themselves. We now have a large bunching mass of hops. And since this wall receives the most sun in our tiny back yard, the plants started forming little flowers already. Elsewhere in the yeard between us and our neighbors, I took an extra 10' section of 1/2" gas pipe and pounded it in the ground almost 2 feet, threw a Tee on it and a few short segments to create a pole stand for two other hops vines. These hops vines have also worked out quite well - these were two of the plants I was less certain would make it.
 These plants are not quite flowering, but they certainly are reaching for the sky. It may not be until next year that actual hops buds are produced. But that's okay, the main idea for these is to add some color against the drab color of the neighbor's home, as this is what you see when you walk off our back porch.
I subsequently learned all these hops plants are from the Siebel Institute, a well-respected brewing academy, so I think some homebrewing will be in my future. I even had extra plants that I donated for a friend's pergola. And Chris actually has brewed beer before, so they may get put to use sooner than mine. In the meantime, we're enjoying the extra vertical greenery in our small urban yard.
Saturday, July 31, 2010
Happy Hops Plants

Friday, July 23, 2010
Some Finishing Touches in Front
I can tell you one thing. Putting together a garden during a hot, humid summer day is no fun. So after the initial landscape was in place in the front yard, I took it easy. Off tangent thought... if there no longer is any grass, can it still be called a front yard? Hmm.
Anyway, after the busy weekend planning and planting the front garden, I wasn't about to subject myself to further heat exhuastion. So I have been subsequently doing a little work after the sun goes down each day (but before nightfall). I planted an evergreen groundcover, and then made a trip to the local mulch pile. A few weeks ago, Chicagoland had a massive round of windy thunderstorms that resulted in many trees and branches falling down. Our city picks these up and runs them through a grinder to make mulch. These are stashed in a few locations, and they let residents come by and help themselves to as much mulch as they'd like.
So I went to get some. I really missed my old pickup truck for this trip, and instead had to lay down a tarp in the trunk of our economy car, backed it up to the pile, and shoveled away.
Frequently, this free mulch can get quite rotten, but with the fresh thunderstorms that had passed through earlier in July, the available mulch was actually quite nice. I made several trips over the last two weeks, and it was interesting how the quality varied. Sometimes there was really rough course mulch (shown above), other times it was very fine wood chips. But beggars can't be choosers! So far three trips have been made, and I plan to make at least one more to establish a nice mulch base. And, much as installing trim in a room helps bring everything together, mulch really does help give the front yard garden a finished look. And hopefully with a bit more rain (and rainbarrel water) the plants will all get properly established before winter.
Tuesday, July 13, 2010
Surprise! A green landscape plan
Sometimes the best things evolve and happen organically. Other times they don't.
Our front yard had evolved organically over the past 5 years that we've been in Humphrey House, almost like a nursery rhyme, "here a plant, there a plant, everywhere a plant plant." And you know what? It wasn't working. In fact, it failed miserably. Even though people tried valiantly to help us, we had no clue about various plant sizes - placing things in a tight bunch, too close to the foundation, putting tall plants in front of short plants, sun plants in shady areas - if there was a list of bad DIY landscape plans, I felt certain we were on that list. Well, all that changed over the weekend as I finally set things straight.
With Jen leaving town for the weekend, I promptly set off to surprise her upon her return, and ripped out the existing hardscape timbers and dug up almost every existing thing in our front yard and put the plants into spare containers. The only thing that survived were the coneflowers Chris from TinyBungalow gave us a few years ago and our weeping cherry tree. This gave me a blank slate, with lots of dead ground to play with. The plan for our yard started with a goal: Create a sustainable landscape. Great, but what does that mean? Well, a landscape that is more native (adapted) to the local climate - able to withstand Chicago's winters and dry summers without extra care. A garden that doesn't need extra watering beyond the natural rainfall we receive. And a landscape that would be more pervious and help absorb stormwater on-site rather than directing it to the overburdened municipal storm sewers. Additionally, native plants also are more attractive to wildlife providing food and cover for birds, butterflies, etc.
But there were many challenges to meeting this goal:
- Aesthetics - we wanted something with year-round interest that didn't look like crap.
- Shade - our parkway has a Norway Maple that provides dense shade - and few hours of sunlight. Most aesthetically pleasing drought-tolerant plants and flowers thrive in full sun.
- Maintenance - I like the idea of quarterly yard maintenance rather than weekly mowing.
- Budget - always a factor, which meant trying to use many materials we had on-site
- Size - while not huge compared to many, we are dealing with 2/3 of our front yard, about 400 square feet, which could definitely stretch the budget. We also wanted some good vertical height to transition to the porch.
Well, it all came together so much better than expected. Once everything was cleared out and placed into extra planting containers, I laid down some flagstone pavers that had been left behind under the back porch by the previous homeowners. With a hardscaped footpath in place, I then played around with arrangements with the existing plants such as evergreen boxwoods, along with some new plants I had picked up. Fortunately some of the local garden centers have a nice distribution line with American Beauties. No, that's not a link to some X-rated site, it's a native plant landscape supplier. Combining this with the selection at the big box stores and our existing plants, I grouped the plants together in odd numbers and got successful results.

So what did we do? Well, using advice from friends as well as a native plant specialist, I selected:
- A chokeberry bush which should get 4-7 feet as an edge near the steps.
- Existing dwarf boxwoods for evergreen interest
- Some wild columbine for spring blooms.
- Coreopsis Route 66 - tickseed that is supposed to tolerate part sun (we'll see)
- A nice red fern so I don't have to wonder where it grows anymore
- Shade-friendly bugbane
- Blue cohush
- A sweet bush (yay for shade bloomers!)
- More pretty purple coneflowers
- Our existing joe pye weed
- Our existing Golden Alexander, which hopefully made the transplant
- Our existing coral bells
- Blue liriope clumping grass
- An evergreen groundcover, winterberry


While I was working, several neighbors came up and remarked on how improved things look. Of course, anything is better than the dead lawn that was there for for months. I'm not entirely convinced the spacing is "just right" for everything, but we'll keep an eye on the plants and adjust as the year goes by. In the meantime, it's had a truly transformative effect on our home giving it style and a natural prairie setting to our neighborhood.

Thursday, June 24, 2010
Are Grass Lawns Overrated?
We've been experimenting with a new thing at our home this summer - a dead lawn! Just look at the wonderful progress we've made on killing off the grass. But why... Is this the lazyman's approach to "lawn care"? The latest form of a "no-mow" lawn? No, we are in fact prepping the front yard for a sustainable revival of sorts.
While we are a bit lazy on yard maintenance, and I certainly do not like to mow (especially in August when hay fever allergies set in), the real reason for this unique approach is that we are killing the existing turfgrass lawn and rotting it out with compost on top of it, in preparation for a more natural (and drought tolerant) landscape.
We're going to replace this area with plants that have deep root systems that are native or adapted for the natural amount of rainfall Chicago receives. Once established, the landscape should require no extra water, and only occasional seasonal maintenance (as opposed to weekly mowing). Our biggest challenge will be finding plants that perform well given the abundance of shade.
Traditional lawn turfgrass has very shallow root systems (ever see sod?). When wet, the roots lock up preventing extra rainwater from infiltrating into the ground. This creates "ponding" or soggy lawns, and causes excessive stormwater runoff. On the other hand, native plants have deep roots that go down 6 feet or more to tap into the Earth's moisture. These plants grew all over the prairies of Illinois, and as the plants died or were burned off in natural fires, their root systems became deep-rooting fingers of compost. Over decades and eons, these composting roots evolved into some of the best soil and farmland in the United States.
In addition to returning some of this land to its natural sustainable use and using less water, our goal is to give a nice prairie-type of landscape setting for Humphrey House, which should fit well with the arts and crafts feel of the home. Now all we need is a good plan.
Monday, June 14, 2010
Building a Planter Box
The last few months have been too busy to blog, but we're going to try and carve out specific times to update the blog to let you know all that's been happening at (mostly outside of) Humphrey House.
We'll start with something actually made before winter: A raised bed planter box in the backyard. Since our porch is a half-story off the ground (about 5'feet) and we have a small yard, we felt like we needed something to help transition the yard to the porch.
I originally had brought home used railroad ties and had planned to use those to construct the raised bed. I figured they'd be nice thick materials and provide plenty of butt space. Plus, they were quite cheap and very thick. Perfect right?
Well, as I was unloading them, I realized a lot of "stuff" was coming off. This stuff is creosote, and is what railroad ties are treated with to resist decay. After reading up and learning creosote is probably carcinogenic to people and contaminates groundwater, I realized I probably don't want to bring that onto our property, much less have people sitting on it.  So, I took the railroad ties back to the store and got regular 6x6 treated lumber (ACQ, not CCA).
Anyway, because the timbers are 8 foot lengths, I planned to make a 6' x 2' raised bed, using four courses of timber to give the planter a comfortable sitting height. To start, I dug trenches a couple inches down into the soil for foundation drainage, and filled this pea gravel and sand. This made leveling the raised bed much easier as well, since there originally was a slight slope from the left to the right sides.
I laid the first course using full 8-foot lengths, and then cutting two 1'-6" pieces for the short ends. The next course would be 7' on the long sides, and a full 2 feet on the ends to stagger the joints. However, I soon realized that I was going to need something to keep these all together once they were stacked.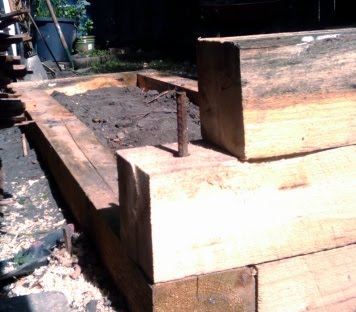 Fortunately I had a few 2'foot lengths of rebar lying around (doesn't everyone?), so I bored 3/4" holes through the corners and "persuaded" the rebar through with the help of my trusty mallet. I did the same for the second course. The third course I only bored halfway through so it was a sort of "cap" that would add support and then the rebar wouldn't be visible.
Because I imagined a 400-pound gorrila coming over and wanted to over-engineer the planter bed, I poured extra sand through a funnel down the boreholes around the rebar so it would extra be solid. I also had some galvanized steel (safe for contact with treated lumber) right-angle ties that I used on the top course to further anchor the front side of the planter to the two sides and the back side, so the entire top course is tied together. And just to be safe, I lined the sides of the bottom two courses with plastic so the AC2 chemicals stay away from the soil we put in there.
All said and done, it came together wonderfully. We now have a nice planter bed next to the porch that will be a perfect spot for herbs, veggies and flowers and an occasional butt when we're enjoying the outdoors. Here's how it looked at completion: And how it looks now with a garden of herbs and lettuce growing in it:
Thursday, December 10, 2009
Placing Pavers
Well it took a bit of time to install (and even more time to post), but we got our bluestone pavers all in place. It wasn't easy as the shapes were mostly rectilinear, so we had to conjure up some old Tetris skills (see Dad, I told you Nintendo was good for us!). We were able to lay out a design that would blend the large stones with the small, yet have the durability to last.
We started by "cascading" the largest pavers in the high-traffic area of the back yard, near the rear stairs. These large stones are roughly 3 x 4, and quite hefty! But by offsetting each by about 6" or so, the pattern creates an optical curve from the gate towards the back yard. We then had to reserve some large 2' x 4' stones for the walkway that connects our garage to the patio.
The pavers are not grouted or set in concrete, but instead the joints are filled with sand and stone dust. This permeable paving allows for stormwater to drain through the paved area more naturally, instead of diverting all the water to the edges of the patio. It also will be more tolerant of any movement due to freeze/thaw cycles during winter.
The colors of the bluestone pavers are a muted in these photographs of the completed job area due to the final layer of stone dust. After winter, we'll likely do a light powerwash to remain any residual surface grime. In any case, here is the completed work:
 Everything wrapped up pretty nicely, and we even have a pile of remnants we may do something artistic with next year. For the time being though, we had about one nice day that we got to enjoy our patio before the weather started to really cool down. After the winter snows freeze and thaw, hopefully there will be little movement between the pavers.
Tuesday, October 20, 2009
Finding Place for Extra Dirt
Humphrey-house has been a bit of a mud pit for the last... oh five weeks or so, as we tore out the old concrete in the backyard and are putting in reclaimed bluestone pavers. It seems like years already. There has been a lot of digging, excavating, pain killers - and then - more digging. It's all a necessary evil as we prepare for a 4-inch base of gravel and 1-2 inch of sand under the pavers.
Given the small urban lot, we quickly ran into a problem though. What do we we do with all of that dirt? We had to creative. Fortunately, some landscape design wishes and our favorite holiday came in to save the day.
Ideas for Extra Dirt:
1) Create a landscape planter!
We always thought a nice raised planter bed with wide rails in front of our rear porch would be a great landscape feature. It would make gardening a bit easier, and also provide extra sitting room outside. If only we had enough dirt to fill it though... a-ha! Problem solved! Sadly, while this turned out great (and I will post about the construction later), this ended up taking only a few loads of dirt in the wheelbarrow, so other dirt solutions were needed.
2) Raise those flower beds!
We have a "peripheral" planting area that surrounds the yard. In the past, it's been unofficially defined as the line where we can't get the few blades of grass in the yard to grow further. Now, with several wheelbarrows (20+) of roto-tilled soil, we have sleek looking berms surronding the yard. The berms give a lot of depth and texture to the small space! Bonus: concrete chunks can be reused as a nice little "rock garden".
3) Make graves!
This was honestly the most fun way to place the extra dirt. We normally have a cemetery in the front yard at Halloween. but this year it got more interesting and authentic as we created fresh graves for the tombstones. Mwah -ha -ha!
Even after these efforts, we still have a fairly hefty mound we will need to deal with. Some will be used to back-fill in dirt around the edges of the patio, but we may have to craigslist it, or build a semi-raised planter for next year's veggie garden. In the meantime, we're ready to climb out of the mud and onto a patio!
Monday, September 28, 2009
Restoring Siding and Building a Trap Door
The front of our house looked so good after removing the crappy white vinyl siding last September, that Jen and I have been talking ever since about restoring the original siding back a little bit further. We considered going "all the way" down the sides, but that idea was quickly eliminated, as it would require (a) lots of work to repair the original wood siding, and (b) lots of paint (and $).
So, a happy compromise was to take the siding off just along the front porch part of the home and restoring that original wood siding. This allows us to stay within a reasonable budget (1 gal of paint) and we also don't lose the (marginal) value of the foam board insulation under the vinyl that covers the heated living area. Best of all, the house looks good from the street instead of having the wood siding in front oddly transition to white vinyl at the corner, as shown below.
 The timing to do this project is now, after the blower door test revealed that our access door connecting the basement to the front porch crawlspace was a major source of air leakage. Really not too surprising, considering how cold that part of the basement can get in winter. We decided to seal off this door permanently, and realized we could still access this storage space from the outside if we built a new door into the siding. This would actually make the front porch crawl space more usable and be a great space to store gardening pots, landscape supplies, etc.
As with many of the finer carpentry projects at Humphrey House, Kenny came up for a weekend to help with this project. Removing the siding went quite quickly, and we even found someone on Craigslist to take it away for free. During siding removal, we found the wood underneath was in really good shape,especially on the North wall. The south wall was a bit worse, but was still quite salvageable.
 We then cut an access hole for a new door to the crawl space on the south wall. The bottom piece of lumber (touching the ground) was quite dry rotted, which is really no suprise given that it was original pine, untreated and left in contact with the soil. We had to replace this board, and also "sister" brace the studs as some of them had rotted at the bottom few inches. To avoid future damage, I also dug out a trench and filled it with two layers of old 16 x 8 concrete pavers and sand before we replaced the bottom board with a pressure-treated 2x8.
It was interesting to see the porch framing was really a "skirt" in which the studs came down from above,  but were tied with a cross-beam to the main part of the house, and a support column at the corner. Of course, we had to reinforce this when we cut out the crossbeam for an access door. We put in a LVL header (leftover from the LVLs we sistered to the second floor floor joists), and beefed up the framing with supporting studs underneath this header.
Anyway, we debated how this new door should open, to the left or the right? To avoid future landscaping damage and any threshold issues, we decided that it would be best to try and get this new access door to swing UP, and we could attach it with a chain / hook to an eyelet in the wall. We also wanted to make this look unobtrusive, so we used low profile 1x4's as the trim edges, and reused the siding cut out as the finish of the door, working to line up the lines so they would match the existing siding. This was more difficult than it sounds because there were some really bad pieces of wood in this particular part of the wall. With a few pieces of old kitchen wall lathe (we don't toss anything!) as a bit of a standoff, we ended up mounting the siding on a piece of plywood and the lines matched up pretty well. A few hinges completed the job, and we now have a nice little trap door to the front porch!
Once the wood siding is repaired with some wood filler and then primed, we will paint the door the same Roycraft Bronze Green as the surrounding wall so it all blends together. Then it will be a like a secret trap door to a hidden passageway! Where one can behold bags of potting soil! Exciting, right? Well, we'll see once it's all painted.
Friday, April 24, 2009
Firmer, but not final, Backyard Plan
I've been meaning to post this for awhile, but here is a more refined version of our backyard plan that we're going with. Now we're starting to get a feel for the costs for redoing portions of the concrete (which need redone badly, especially near house / rear stairs). 
The "Dharma patio" may or may not be feasible this year... we'll have to see. Click the image above to view a larger version of this - and kudos to Jen for the excellent digital mock-up using our original plat of survey!
Friday, March 20, 2009
Developing a Garden Plan: part 1
After the hit-and-miss plantings of the last few years, Jen and I decided that this was the year to actually develop a plan for our backyard that would incorporate many of the the things both of us desire.
- space for a table / chairs
- vegetable garden
- herb garden
- raised planters
- gravel / porous paving areas
- solid paving from house to garage
- shade-friendly plants
- perennial plants
- firepit area
- compost area
- water efficiency (more rain barrels)
- And perhaps a bit of an oxymoron - low maintenance

After this initial step, we are now working through designing the hardscaping that needs to be done to accommodate all of these features. In addition to the soft lines of the gravel-based plan above, we came up with many other ideas for the space - rectangles, a diagonal patio, a circular theme. With the goal of trying to find a plan that best fit the small space, we have pretty much settled on the octagonal patio idea shown below.

This would ideally be pavers, but may be stamped / stained concrete too. We already need to have some concrete re-done in the left-side area of these plans. The steps leading down to the basement are crumbling, and the slab there is pitched towards the house. When coupled with a large downspout that sometimes overflows, that is a bad combination.
Also, Jennifer is a little concerned about the patio area being limiting - we like to have gatherings with friends when weather allows, and the backyard fills up fast - she's worried it will fill up even faster with a small defined patio space! So this may evolve ... we shall see.
But with a firm(ish) plan in place, we can start to look at how to go about implementing it - and what will fit within our budget.

 Posts
Posts


