
The front of our house looked so good after removing the crappy white vinyl siding last September, that Jen and I have been talking ever since about restoring the original siding back a little bit further. We considered going "all the way" down the sides, but that idea was quickly eliminated, as it would require (a) lots of work to repair the original wood siding, and (b) lots of paint (and $).
So, a happy compromise was to take the siding off just along the front porch part of the home and restoring that original wood siding. This allows us to stay within a reasonable budget (1 gal of paint) and we also don't lose the (marginal) value of the foam board insulation under the vinyl that covers the heated living area. Best of all, the house looks good from the street instead of having the wood siding in front oddly transition to white vinyl at the corner, as shown below.
 The timing to do this project is now, after the blower door test revealed that our access door connecting the basement to the front porch crawlspace was a major source of air leakage. Really not too surprising, considering how cold that part of the basement can get in winter. We decided to seal off this door permanently, and realized we could still access this storage space from the outside if we built a new door into the siding. This would actually make the front porch crawl space more usable and be a great space to store gardening pots, landscape supplies, etc.
As with many of the finer carpentry projects at Humphrey House, Kenny came up for a weekend to help with this project. Removing the siding went quite quickly, and we even found someone on Craigslist to take it away for free. During siding removal, we found the wood underneath was in really good shape,especially on the North wall. The south wall was a bit worse, but was still quite salvageable.
 We then cut an access hole for a new door to the crawl space on the south wall. The bottom piece of lumber (touching the ground) was quite dry rotted, which is really no suprise given that it was original pine, untreated and left in contact with the soil. We had to replace this board, and also "sister" brace the studs as some of them had rotted at the bottom few inches. To avoid future damage, I also dug out a trench and filled it with two layers of old 16 x 8 concrete pavers and sand before we replaced the bottom board with a pressure-treated 2x8.
It was interesting to see the porch framing was really a "skirt" in which the studs came down from above,  but were tied with a cross-beam to the main part of the house, and a support column at the corner. Of course, we had to reinforce this when we cut out the crossbeam for an access door. We put in a LVL header (leftover from the LVLs we sistered to the second floor floor joists), and beefed up the framing with supporting studs underneath this header.
Anyway, we debated how this new door should open, to the left or the right? To avoid future landscaping damage and any threshold issues, we decided that it would be best to try and get this new access door to swing UP, and we could attach it with a chain / hook to an eyelet in the wall. We also wanted to make this look unobtrusive, so we used low profile 1x4's as the trim edges, and reused the siding cut out as the finish of the door, working to line up the lines so they would match the existing siding. This was more difficult than it sounds because there were some really bad pieces of wood in this particular part of the wall. With a few pieces of old kitchen wall lathe (we don't toss anything!) as a bit of a standoff, we ended up mounting the siding on a piece of plywood and the lines matched up pretty well. A few hinges completed the job, and we now have a nice little trap door to the front porch!
Once the wood siding is repaired with some wood filler and then primed, we will paint the door the same Roycraft Bronze Green as the surrounding wall so it all blends together. Then it will be a like a secret trap door to a hidden passageway! Where one can behold bags of potting soil! Exciting, right? Well, we'll see once it's all painted.
Monday, September 28, 2009
Restoring Siding and Building a Trap Door

Monday, December 15, 2008
Solving the Stairway Dilemma
One of the problems with living in a home during substantial remodeling is the sometimes piecemeal approach you must take to projects out of shear necessity and sanity. Case in point: our stairs from the second floor into the family room / kitchen.
This space was unfinished and open for a long time and was often a ground zero dividing line between living areas and work areas for different phases of our remodeling. And not being very experienced in trim carpentry, we never were quite sure exactly how to complete the transition. But after finally consulting with several people (who insisted it was much easier than we were making it out to be), we developed a sort of hybrid solution of various ideas. First of all, instead of having the handrail terminate directly into the wood jamb and center column, Jay decided to use some extra plinth blocks he had to make a decorative terminal for the handrail, shown in the image here.
We still have plans to do a craftsman-ish trim design on the center column, which will focus on three raised pieces of oak trim, and to echo that triple motif, we decided to arrange the stair banisters in groups of three. Instead of the typical turned oak spindles, we wanted to keep the straight lines of the era and went with 1" rectangular spindles, shown here as we waited for the two coats of "Rosewood" stain to dry. Speaking of this stain color, it took a lot of experimenting to find a stain that best matched the vintage 1912 trim in the house, and we even mixed different stains together. But ultimately, the rosewood came to be the closest match and after a couple of coats, gave the depth and color that we wanted. Best of all, this is a water-based stain (not oil-based) so cleanup and any mistakes were a breeze to handle, and there weren't any noxious fumes.
Anyway, back to our stairs dilemma. While it was obvious that the stairway spindles would attach to the bottom of the handrail, we struggled with how to finish the bottoms. Should we create a bottom rail parallel to the top handrail that would be slightly above the stairs themselves, or should we carry the spindles all the way to the treads of the stairs? We decided to go with the latter.
Thursday, September 18, 2008
Green Home Tour Redux
Despite Chicago receiving a record-breaking rainfall last Saturday, we finally had our Green Home Tour. After weeks of preparation, it was great to finally take a step back and take in what we accomplished, and show off our home to the 60+ people that came through to learn a bit about green building.
Looking back at where we were a month ago, I'm amazed at how much work we were able to get done in preparation for the tour. We'll detail most of these projects in upcoming blog entries, but here's the quick hitlist: Exterior painting, stucco painting, replacing broken glass and re-puttying our porch windows, interior staining and sealing of our kitchen trimwork, wallpapering, major ceiling and wall repairs to the dining room (and adding a tubular skylight), installing an arts & crafts stair banister, and putting together a rough landscape in front of our home. Wow. In particular, the exterior painting turned out to come down to the wire. We had finished painting on Thursday, but it started raining that night and didn't quit until the day after the tour. This made it quite difficult for the paint to dry. In fact, two hours before people were scheduled to show up, Kenny was helping us dry the paint of our front steps using Jen's hair dryer. We had tented off the steps to prevent them from getting wet for two days, but there was just too much humidity in the air. It's amazing what a hair dryer and a little patience can accomplish! As always, Kenny deserves a big shout out for all the help he gave us to prepare for the home tour.
And for all of you wondering how our colors on the house turned out, we managed to snap a photo during a brief break in the rain on Saturday. Here's before, and now our house looks like this:
I also wanted to summarize some of the things we pointed out about our green home. Thanks to Michelle at Seven Generations Ahead for organizing this list and producing a nice tour program for our home and the others on the tour. I'm sure it will be a great resource for the visitors and their future green remodeling. Here is Humphrey House's "green" resume:
Energy Efficiency
- Over 40 CFL's in the house
- Soy foam insulation in gutted walls
- Blown-in cellulose insulation in existing walls
- Daylighting tubular skylights
- Tankless water heater
- PowerZoning air recirculation
- Market-based electricity pricing
- Rain barrel
- Low-flow plumbing fixtures
- Low water usage laundry machine
- Low VOC paints
- PhotoHydrolonization (PHI) cell air purifier
- Zodiaq recycled content / low VOC countertops
- Reclaimed flooring
- Salvaged vintage doors
- Salvaged appliances
- Reclaimed windows
Locally Sourced Items
- Soy-based paint stripper
- Oak trim from regional forests
Tuesday, August 26, 2008
true colors
A few posts back, we asked all of you out there on the super-inter-web-highway to give us your feedback on some color ideas we had for Humphrey House. The response, both on the blog and via email, was amazing! We were happy to have so many people sharing their thoughts with us - very cool.
Jason and I were both really struck and somewhat amused about the general consensus that a red door was a big bad no-no. It was funny, because both of us had always, always intended to have a red door on this house. But you'll all be glad to hear that, after mucho consideration, we've axed that idea (along with several others).
But another point that really hit home was about the siding. As Bret, our friend and fellow house-rehabber (although on a different scale than us, for sure!) put it, "I just can't get past the siding." He was right. Neither could we. And so, last week when we were supposed to be spending seven days fishing on Lake Bellevue and frolicking in the Chequamegon Forest, we decided to stay home and take the siding out of the equation. Well, at least in front. We looked at other houses on our block and were surprised to notice that several had a different facade on the front than on the rest of the house. Confident we could pull it off at least half as assuredly as these other houses could, thus began our outer remodeling.
 |  |
 |  |
Fearing what lie beneath, we decided to take the vinyl off the front only instead of the whole house. As you can see, my father Kenny came up to assist us in our endeavors, and ended up leading the charge (as always). The best thing about Dad is that he's not afraid to be ambitious about projects. Must be an engineer thing. He certainly put his skills to the test helping us solve the riddle of how to transition from the siding we would leave on the sides and rear of the house to the original wood siding on the front. The solution? Copper-topped cedar corners with edging and trim, that I have to say look pretty amazing. Pix to come ...
But we still had the pesky problem of choosing a color scheme. Jason went to the Sherwin-Williams store and got samples and I did some test painting, and I think we have one we finally both agree on.

Saturday, March 29, 2008
Bathroom in a Weekend - Part 1: Flooring
Our first floor bathroom (original to our bungalow) has been a utility room of sorts for the last three years. It served as the only bathroom for the first year and a half while we did the second floor. Once that new bathroom was complete and we moved on to redoing out kitchen, our original bathroom became the default utility room.
It was still functional. Indeed, we used the sink as our main source of water for our temporary "college kitchen" while the new kitchen was constructed. But by backing up to the kitchen stove and exhaust hood (and originally on the same electrical circuit), it slowly became part of the construction zone. Coupled with the fact that we started using the bathtub as a utility sink for drywall and painting, it soon became a disaster zone. Especially when we found out about the faulty wiring that was frying slowly in the ceiling!
Enough was enough. We (mostly Jen) were embarrassed to have such a fabulously wonderful new kitchen, only to take a few steps and find a slummed bathroom. So it was with grandiose fervor that Jen announced that the bathroom would be redone prior to our kitchen unveiling party to thank all those who have helped us out.
The plans were to tear up the 1 foot-by-1 foot stick-em tiles that the previous owner had installed, and lay down some ceramic tile, and then replace the 19inch cheapo vanity and fragile medicine cabinet the POs had installed in some half-hearted attempt at "modernizing" the bathroom when they went to sell the house to some unlucky schmucks (which naturally became us). A few weeks ago, to prove her commitment to the project, Jen took up one of the tiles and found another layer of hideous older adhesive tiles underneath. She then panicked, realizing she may have loosed asbestos in the air. A week later with our wallet $80 lighter, we had certified proof from EMSL that the floor/glue was asbestos free. And so began our first real it-could-really-be-done-in-a-weekend-just-like-on-tv-DIY-project.
We called up some of the usual suspects (Kenny, Scott, Julie) to help us out. Kenny and Jen began removing tiles in the bathroom as we waited for Scott and Julie. Underneath the stick-em and the gaudy 70s non-asbestos gold tile was the original tile floor of the bathroom. As typical for bathrooms in the 1910's, the tiles were small 1" white hexagons set in a deep bed of concrete. I was shocked to see that there were very few that were cracked. In fact the whole floor was very well intact, but had a thick layer of dried glue on it. Jen didn't think it was salvageable (read: pretty) so she and Kenny headed off to buy tile. While they were at the store, Julie showed up at the house, and upon seeing the floor exclaimed, "Oh you guys have to save that!" and grabbed a nearby chisel to start scraping up the old adhesive. As I agreed with Julie, I joined her and before long, we had about a square foot scraped, shiny and glue-free. When Jen came home, Julie convinced her to try refinishing the tile there instead of laying down a new layer on top by offering to do rest of the scraping herself! Jen acquiesced, and Julie and I set back to work.
Then Kenny came in with some lacquer remover, rubbed it on a spot and - voila! - no more adhesive. He started to use it on the rest of the tile and the glue came right up. (This is strong stuff though, let me tell you - lacquer remover is definitely not low-VOC, and in true dad-as-superman-fashion, Kenny insisted on doing the work and having us leave the room so we weren't affected by the fumes. Apparently his lungs and brain cells are made of steel????)
An hour later, the floor had been restored to a lovely white porcelain tile with blue inlay flower patterns that matched the 1952 baby blue bathtub!
So that's the first part of our Bathroom in a Weekend Story - and it was only the first few hours. WHEW! More to come ...
BEFORE

Tuesday, January 15, 2008
Cinnamon Spice Makes EVERYTHING Nice
It's FINALLY really coming together. The cabinets were hung with care on Saturday by Jason, Kenny (aka Dadoo), Jen's brother Matthew and our dear friend Mark. They look incredible. Jennifer & Amy assisted by being bossy and rather uncharacteristically laid back (truth be told they worked on wedding plans most of the day for the upcoming Jackson-Zientarski nuptials). But who, you ask, is the adorable (albeit short) red-headed fellow peeking out from the sink cabinet depths? It's Daniel, our nephew (Matt's 18 month old son), who made sure to test the durability of our cabinets (and his own as well - we need kid-sized hard hats in this house). Check our photos from the weekend below! They look amazing, I can't believe how happy I am!
Monday, November 19, 2007
Dad was Right
All of our dads were right, actually, as we discovered last weekend.
KENNY
Kenny had come up with the new kitchen layout right away, even though Jen and I (mostly me) tossed, turned, twisted and tried to come up with a different idea for 2 1/2 years. When we had a professional designer lend his opinion, guess what? It was almost identical to Kenny's plan!
JOHN
Then last weekend, John came and routed our plumbing for our kitchen sink. When the Today Show filmed us removing cabinets, we learned two interesting things.
- The kit sink was originally in the corner of our kitchen (on the bathroom wall, which meant only one plumbing wall).
- When some PO last remodeled the kitchen (circa 1952 from newspapers we found in the wall), they moved the sink. And ran the water supply lines on TOP of our floors in that little space under the cabinets.


We ended up gutting out the last of the old galvanized steel pipes in the house so now there is nothing but copper (and water pressure everywhere!) By the the time John left it was very late, but we managed to squeeze in hooking up the gas line for our new dryer in our second floor laundry area as a final project. Which was useful, because the next day, we went to Jay's dad's house for an early Thanksgiving. Not only did we leave with full stomachs, but also a bed full of new laundry appliances.
BOB
The new house Bob & Kathee moved into had a nice Fisher & Paykel washer and dryer in it. However, it was all EcoSmart and computerized, made weird noises, blinked a lot and paused in the middle of washing a load. It was too frustrating for them, so they bought new appliances and offered us these temperamental appliances if we wanted them.

Since we both earn a living via a computer, a computer-controlled laundry machine didn't really seem to daunting to either of us. At least, until we hooked them up and washed a load.
Actually the first load went flawlessly. I was busy running up and down the stairs trying to make sure that all the insulation I packed into the floor last year was doing a good job of muffling the sounds of suds from the dining room below. It was amazing! I couldn't hear a thing! Then came the bedroom test (a regular 2x4 wall with insulation is between the laundry and our bedroom). Almost nothing! Fantastic! I was very excited and pleased. And the washer and dryer were Energy Star rated too!
But when Jen did the next load, when the machine gave up halfway through the wash and started a monotonous beeping noise and flashed all kinds of lights. "Aha," I thought. "This is what Dad was talking about. I'm sure it's something simple. Let's consult the manual" (which I had printed earlier).
Things quickly devolved. Hot and cold supply lines not supplying water? clearly not the case as one wash went through without any problems. Could the angle of the drain hose really prevent the machine from properly executing a rinse cycle? Seems outlandish, but who knows.
At this point, we have done approximately 7 loads of laundry, and sadly, I think we have only had just the first instance that went off without any interruptions. So it seems like it's time to consult the Search Engines to see who else is running into these problems.
Nevertheless, I think it's definitely safe to say our Dads were all right. It's been a humbling month so far.
Tuesday, March 20, 2007
Reclaimed Vanity

As our new dormer bathroom as nearing completion, we started looking for cabinetry. Although our width was a standard 6 feet wide, we only planned for one sink and it would need to be not centered but right-justified. We quickly found prices for just cabinetry escalating to the $500-800 stratosphere, and that was without a countertop or sink! So we started scouring demolition sales, ebay, and Craigslist, and lo and behold, a nice marble-topped maple cabinet came up that was 54", but had the sink in place right where we needed it. It had been ripped out of somebody's Lincoln Park townhouse and needed some repair in teh back, but Jen fell in love with the fossilized trilobites and the price couldn't be beat: $200.
Jen's dad came up and worked some cabinet wizardry to get it into shape again, and helped prepare it for our unusual plumbing configurations upstairs. A little bit of glue, extra reinforcement, and a few saw cuts later, we had it in place. It definitely gives an upscale feel to our new bath.
All we need now is a faucet and it will be complete!
Tuesday, July 18, 2006
A skeleton in the attic
Gramma's ghost has given way to a skeleton, as sidewalls, knee walls, and ceilings emerge upstairs.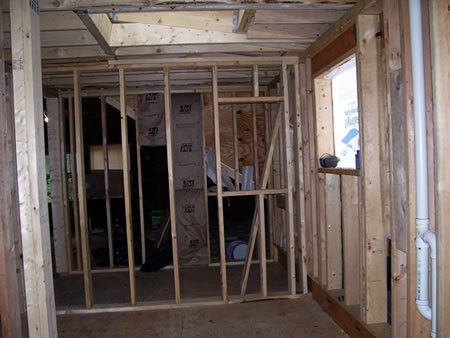 I think this is one of my favorite parts of the whole construction process. For the first time, you start to see how the plans and designs you drew up (years ago) physically take shape. No more 1/4" = 1 foot scale; this is the real thing. Three dimensions, baby!
And it allows you to come up with other ideas. Such as pocket doors to allow more space (and light) into what will be a somewhat narrow laundry room. Or laying out and framing openings for future built-ins, such as two dresser drawers in what will be the master bedroom. Many of the interior walls are being constructed by our contractor, but Kenny and Brian came up to lose weight during Chicago's massive heat wave last weekend by working in our attic with Jay. Actually, Brian raised the ceiling framing in the master bedroom, and Kenny helped construct the knee walls and insulate the under-eave areas.
Getting the materials upstairs proved to be fun as Mark briefly stopped by at the perfect time to help Ken and Brian toss boards up through the window. This assembly line was so much easier than carrying things through the kitchen and up the stairs. Wish Mark had thought of this sooner! ;-)
Anyway, thanks to Brian and Kenny's help, we got through the long weekend, and we are nearly complete with the framing for upstairs. We're planning on having the electrician come next weekend, and it all needs to be in place by then.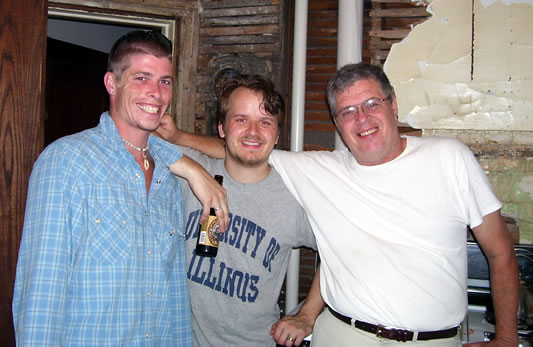
Wednesday, November 16, 2005
Powerzoning Humphrey House
Busy weekend as we went about getting a lot of punchlist items taken care of to help us feel better about living in rehab.
Scott came over Saturday and helped Jay seal off the final walls in the basement (actually, the stairway walls going down). And Kenny came up for an extended weekend to help with a number of things that will help make life easier for us as winter nears, not the least of which was figuring out some arcane wiring in our breakfast nook. No wonder the Previous Owners had never had that light hooked up to a switch! It took Ken and Jen nearly 2 hours to sort out the power flow and switching (hidden receptacles didn't help!)
Also on Saturday, Chris journeyed out from Aurora to come do some work on our HVAC system before it got too cold. He and Jay added a register to the breakfast nook, which means we finally have heat on that half of the house! He also installed a new drum humidifier for the furnace that spins around automatically. Looks very similar to a hamster wheel with a pool of water in the bottom!
But one of the most interesting things Chris did was cut a 12" hole in the back of the furnace and putting in a return in our basement. This proprietary technique his company pioneered is called Powerzoning [view website], and acts as a booster for the cold air return. It gives the system a lot more velocity and we have already noticed a difference! An added benefit is that in summer, we can run our HVAC on fan, and it will be pulling most of the air from our basement, which is naturally cooler. This will reduce the need for running the AC. Jay can't wait to see the lower utility bills!
Tuesday, August 30, 2005
Stairs as promised
As promised, we have some photos to share of our wonderful new stairs, that now allow even Scott to walk throughout the house without worrying about head clearance! Seriously, they have really opened up the house a lot, and are quite spacious! Jay's grandpa Don did all the design, layout, and led the construction. Along the way Jay, his brother Rob pitched in. And Kenny came up TWICE and took time off his vacation to help out, making several trips to the hardware store, adding new doors and all sorts of miscellaneous things. When it was all said and done, it added up to give us this:
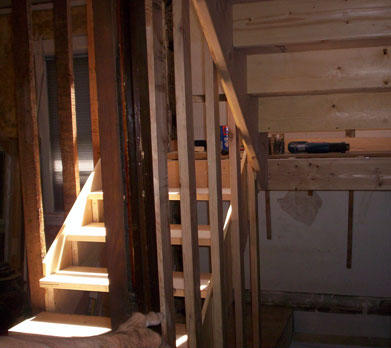 The photo above was taken from the top of the second floor. In the photo at left, you can see we ended up getting a lot more light in the house as well - The windows above the stairs are the only ones we have that face south with full sun all day long. Just look how the sunlight floods through the stairs going up! And the stairs going down to the basement (on the right) will have loads of headroom, and an access door for storage under the other set of stairs.
Now we can start planning for upstairs as we work on finishing off the basement. Thanks to everyone for their help, but especially Grandpa! :) Now we just need to do something nice to thank him for his hard work. Any creative ideas are welcome :)
Wednesday, August 10, 2005
It's been awhile ...
... and we've accomplished quite a bit! We were able to manage to go on an actual vacation - albeit an abbreviated one - and spend some time not thinking about the house (too much, anyway). Then we came home a few days earlier and got to work in earnest.
Most people know the basement has been a bit of a BYOB project - that is, Build Your Own Bedroom (Scott's got his ready!) But it's really starting to near completion now. I spent the other day painting the office in the basement a mixture of yellow and peach. It looks pretty cool. I also finished the ceiling in the b/room, and Jason and I picked out colors for the main room. Right now, we're just waiting for the stairs to get finished (hopefully by next week, Grandpa Duck is volunteering his time and energy out of the sweetness of his heart) and once that's done, we can get moving on the basement - FULL SPEED AHEAD.
Jason's grandfather has been busy like a bee on our stairwell. He and Jason tore out the stairs completely (photos to come in next post) and designed the new ones. My dad took a day off of his own vacation to spend helping them get started on the actual construction. Jason's brother also has come by to lend a hand. Muchas gracias!
That's all for now. Will be posting some of the more acrobatic photos this weekend. Ever wanted to see Jason walk a tightrope?
Tuesday, March 01, 2005
Take 2: Demolition Derby - 2nd Floor
After clearing away basement lath and plaster for 4 hours (covering only 150 sq. ft!), Jay emerged from our dusty dungeon to discover what Jen and Ken had done upstairs. Assessing the state of the walls in the de-panelled future bedroom, I got a very creepy feeling. Underneath was a greenish fern/floral print on the ceiling and some kind of wavy yellow-brown organic pattern on the walls. It looked like a nightmare. Frankie later remarked that it looked like someone was trapped or held captive in the room. Remember that movie, People Under the Stairs? Yeah... Not at all encouraging. It begged to be destroyed.
So, late on Sunday night, we did just that. After removing the hideous drywall, we discovered yet another layer... old (and in nice condition) wood wainscotting installed horizontally [View Image]. Maybe this was part of the original attic? If not, someone really liked dark wood. While we won't be keeping this in our future bedroom, perhaps we can salvage it and install in the basement at somepoint (3, 4, 5 years from now...)
After two long days of work though, our mission was accomplished: We had completely filled a 10 cubic yard dumpster. Extra thanks to our Demo Team helpers, Ken and Frankie! Obviously, since it took 2 weeks to put these posts up, we took some much deserved rest. :)

Take 2: Demolition Derby - Kitchen
It's been awhile since an update here, but I wanted to wait until we got some photos developed. I know, I know. How can someone with a blog not have a digital camera, right? Well, we are accepting donations if you're interested.
We found out that people can hide a lot of things with paneling! Once the paneling came off in the kitchen, we discovered that the standard 1920's subway tile we were hoping to find underneath had been removed in the past. Too bad. :( In the breakfast nook (behind Ken), we did find covered up electrical outlets (how safe!), and discovered that the nook was probably not an add-on as we originally suspected but original. The construction of this was lath and plaster, which wasn't used after the War (WWII).
Definitely going to keep the Paint Can Lid in our souvenirs box. :) Too bad it didn't have a Mfr or date stamped on it. I doubt we'll be able to use the flue for our new stove based on our plans, but it's good to know we have the option if we need it!

 Posts


Anyway, although it was incredibly labor and time intensive for just a few square feet, we're very pleased with how the stairwell turned out. When its warm again, we plan to create some detail work on the center column that will echo the triple-pattern of the stair banisters. The plan is to have three 1-inch vertical oak trim pieces hanging from a horizontal band that wraps around the column, to lend the room more of a craftsman feel.